|
Pz. IV Prototyp Krupp |
|||
| Kit # 7206 | Construction review by Rob Haelterman - heman_148(at)hotmail(dot)com | |||
|
Pz. IV Prototyp Krupp |
|||
| Kit # 7206 | Construction review by Rob Haelterman - heman_148(at)hotmail(dot)com | |||
 |
1. Introduction This kit represents an experimental (hypothetical) version of the Pz.Kpfw. IV with the long barrelled 75mm gun and sloped armor, apparently sometimes called the Ausf. K or Ausf. L. The result is something resembling a scaled down Panther, while retaining the running gear and turret of the Panzer IV. I've read somewhere that it actually was meant to be fitted with a Schmalturm at one point.
2. Packaging Sturdy top opening cardboard box. 3. Type of kit Multi-piece resin.
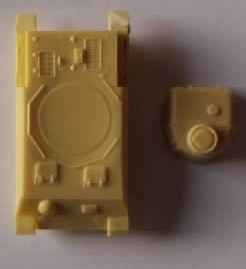
The hull and turret are clearly based on that of the Revell kit but with a major facelift of the hull. All hatches of the hull and turret are closed. The turret looks like your regular Pz IV turret, except for the lack of a Rommelkiste on the back, which I find surprising.
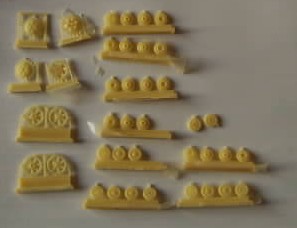
The running gear is nicely done and
represents the cast, U shaped idler, late hub caps on the road wheels
and rubber rimmed return rollers. (The Revell kit has the metal return
rollers.) Even if this is a hypothetical vehicle, this makes a rare
combination (see below).
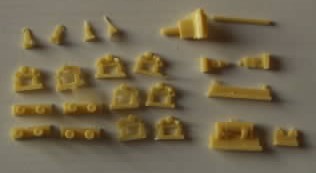
The other bits are for the muffler and auxiliary muffler, tow brackets, antenna mount, gun and MG. (Sorry for the low resolution pictures of the parts. I thought I had taken better ones when I started to work on this kit, but if so, I must have lost them.)
4. Instruction sheet: One step "exploded" drawing, but very clear given the limited number of parts.
5. Decals Nihil. This vehicle was never built, so let your imagination run wild !
6. Quality of casting Overall detail is nicely done and (mostly) crisply cast. Almost no air bubbles are present. However, the single piece hull is a very large piece of resin that was distorted in my example. I tried to rectify this by heating and reshaping, but the top of the hull remained concave (probably due to shrinking when the resin cooled). For that reason, the only option that remained was to redo the top plate of the hull. This either means scraping off the detail and building the hatches and turret splash guard from scratch, or scavenging a Revell kit...
7. Accuracy
8. Construction The turret of the Euromodel kit is basically a one piece Revell turret without a Rommelkiste and with a closed hatch. As I got a partial Revell Panzer IV kit that was donated by Andrew Smith, I used the turret thereof, as it allowed me to open the hatches and add the Rommelkiste. I added turret doors from the spares box (the donor kit was lacking them), extra armor on the turret roof from scratch, a rainguard above the turret doors from scratch, and enhanced the welds and hinges. After first installing the Revell barrel for the KwK I finally substituted it for another gem: the Armorscale metal barrel.
To get rid of the concave hull top I sanded down the top of the resin hull and transplanted a Revell hull top.
Various extra items were fitted that looked "cool" to me. Spare tracks and roadwheels, tools, boxes, tube holding the cleaning equipment for the barrel, a jerry can. I decided to use Dragon tracks, which
were also donated by Andrew Smith, in stead of the resin parts. These
fitted surprisingly well.
Zimmerit was then added using Vallejo acrylic putty, which helped me to hide the joints between the Revell and Euromodel parts.
9. Conclusion I've heard very good things about Euromodel kits, but this one is quite disappointing to me. While I can imagine that it CAN be
a very good kit, the heavy warping ruins it all to the point that
it would be easier (and cheaper) to start this conversion from scratch
using a Revell kit. Indeed, I only used the Euromodel kit from the
waist down, and then only partially
|
| Back to Manufacturer Kit List | Back to Construction Reviews |
Article Last Updated: 26 December 2011 |
Back to Home Page |
.JPG)
.JPG)
.JPG)
.JPG)
.JPG)
.JPG)
.JPG)
.JPG)
.JPG)
.JPG)
.JPG)
.JPG)
.JPG)
.JPG)
.JPG)
.JPG)
.JPG)
.JPG)
.JPG)
.JPG)
.JPG)
.JPG)