The Hasegawa Pzkfw IV ausf. F1, ESCI PzKfw IV ausf. G, and the PzKfw IV ausf L Ocelot conversion, 1/72 AFV kits. A compare & contrast building review. Introduction A college professor of mine believed that one of the best ways to learn about something is to be able to compare and contrast it to other items, i.e. show how the items are alike and different from each other. I think this is a great method as well and like to use it in my kit reviews as it helps put things in perspective for me. Please note that I do not profess to be an "AMPS Gold Medallist" model builder but hope I can share my experience. I build from the point of view of a builder of static displays though appreciate wargame builders as well. To expand my Pz IV collection I took to building at the same time, three different 1/72 scale Pz IV kits: Hasegawa's new F1 (Kit #MT-41), a conversion of ESCI's old Pz IV G (Kit #8364), and the conversion & correction of ESCI's Hummel (Kit #8314) into a Nashorn panzerjager. [The Nashorn project I will write about in a different review for this website.] Also discussed here is a model of ESCI's Pz IV G that I actually built several years ago. Occasional mention will also be made of Revel's 1/72 Pz IV ausf. H kit (#03119) for comparison purposes. Doug Chaltry has written several superb articles covering these kits that I hope this article will compliment them. There are many details in correcting these kits and due to space I advise you to see photos in the references listed at the end for full clarity. I will do my best to note part numbers and correct names for the vehicles features. Though I know it to be very important to some that exact scale be measured I did not do this as I honestly do not find it extremely critical. I prefer only that it look right in most cases. Other modelers before me have told me that these kits are, or are very close to 1/72 and I feel no need to doubt them at this point. The following evaluations are my opinions and you may come to different conclusions.
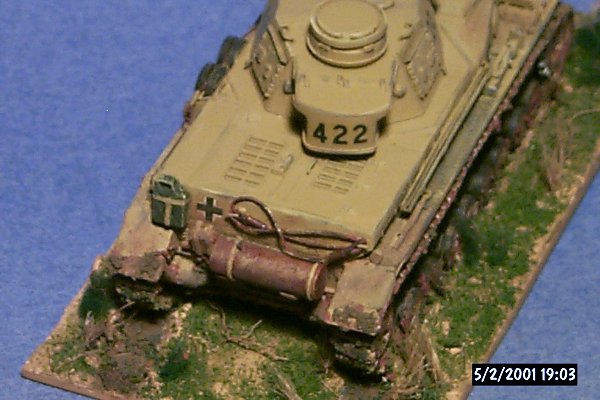
Photo 1. Nice Doggy from Stalingrad! In front of Hasegawa's superb box art: their Pz IV F1 on a Matchbox diorama base, with several ESCI German infantry figures and, at left, a dog from Revel's WW1 German infantry set modified to a Russian mine-dog. This mini-diorama is set in late summer 1942, and represents the 14th Panzer Division's approach to Stalingrad, where the Division was later lost with the 6th Army. Vehicle Histories The Pz IV F1, SdKfz 161, represents an up armoring of the Pz. IV ausf. D & E to 50-mm thick front armor, and the return to a straight front plate noticeable in the box art in Photo 1. Only 462 were produced from April 1941, to March 1942. Some F1 series Pz IV's were still in use up to the summer of 1944 in Russia. The tank weighed in at 22.3 tons and being designed as an infantry support vehicle it was still armed with the short 75 mm L24 gun like the earlier Panzer IV versions.
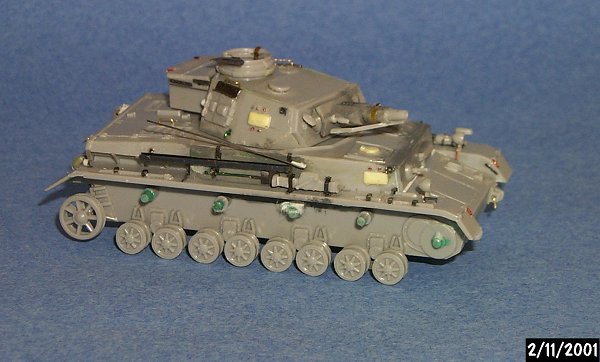
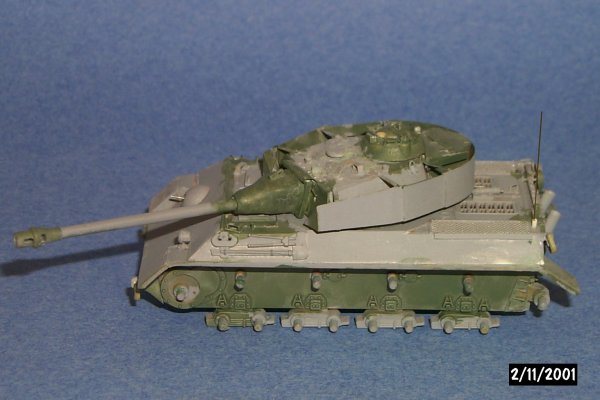
Photo 2. ESCI Panzer IV ausf. G kit. Note addition of the scratchbuilt turret smoke-dischargers & grab handles added to the turret; and the lack of turret side viewport found on earlier models. This model represents an early Pz IV G with the L43 gun and with no turret skirt. Note also the spring holding the rear fender down that I added (an important detail). The sandbags I added on the front are barely visible. The Pz IV ausf. G, SdKfz 161/2, was produced from May of 1942 to June of 1943 with a total of 1,687 being manufactured. It had the same 50-mm frontal and 30 mm side armor of the F1 and F2, but had an additional 30-mm added to the front. Early G models such as this kit had the 75-mm L43 gun, as did the F2 but with a double port muzzle break. Late G's had a 75 mm L48 gun and turret skirts (schurzen) like on the Revel Pz IV H kit. [Note, that many older references state that the schurzen was added to German tanks to defeat hollow charge weapons like the US Bazooka, the latest books correctly explain that they were to counter Soviet 14.5 mm AT-rifles.]. The British referred to these long-barreled Pz IV's as Mark IV Specials. This ESCI kit is a mish-mash of various Pz IV features and needs much correction to make it an accurate representation of any model. The Pz IV ausf. L Ocelot is my attempt at a little artist's license in doing a conversion of an ESCI kit to a proposed upgrade of the Pz IV to standards reflecting the Soviet T-34 (assuming the Panther was never developed). The design was supposedly found by allied engineers sketched on a napkin in the Krupp factory's cafeteria at the end of the war… so being German it had to be made into a model! The design is rumored to be that of Dr. Phront Porche, half-brother to Ferdinand Porche and was pushed strongly by General Avril Phools. The armor was sloped on the front and sides, and is estimated to be 60-mm thick plate in the front and 40 mm plates at the sides. Turret armor remained the same at 50-mm front and 30 mm sides, though the side doors were deleted and replaced by a turret hatch over the gunner. The turret cupola was developed at the French Ford Motor factory and was thereafter known as France's Ford Cupola. The KwK gun was to be lengthened to L50 or L55 to achieve a slightly higher velocity. This AFV would have stretched the limit of the Panzer IV's leaf spring suspension though would have been cheaper than the Panther and with fewer man-hours to produce.
Photo 3. The Pz IV ausf. L Ocelot mini-diorama, circa early1945 in defense of a Reich city. Note the sloped T-34 like hull armor, new gun mantlet with coaxial mg port, brake access hatches in front glacis, turret and turret-skirt without side doors, and the new Panther-like commander's cupola. The vehicle is set on a Matchbox dio-base, with added debris and a Revell 1/72 figure for scale. The Models: Construction & Detailing Hasegawa's Pz IV F1 was released in conjunction with their Pz IV F2 and Pz IV G kits and all share most of the same sprues. These new Pz IV releases are based on the Munitions Pz IV included in Hasegawa's old KARL Morser kit and they include many extra parts from the original kit. Unfortunately many of these parts (such as the suspension, wheels and tracks) show their age. The rubber band type track pattern is rather simplified and is not as good as ESCI's or Revell's. If I were to improve anything in Hasegawa's kits it would be to improve the tracks! About my favorite quote from any model assembly instructions come from this kit: "Actual feelings increase when it is made to become loose and installed". I interpret this to mean that the tracks look better when you make them sag! I created a sag in the track run by gluing them down over the idler wheels with Cyanoacrylate Super Glue. I don't know about you but my feelings did increase! Overall the kit went together very well. The turret, hull top, and gun parts are new molds and are very admirably done. I am particularly impressed with the fine, delicate molding of the antenna deflector (part C3) and other small parts (characteristic of Hasegawa's new AFV kits). Unlike the ESCI kit, this model comes with the small auxiliary engine muffler (part B8) used to power the turret traverse motor.
Photo 3a. The half finished Pz IV F1 showing brass fittings from Eduard. The odd green coloring on the axles is a liquid mask I applied to keep them clean of paint before the wheels were added. After painting it peals off with a gentle pull of tweezers. Things in need of correcting include: the rear turret pistol ports will need to be scratchbuilt; straps and brackets will need to be added to the rear turret bin (parts A2 & A3); fill the opening under the superstructure where it overhangs the tracks. Also scratchbuild an antenna to go with the antenna trough & case (part B20) and a smoke discharger rack above the muffler. If you compare the Hasegawa hull bottom to Revell's you will observe that Hasegawa's lacks a lot of detail. The Hasegawa roadwheels are very simplified and to create a better miniature representation you may want to replace them with ESCI's roadwheels. Revell roadwheels have the late stamped hub and would not be appropriate for a Pz IV F that has cast hubs. Hasegawa has splendidly retooled their Pz IV roadwheels and sprockets with the release of their 1/72 Wirbelwind and Ostwind kits.
Photo 4. Overhead view of the Hasegawa F1 model with kit instructions. An interesting conversion for this kit would be the mating of the front part of the KARL Munitions Pz IV hull (with the stepped front plate) with the rear superstructure of the F1 to create a Pz. IV ausf. A, D or ausf E tank.
Photo 5. Close-up of left rear side of Hasegawa's F1 model. Important for this model is to remove two of the kit's gun cleaning rods (visible on the side above the engine air-intake, out of the four supplied with the kit. Only two rods were used with the short L24 gun, four for the longer L43 gun. The Soviet mine dogs were trained to run under tanks in search of food, the rod sticking up on the dogs back would be bent back igniting the explosive. Will the Grenadier LT stop the dog from going under the tank…or will he hit the dirt,… and in time? My ESCI Pz IV G model in Photo 2 was one of my first ESCI kits I ever made and was the only 1/72 scale plastic kit of this tank available at the time. Last year I rebuilt it by taking off the old paint with a pine oil household cleaner, adding many missing features and repainting. Overall this may be ESCI's worst small-scale kit (only surpassed by their horrible Hummel kit which does not even have the decency to have ESCI's fairly nice two-part Pz IV G roadwheels). With side skirts I have seen this kit sold as an Ausf. G and as an Ausf. H, though the gun is too short for an H version (among other problems). Fit of the parts is not bad. The gun muzzle break is a little thin and is best replaced by another. The small muffler is missing from the rear so you may wish to steal one from a Hasegawa kit. The sprocket and idler are appropriate for an early to mid Pz IV though are too simple, but not any better than Hasegawa's. The kit's hand tools are molded separately but are a bit too thick for the scale. The front and rear fenders of the real Pz IV tank were hinged and could fold up. To simulate this, scribe the joints and add or correct the springs for these pieces (see good photos for details). On the bow, ESCI molded the access hatches to the tank's transmission and brakes with raised panel lines. To correct this we have a choice of either cutting off the raised lines and scribing new ones, or covering them up. I went for the easy way and covered them with sandbags (sometimes done to enhance the tank's armor. Above the driver's visor we need to drill-holes for the episcope. Next to the gun mantlet we'll need to drill the gunner's optics port. Straps and brackets should be added to the turret bin. The vertical muffler pipe is supposed to angle left as it comes out the top (see references). The tracks are the ESCI kit's biggest headache. Later ones had a set of nice styrene link & length tracks that were the best available at the time. Early ESCI Pz III's and IV's came with the same stiff polyethylene tracks that cannot be glued with cyanoacrylate, epoxy and models glues. Sometimes they broke when bent around the sprocket. Like the Hasegawa tracks there is a long ridge running up the backside instead of individual guide teeth. The sprocket teeth also do not line up with the holes in the track! I happened to have these tracks for my two kits. There are six things I recommend for managing these tracks:
For the Pz IV ausf. L Ocelot conversion I began with a standard ESCI Pz IV G kit. With a little measuring the sloped plates were easily cut from 0.020-inch white styrene plastic sheet and glued over the Pz IV hull & superstructure. Gaps between the pieces were filled with Squadron putty, sanded smooth, and the well seams scribed in. To get a steeper slope to the glacis I did cut a little of the bow plates away between the front fenders. I did not change the rear other than scratchbuilding two "late Pz IV" exhaust stacks and adding a small muffler for the power traverse (on Pz IV's up to including the ausf. H). Like on the Panther, I placed the two tow cables running down the side. A turret skirt was made from Eduard's old etched brass set though I deleted the doors by filling the spot in with a sheet of plastic sheet. The side skirts were made from clear 0.005 plastic sheet, which is stiffer than the white styrene but still takes model glue. It is important to overlap them going front to rear as with the real tanks. My Ocelot side skirts are designs halfway between old Pz IV skirts and Panther side skirts. The gun barrel and tool racks I took from Hasegawa's Panther ausf F kit. The France's Ford Cupola is a resin duplicate of ESCI's Panther cupola. As this is a very late war variant, all the view ports through the armor were closed up and replaced by periscopes like on the late Panther tank. I scribed a new, round hatch on the turret roof for the gunner and added a revolving periscope similar to that on the Jagdpanzer IV. Like late Pz IV's I added steel roadwheels on the first two stations, made from slightly modified Revell StuG IV roadwheels. The mantlet is a modified resin duplicate of Revell's StuG IV Mantlet. As the side skirts cover much of the track area I opted to use ESCI's poor polyethylene tracks and save my better ESCI styrene link & length tracks for my Nashorn. Brass Detailing Eduard makes superb 1/72 scale photo-etched brass detailing sets for the three Hasegawa Pz IV kits that can also be used by any of the 1/72 scale Pz IV kits produced by ESCI and others. I had on hand Eduard's brass set #22 026 released for Hasegawa's Pz IV ausf. G that has many parts in common with the ausf. F1. I used an old 1993 Eduard brass set (#22 004) made for ESCI's Pz IV, which was sparse in the number or parts offered, but contained a usable turret skirt I used for the Ocelot model. Eduard's brass set for the ausf. F1/F2 is number 22 025. PART Company also produces etched brass sets: #P72 043 which are Pz IV fenders, #P72 020 which are drilled Thoma side skirts (schurzen) for the ausf. J, and #P72 044 which are solid side skirts for the Pz IV tank. Painting & Weathering Prior to the base coat I primed all models in a light gray metal automotive primer. This insures better adherence of the later paints, shows up imperfections and gives one even color to paint with the base coat. The Hasegawa F1 was painted in Model Master panzer gray acrylic as a base coat. This is darker than the Poly Scale panzer gray though based on photos and reading, both shades are accurate. Panzer gray can be very dark though can also be lighter depending on the time period, weathering and fading, and manufacturer of the paint. [This Model Master acrylic is a considerable improvement over the Model Master acrylics of 5 years ago, which all gelled up on me!] You could perhaps see a Pz. IV F1 in 1943 panzer-yellow but it would be rare. The two ESCI Pz IV models were given a base coat of Polly Scale acrylic paints. My Pz IV G was done in Depot Buff color, which is a semigloss model railroad color and one of my favorite panzer yellow shades. This 1943 Eastern Front vehicle could also be done in Africa tan color as some tank vehicles originally destined for North Africa were diverted to Southern Russia. Preceding the spring of 1943, the G model was also seen in panzer gray. My ESCI Pz IV L Ocelot conversion was given a base color of panzer olive, which was a common factory-applied base coat near the war's end. I opted to give neither vehicle a multi-color camouflage scheme. The Hasegawa model and the Pz IV Ocelot were weathered using a technique described by Adam Wilder in his article: http://www.missing-lynx.com/articles/other/awpaint/awpaint.htm, modified for the smaller scale. After the base colors I added various layers of dust and dirt using thinned shades of tan and brown. The varying shades represent different types of dust and different moisture contents of the dust of the varying environments the vehicle may have gone through. Some coats were applied with airbrush to represent driving through dust clouds kicked up by driving. Some patches of dust represent areas where the crew climbs on with dirty boots, such as around hatches. In between applications I scratched and lightly sanded a little of the weathering off to represent scratches on the vehicle from driving through vegetation, etc. It's important to keep the dust applications translucent so you can see multiple layers. Artist's oils I find superb for making streaked weathering down a vehicle side. If you wish to use a wash over the model I urge you to spray a coat of gloss acrylic floor wax so the wash spreads smoothly into corners and does not soak into the flat base paint. Drybrushing (highlighting) of edges and high spots was done with artists oil paints; starting with a light shade of the base color and working toward white. In the end, after a dull coat application, pastel-dust was added, particularly to represent dust collecting in corners. Edges that I think may be subject to the wear of crew members and grenadiers clamoring over the AFV I highlighted in pencil graphite (don't go overboard on this). Decals & Markings Hasegawa's three Pz IV kits all come with the same decal sheet with different markings for each Pz IV variant. I always lay my decals down over a coat of clear acrylic floor wax to help prevent silvering of the decals. After trimming the clear edges the decals went on well and snuggled down with a little Solvaset. The unit markings are for the 14th Panzer Division. For the ESCI kits I used spares from my decal box. You may notice that my Pz IV's were done as being in the regiments fourth panzer company: 423, for example, would be a tank in the 4th Kompanie, 2nd Platoon, 3rd vehicle.
Photo 6. Front and right side of the Pz IV F1. Just over the grenadier's head and folded down is the scratchbuilt antenna. Unfortunately an antenna mount is not included with the kit. A hole was cut in the turret front and the right view port opened. This loader's view port was deleted in the ausf. G. The kit hatches for the commander's cupola have been replaced by brass hatches for the Eduard set.
Photo 7. The partially built, primed, and painted Pz IV L conversion. Visible is the tool rack from Hasegawa's Panther G kit on the side, Hasegawa's Panther gun barrel, the gun mantlet resin-duplicated from Revel's Stug IV kit, Eduard's old brass turret skirt set (#22004), the resin duplicate of Revel's cupola, and the scratchbuilt late-Pz IV exhausts, etc.
Photo 8. Right rear view of the Ocelot, completed and mounted on its base. The base color is Polly Scale Panzer Olive slightly lightened, representing a late war vehicle.
Photo 9. A comparison of three, unbuilt, small-scale Pz IV superstructures. At the left is Airfix's 1/76 scale from their F1 through G kit (a very nice kit for its age). In the middle is Revell's newly released 1/72 Pz IV H hull in dark olive plastic, missing the rear fenders (I think the best Pz IV kit currently available). At far right is ESCI's Pz IV kit hull. The Airfix is the smallest in both width and length. The Revell is the same width as the ESCI and Hasegawa Pz IV hulls though slightly shorter, but not as short as the Airfix hull. The ESCI compares well with the Hasegawa superstructure (not shown here) though I have heard that both are slightly long for true 1/72 scale so I believe this puts the Revell kit as the closest to true 1/72.
Photo 10. The bow end and top view of the ESCI Pz IV G. Note tactful placement of sandbags on bow and smoke dischargers on turret sides.
Photo 11. Rear oblique view of Pz IV G. Note added tow cable and hooks, fuel can and holders, small muffler on left side, pistol ports on rear wall of turret, antenna deflector strip at bottom of turret basket, and scratchbuilt antenna trough on right side. Conclusions Hasegawa's Pz IV built into a good model and its best features are its turret and gun. The handtools are good but molded on. The roadwheels, and tracks are particularly lacking though. It will build into an excellent wargaming model (no offence to wargamers, who's needs are different in some ways from those who build static displays). If you have an ESCI kit, you may wish to use those wheels in substitute for Hasegawa's. ESCI's Pz IV G built into a good rendition of a Pz IV, but with the Revell and Hasegawa kits now available I would not go out of my way to buy one. There are just too many corrections to make to make it accurate and the vinyl tracks are not worth the bother for wargamers (in my opinion). There are a lot of conversion kits available for ESCI's model that I suspect will go fine with Revell's and Hasegawa's kits. Pz IV ausf. L Ocelot ESCI/Scratchbuilt conversion. In case you have not guessed, this is a totally made up conversion based on my imagination. All characters and events mentioned were fictitious. I had a good time doing it. Every once in a while do we not need to build something and not worry about the minute details and historical accuracy? References ACHTUNGPANZER, Nihon Kaiga publishing, 1989. This is, in my opinion, the absolute best detailing reference for the Pz IV. It is chock full of line drawings showing and comparing all the main exterior features of all variants of the Pz IV tank. Though in Japanese it does have English captions. To this I have added printouts of many fine 1/35 scale Pz IV models from many websites. Expensive. Pzkpfw IV In Action, Culver & Greer Squadron signal Publications. A great and inexpensive detailing reference with color plates. Inexpensive. Panzer IV & Its Variants, German armor & Military Vehicles Series vol. 4; by Spielberger. A great book covering the tank's history and progressive development. Also expensive. Panzerkampfwagen IV, #28, Osprey New Vanguard series. A good condensed history including variants and great color plates. Encyclopedia of German Tanks, Chamberlain & Doyle (1978). A very interesting book, now in soft cover, systematically covering the development and models of German AFV's in WW2. This book is the source for much of my vehicle history information. Panzer Colors I, 2, and 3 books, by Bruce Culver. Though dated a bit, this inexpensive three volume series contains many photos and color plates, and loads of great information on German camouflage, markings, unit histories and numbering. |