| Preliminary
note:
The box calls this kit the Sd.Kfz.251/1 Ausf.D mit Wurfrahmen 40. The /2 was a mortar
carrier, however. I will use the correct designation (and not the
kit label).
Construction
_t.jpg) _t.jpg)
 _t.jpg) _t.jpg) _t.jpg)
- It
is best to leave the suspension off until the end, to avoid damage,
whatever the instructions tell you.
- While
the concept of interlinked roadwheels is nice, I decided to cut
off the individual wheels of parts B4 and B5, as this allowed me
to position them all with the holes in a slightly different position
(the inner wheels won't line up in this way, but this is almost
impossible to see), whereas the kit parts "as such" all
have them in the same position.
- The
tracks in this kit are the all metal type (rubber "sprue D2",
which is confusing as the tracks themselves are referred to as "D1"
and "D2"). Note that the drive sprocket was fitted with
rubber pads, which need to be painted dark grey/black. I also removed
the thin overlapping end of the DS tracks as it would have made
the tracks too thick in the overlapping area and made sure that
the area where the tracks connect was hidden behind a roadwheel
on the bottom.
Note that DS tracks can be glued with ordinary glue, but that they
easily snap when glue is applied to tracks that are under tension.
- My
kit had the old instructions for the front suspension.
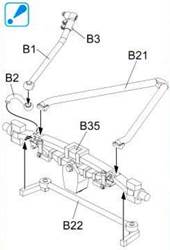
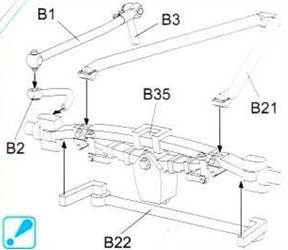
Correct installation of parts B2, B3 and B22 in some instructions
(picture on the right), confusing and wrong in others (picture on
the left), as in my kit.
(Pictures by Timothy Lau.)
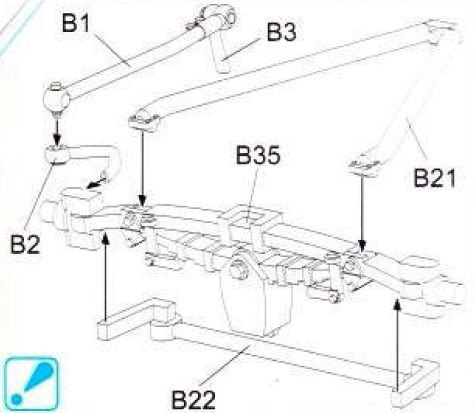
I
believe that the corrected instructions are still confusing. A comparison
with the instructions from AFV Club kit 35251, might help.
_t.jpg)
(Picture
by Timothy Lau.)
A
useful picture can also be found here.
This
is how decided to assemble the parts.
_t.jpg)
- The
floor plate (A8) is a bit too narrow, although most of this will
be hidden behind the lateral seats.
_t.jpg) _t.jpg)
 _t.jpg)
- There
is interference between the dashboard (A17) and the upper hull (A1),
if the former is not lowered a bit. (Removing material from the
top will damage the nice dials, so better work from the bottom.)
- While
the upper hull should hang over the lower hull, this is overdone
in the kit. It actually seems as if the lower hull is too narrow
for the upper hull and rear plate.
_t.jpg)
- I
chose to install the flanges (C9) to the lower hull before adding
the upper hull. If you bend them outwards slightly, this will ensure
a tight fit when the upper hull is added. Otherwise you will have
to fiddle around with clamps.
- I
have no idea where part MA4 should go, so I left it off.
- There
are sink marks on the rear hull plate (A16) that will remain visible
after construction, if not filled in.
- The
attachment of the rear Notek (B8) is very (!) weak.
- If
the rear doors are left open, the handle (A23) should be put in
the horizontal position, something Dragon overlooked.
- While
both tracks are marked "D" in the instructions and "D1"
and "D2" on the rubber sprue, one (D2) is actually one
link longer than the other (D1) and should go on the right. (On
the real vehicle the tracks had 56 links on the right and 55 on
the left [3].)
- The
Sd.Kfz.251 had its front licence plate painted on. Some kits in
the Sd.Kfz.251 series by Dragon have a PE part for it, but not this
kit.
- The
instructions don't ask you to install the antenna mount, while pictures
clearly show that (some of) these vehicles had them installed on
the right side of the fighting compartment.
- I
didn't use the PE parts for the front MG shield.
Remarks specifically related to the Wurfrahmen and
their mounting frames:
- The
rockets cannot be slid into the wooden frames after these have been
assembled. Remember that.
- The
angle of the Wurfrahmen could be altered on the real vehicle. In
the kit this is fixed at around 45°.
- Parts
MB3 were ritually sacrificed to the carpet monster
- The
whole assembly of the frames is a very, very fiddly affair. It doesn't
help that there are no location markers in the kit and that the
instructions are not very clear.
I tried to install the frames as per the instructions (after painting
it as a subassembly), which is not something I am going to attempt
again. If I ever can bring myself to building another "Stuka
zu Fuss", I will first glue the frames (E4, E7, E8) to the
hull, before painting. I have yet to figure out how to make sure
they are in the right position. After painting, I will add the plates
(E11-12-13).
- The
hooks at the end of the frames (red in the scan below) interfere
with the handholds on the top of the fighting compartment (green
in the scan below).
I ended up sanding down the hooks to make them fit. I think next
time I will remove the handholds, as they don't seem to be a universal
feature on the real vehicle.
_t.jpg)
- Note
that the hooks that hold the frames (parts E3) were folded up when
the wooden frames were not fitted.
- I
forgot to add sighting rods on the nose until the very end. (The
instructions don't mention them.)
There
are some remarkable observations regarding the parts count
- There are too few rifles (C13) in the kit to fill
the racks. There are 4 rifles, while there are six slots to hold
them (three on each side). Nevertheless, the instructions only want
you to install two in total.
- There
are too many pick axes: two, while one is needed.
- There are 4 ammo drums for the MG, while you actually
only need two. The two others are useful as stowage, however.
- There
are a total of 9 plates to mount the Wurfrahmen (3 each of parts
E11-12-13), while you need only 6. At the same time, there are 9
frames (part E7), while you need 6. You also get parts E4 and E8
twice, while you only need one each.
- It's nice that you can choose between 28cm and
32cm rockets.
- This kit has no holders for the MP40, while other
Dragon kits of the SdKfz251 have them in PE.
Decals
and Markings
I
painted the vehicle in a fictional scheme, using decals from the spares
box.
_t.jpg)
 _t.jpg)
 _t.jpg) _t.jpg)
Below
are some pictures that show the finished kit in a diorama together
with an ICM
Kfz.70, a Dio72 house
and TQD Figures.
_t.JPG) _t.JPG)
 _t.JPG)
 _t.JPG)
Accuracy
A discussion
about the dimensional accuracy of the Dragon Sd.Kfz.251 Ausf. D can
be found here.
References
[1] Panzer
Tracts 15-2 Mittlere Schuetzenpanzerwagen (Sd.Kfz.251), T.L. Jentz
& H.L. Doyle
[2] Panzer
Tracts 15-3 Mittlere Schuetzenpanzerwagen (Sd.Kfz.251) Ausf.C &
D, T.L. Jentz & H.L. Doyle
Dragon
kits can be purchased from

|
.JPG)
.jpg)
.jpg)
.jpg)
.jpg)
.jpg)
.jpg)

.jpg)
.JPG)
.JPG)
.JPG)
.JPG)
.JPG)
.JPG)
.jpg)
.JPG)
.JPG)
.JPG)
.JPG)
.JPG)
.JPG)
.JPG)
.JPG)
.JPG)
.JPG)
.JPG)
.JPG)