| Introduction
The Jagdpanzer
38(t) "Hetzer" was a tank hunter derived from the PzKpfw
38(t), using a widened chassis and completely redesigned hull together
with larger roadwheels (825 instead of 775mm diameter). Its gun was
the Pak 39 L/48 which used the same ammunition as the 7.5 cm KwK 40
of the PzKpfw IV and as the 7.5 cm StuK 40 of the StuG III and IV
(but not the same as the PaK 40). It seems that the name "Hetzer"
was never used by the Germans themselves during the war. Risking the
wrath of some historians, I will continue to use the name "Hetzer"
in this article nevertheless, purely because it is shorter to type
than Jagdpanzer 38(t).
Production
started in March 1944. 2447 Hetzers were delivered to units between
May 1944 and May 1945 [5] and the vehicle became operational on the
Ostfront in the Summer of 1944 and on the Westfront in September 1944.
The type served in Panzerjäger units of infantry and Volksgrenadier
divisions and independent Panzerjäger Abteilungen, not in the
Panzerdivisionen, although some exceptions existed [2,5]. A detailed
distribution list can be found here.
_t.jpg)
_t.jpg)
Contents
Vespid
is a relatively new Chinese manufacturer, but already with a solid
reputation for quality, akin to that of Flyhawk
kits.
_t.jpg) _t.jpg) _t.jpg)
 _t.jpg) _t.jpg)
The instructions
are clearly printed, in color, on glossy paper. A few parts are not
for use as they are intended for the earlier version represented in
kit VS720022. (In case you wonder, it doesn't seem that you have all
the parts to build the early version from this release, however.)
The only option this kit offers you is to use a plastic or metal gun
barrel and the choice between two marking options that don't refer
to any particular unit or theatre of operations. We'll coma back to
that later.
_t.jpg) _t.jpg)
The main
parts. An interior or crew figures are not provided, but the gun sight
is connected to the main gun, allowing it to move in parallel.
I wonder why there is such a large gap next to the lower hull. (I
checked, and it's also there in companion kit VS720022.)
Based on what I find at Henk
of Holland, sprue A is almost, but not entirely identical to that
of VS720022 as the latter contains two types of gun mount.
_t.jpg)
Tracks
are link-and-length, very crisp and well detailed.
_t.jpg) _t.jpg)
Roadwheels,
idler, mantlet and other parts that are dedicated to the late version.
The roadwheels have detail on the back. Only the rare 4-hole idler
type is given, which is a pity, given what marking options you are
presented with.
_t.jpg)
Steel
tow cable, plus metal cylinder (sleeves) for the ends of that cable,
a metal gun barrel and PE parts. The instructions tell you that you
get two sleevs, but my kit contained three. Clearly Vespid knows that
I am bound to feed at least one of these to the carpet monster.
_t.jpg)
Small
decal sheet. Well printed.
Version
According
to my references (see below), the Hetzer evolved as follows (in bold
the features of the kit), leaving out the prototypes:
- Initial
prodction
- scalopped
gun mantlet
- ram
horn towing attachments
- 12-hole
idler
- A
few with muzzle brake
- A
few with transversal beam and tow hook on rear plate
- April
44:
- Ram
horns dropped, hulls extended with towing eyes
-
Slightly smaller flange on top plate for mantlet
-
No lightening holes in outer rim of drive sprocket
-
Rundumfeuer MG shield shortened
- May-July
44
-
Extra hatches sloping on rear hull plate: one for commander
and two close at each side of the bottom of that plate. Spare
tracks moved accordingly.
Some remarks:
- I
have read (but can't remember where) that the commander's
hatch was later reduced in size. I have no visible proof
of this.
- [5]
shows a picture of a vehicle with only the extra commander's
hatch, but not the maintenance hatches, and already with
the new gun mantlet. This seems like a rare exception.
Drawings in [5], however, show the following evolution which
seems to be contradicted by pictorial evidence
- Two
extra hatches: commander + right maintenance
- Only
extra commander's hatch
- Three
extra hatches when the new muffle was introduced
-
No heat guard for muffler. I am unsure if this was an intentional
measure, or it was only due to temporary lack of parts.
-
3 Pilzen on roof (June, according to [5])
- Aug
44:
- "Ambush
scheme" introduced
- Lighter
gun mount mantlet (gun mount without bolts and different shape,
no notch in "Saukopf" mantlet)
- Larger
wheels with smaller rubber rim and 16 rivets (?) instead
of 32 bolts, but same overall diameter accorindg to . [5] claims
this only happened in October 44.
-
Various new types of idler fitted
- 6 hole flat
- 8 hole flat welded
- 6 hole dished, stamped, ribbed
- 6 hole dished smooth
- 4 hole dished smooth (Skoda)
- Sep
44:
-
Edges of Schürzen bent inwards
- Oct
44:
-
Flush driver’s periscope with rainguard
-
Riveted (instead of bolted) roadwheels, which is probably indistinguishable
in this scale. (This change might already have happened when the
new roadwheel was introduced.)
- Flammvernichter
exhaust, mounted higher.
- Stop
light on left rear fender in lower position.
- New
hatches left and right of exhaust
- Small
reinforcements to top of gount mount on some vehicles [5]. I have
not yet seen visible proof.
- Stronger
front suspension; the vehicle no longer showed a nose heavy stance
- "Ambush
scheme" phased out
- Very
late production.
-
Loops for camo
-
Side supports for tow eyes, or tow eyes replaced by heavy duty
U brackets
Befehlspanzers
carried an extra Sternantenna on the rear left hull side.
Tim Lau
points out that some of the features of the Hetzer allow us to identify
the manufacturer (BMM or Skoda). A detailed discussion can be found
here.
In that respect, this kit has a fatal flaw.
- The
idler wheel (with the 4 holes) is a Skoda specialty.
- All
other hull details are BMM. So the kit (along with the early and
mid variant, which shares many parts with the late) can only be
built as a BMM vehicle.
- The
easiest fix would be to modify/replace the idler, as I (Rob) did
in my build; see below.
- As
a heuristic, the kit can then likely be used for any BMM vehicle
that:
-
has wavy bands (BMM speciality)
-
does not have amoeba patterns (Skoda speciality)
- or
does not have ambush pattern (too early).
Doing so, the
kit appears usable for the Bovington captured exemplar or "Basso"
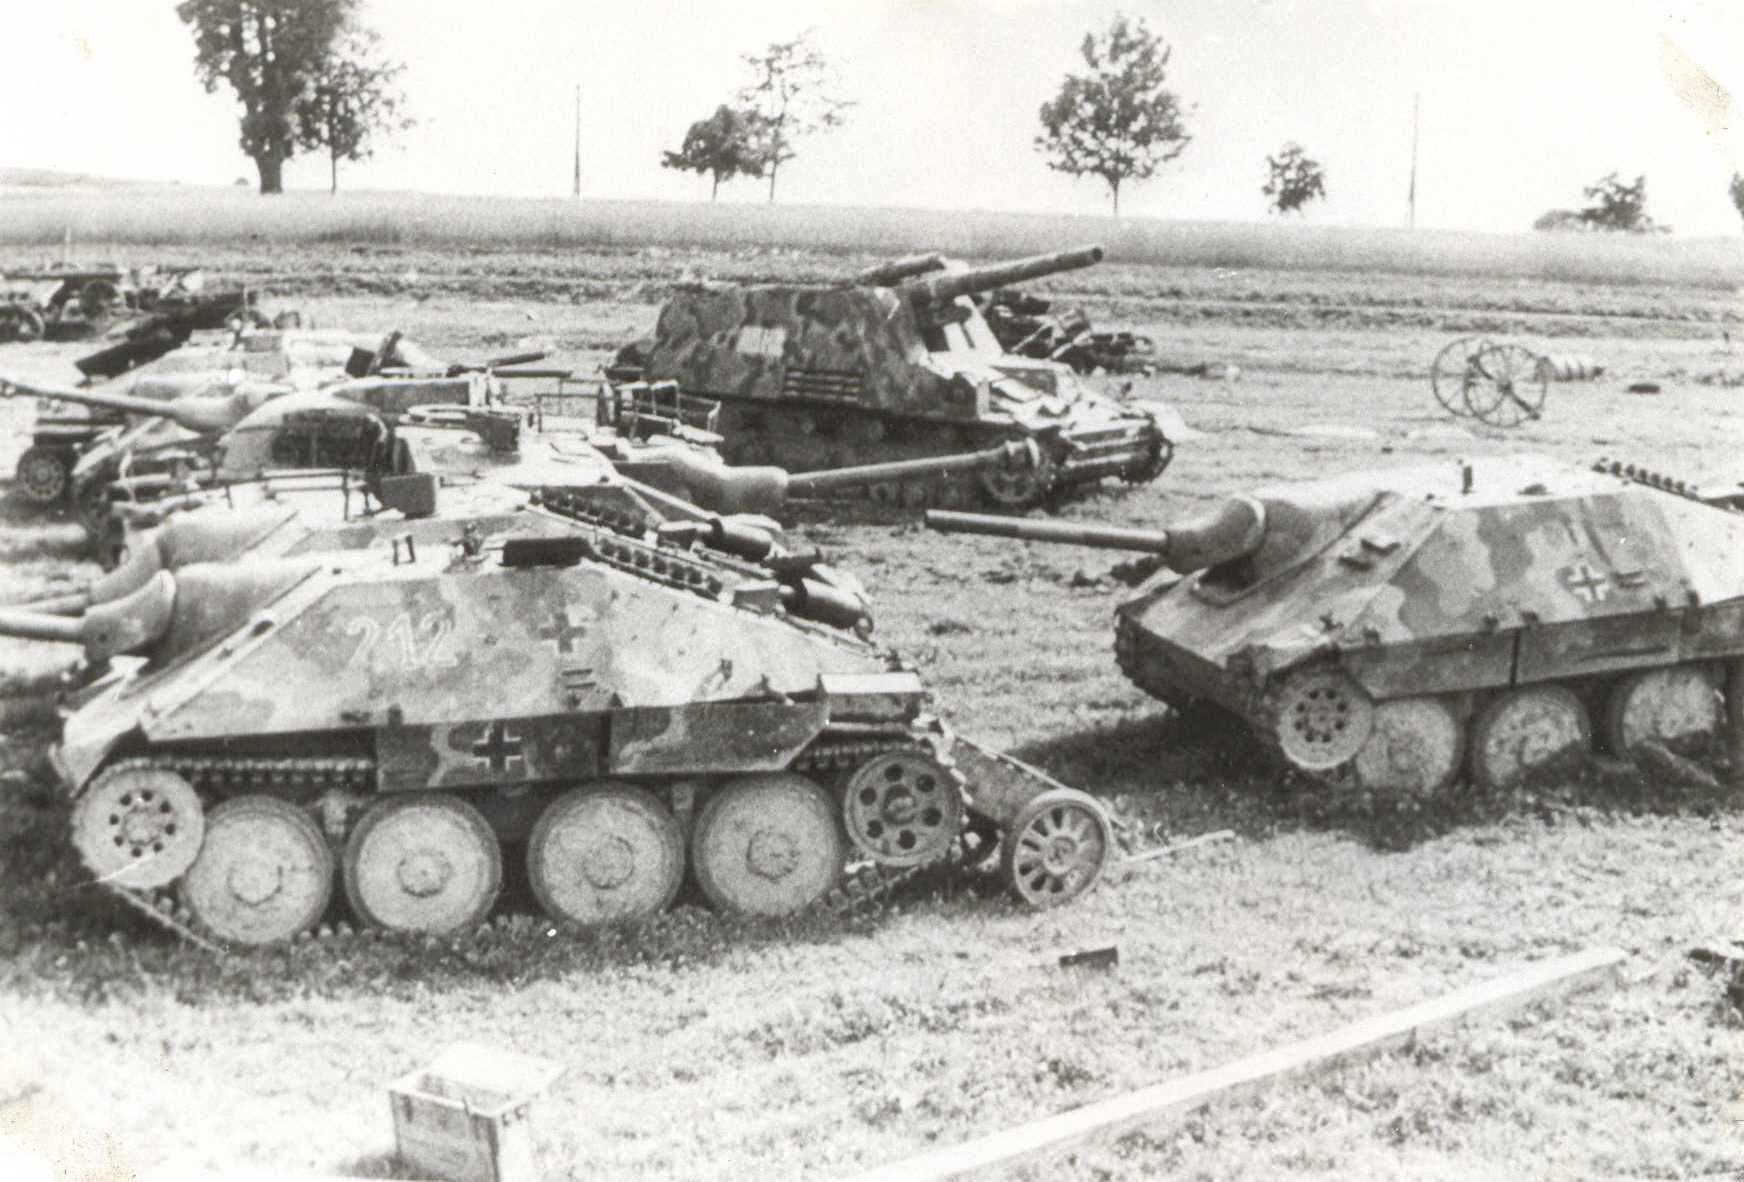
or 212 (but not the vehicle right behind 212).
There are similar
frustrations with the Vespid kits of the mid and early Hetzer, but
these can probably be built into a BMM vehicle straight-out-of-the-box.
Construction
- Preliminary
remarks
The final model didn’t turn out as well as it deserves, and
I take full responsibility for it, although only partially. The
main reason is that it seems that Vespid has changed the type of
plastic that they use. While I previously wrote that the plastic
in the Comet kit (or
any other Vespid kit that I built in the past, for that matter)
reacts very well to MEK, the plastic in the Hetzer kit is almost
inert. After having asked around, I started to believe that I didn’t
clean the kit parts well enough before starting the assembly and
that the mold release agent was playing tricks on me. Parts just
kept falling off, with all the types of glue that I normally use
failing to hold the kit together, apart from cyanoacrylate. I was
almost ready to accept my fate when I decided to do an experiment
on a bit of sprue. I cleaned it, sanded it, cut it in two, just
to make sure I had access to plastic that couldn’t possibly
have been in contact with the molds. Behold… the plastic didn’t
stick at all with MEK, and barely held together with regular modelling
glue. I’ve heard from other modelers that they didn’t
suffer from this annoying tendency, but I honestly fail to see what
I have been doing wrong. If anyone has ideas, suggestions, or other
useful remarks, they are welcome to contact me.
- In
the end, to avoid losing any more parts while the carpet monster
was aroused, I decided to stick the model to a small base to be
able to handle it without too much risk. My incessant frustration
made me forget to take enough in-progress pictures of the build,
while the finished model in the pictures below doesn’t show
off all the fine detail this kit has on offer. And, yes, it comes
with some very fine, crisp detail.
- I
wanted to build a Hetzer captured by the Bulgarians after the end
of the war (and after they switched sides). That particular Hetzer
was a late type, but had an 8-hole idler. The kit has a 4-hole idler
while the other kit that Vespid released, covering the “early”
Hetzer, comes with a 12-hole idler. Trying to be as truthful as
possible, I drilled out 4 more holes in each idler part. Other modifications
are a different type of headlight, a makeshift right front fender,
omission of sections of Schürzen and omission of the MG. A
picture can be found here,
while more information on Bulgarian armor can be found here.
_t.jpg)
- Decals
came from a Bison set.
This vehicle only needs three red stars. Unfortunately, the white
border of the stars in the decals is not in perfect register, which
didn’t bother me too much as I reckoned that this might have
been due to hasty application by the captors (even though the picture
of the real thing seems to show a more uniform border).
On to
the actual construction.
The suspension is a very nicely detailed bit of engineering, but the
axles of the support rollers were a bit short to correctly align those
tiny wheels (unless I did something wrong). The rim of the idlers
was also somewhat irregular in my kit. What is nice is that the lengths
of track have a realistic curvature, which will add to the realism
of the finished kit. The kit offers you individual track links that
aren’t called for in the instructions, but which came in handy
nevertheless. (Perhaps Vespid read my review of their Comet
kit.)
A word of warning, which applies to all tracked vehicle kits: always
place at least a single track on the drive sprocket when gluing the
halves together. The slightest misalignment of the teeth will make
the whole track assembly look quite crooked.
The hull extensions with the towing eyes (PE3 and PE4) are very delicate,
very thin and thus have a only tiny mating surface for the superglue
to bite. This becomes even more of an issue for the even tinier reinforcement
triangles (PE5). I would recommend cutting a very shallow slot where
they are to be placed, to have at least somewhere to put your glue.
_t.jpg)
 _t.jpg)
On the rear of the hull you are supposed to place a tow cable. The
kit provides a metal strand of twisted cable, which is nice, but has
a certain tension. You are supposed to wind it around three dimunitive
PE hooks (with almost non existent mating surfaces). I didn’t
want to take the risk of having the hooks snap off, so I left the
cable off. The kit instructions are also somewhat vague about this.
You get one cable to which you are supposed to add three towing eyes.
The math doesn’t add up. The rear hull plate also accepts two
spare track segments. The kit gives you four. Later on in the build,
you will notice that I didn’t fit the longer spare track segment
on the engine deck, just to give the kit its own identity. Speaking
about the engine deck, I decided to hollow out the lifting handles
instead of using the PE parts (which looked too flat). Copper wire
would perhaps have been even better (and surely less work).
_t.jpg)
The
periscopes are very nice, but are a tight fit. Taking a sliver of
plastic off the opening in the upper hull will make life easier on
you.
The kit offers open hatches, but without an interior (or crew figure)
I decided to glue them closed. Well, actually, you get a little bit
of interior: the lower half of the periscopes, the lower half of the
gun sight and the commander’s binoculars. This is where the
kit gets over-engineered. When the gun moved, the gun sight moved
with it (which makes sense, doesn’t it ?). Vespid allows for
the gun to move around both axes. For the periscope to follow there
is a structure that attaches the gun sight to the rear of the gun.
(The latter is not the cradle, just a plastic extension.) It’s
a fiddly affair, made all the worse by the truculent plastic. On top
of that (literally) is the sliding periscope cover (PE 16) that is
supposed to slide with the periscope. Vespid doesn’t mention
it, but if you go for a moving gun, the gun cover would need to be
pushed around by the periscope. A sliding periscope cover held in
place by 4 microscopic PE parts (PE8) and being pushed by a plastic
periscope that is attached to the gun with a fiddly connection characterized
by tiny mating surfaces of glue-phobic plastic is the stuff of nightmares.
I probably overcompensated, but I added as much reinforcement to the
inside structure as I could and happily sacrificed the mobility of
the gun.
For those
wanting to scratchbuild an interior: good 3D interior drawings can
be found in [1,2, 6] and Eduard's 1/35 instructions (or kit) can also
be of assistance.
_t.jpg) _t.jpg)
Some side-notes about the gun assembly: the mantlet and has some nice
casting texture, and the gun barrel comes as both a plastic and a
brass part. The latter being slightly thinker, requiring some drilling
on the receiving end. Going towards the finishing line, I drilled
out the Pilzen on the roof, bent the left rear fender to match the
picture, lost the handle of the jack and scratchbuilt a new one and
added the (empty) Rundumfeuer mount. The instructions for the latter
are puzzling. You are supposed to fit part 18 in front of it. However,
part 18 is also the main gun periscope and is only provided once.
The next part of step 12 is equally puzzling as metal cylinders are
supposed to be added to wires (?). I am not sure where the wires should
come from (or what they represent). Not finding them on the picture
I based my model on, I left them off. I did add the clamp for it,
which fortunately is supplied twice, so I could feed the carpet monster
some dessert with the other one.
_t.jpg) _t.jpg)
 _t.jpg)
_t.jpg)
 _t.jpg) _t.jpg)
 _t.jpg) _t.jpg)
Accuracy
and markings
Based
on my observations and my references, the vehicle in this kit has
accurate feature’s for a BMM vehicle built from September 1944
onwards, which makes it the same version as the Esci kit (which has
other issues however). The 4-hole idler is rather rare, however. Besides,
it was probably only used by Skoda, even though I assume BMM vehicles
could have been fitted with a Skoda idler during repairs.
As this
has implications for the marking options, it would have been nice
if Vespid had provided alternatives.
Both of these options can be found in [5] and are the same two marking
options of the Eduard
1/35 kit.
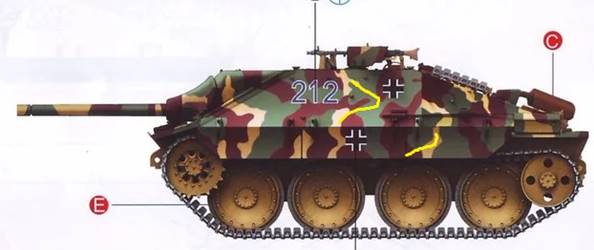
- 212
is given as a vehicle of 97. Jäger-Division in Moravia, Czechoslovakia,
May 1945. The vehicle is drawn in [5] with a 6-hole idler, which
is confirmed by a picture in the Eduard instructions. Eduard also
mention that the "212" might be in red or black with a
white border, instead of blue.
Tim Lau adds that some bands are wrong compared with a picture found
on Aktuální
konflikty and shown below.
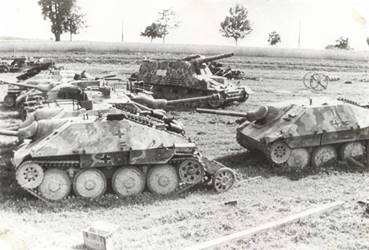
Consider the yellow lines below.
- 102
is given as a vehicle of 8. SS-Kavalerie-Division "Florian
Geyer", Transylvania (Romania), Autumn 1944. The vehicle is
drawn in [5] with a 6-hole idler. While Eduard confirms, I have
not yet found any pictures of the real vehicle. The Eduard instructions
also mention that the "102" might be in red with a white
border, instead of blue.
The idler
in the kit is thus incorrect for at least one of both options and
likely for both. A 6-hole idler can be sourced from OKB
Grigorov, or from the UM
kit of the Hetzer.
Note
that 212 might have had fake visors painted below the real visor.
For those
who are interested Panzerwrecks 6, p 49 clearly illustrate the standard:
BMM & Skoda camo schemes.
Returning
to the accuracy of the features, the only things that that warrant
improvement, in my opinion, are
- adding
the electrical wire for the headlight
- installing
an antenna to its mount on the right rear hull
- adding
a tiny periscope for the Rundumfeuer machine gun (part F6 in the
Eduard
1/35 kit)
What
the dimensional accuracy is concerned, I refer to this article.
Conclusion
This
is a very highly detailed and accurate kit, which is perhaps somewhat
overengineerd and comes with some of the smallest photoetch part that
I had the "pleasure" to work with.
My main concern is the gluability of the plastic, at least in my kit
and in my hands.
References
[1]
Panzerjäger 38(t) Hetzer & G-13 Vol I, Photosniper 3D #14,
M. Motyka et al., Kagero, 2014
[2] Panzerjäger 38(t) Hetzer & G-13 Vol II, Photosniper 3D
#17, M. Motyka et al., Kagero, 2015
[3] Hetzer & G-13 Vol I, Photosniper #17, M. Koenig & G. Parada,
Kagero, 2003
[4] Jagdpanzer 38, In Focus 1, Panzerwrecks, 2015
[5] Jagdpanzer 38 Hetzer Vol.1, Gunpower 30, M. Rainko, AJ Press,
2008
[6] Jagdpanzer 38 Hetzer Vol.2, Gunpower 30, M. Rainko, AJ Press,
2010
[7] Jagdpanzer 38(t) Hetzer, TankPower Vol VIIII (219) Limited Edition,
J Wrobel, Wydawnictwo (1997)
[8] Jagdpanzer 38 ‘Hetzer’ Osprey 2004 E New Vanguard
36
Kit purchased
by the reviewer.
Vespid
kits can be purchased from

|
.jpg)
.jpg)
.jpg)
.jpg)
.jpg)
.jpg)
.jpg)
.jpg)
.jpg)
.jpg)
.jpg)
.jpg)
.jpg)
.jpg)
.jpg)
.jpg)
.jpg)
.jpg)
.jpg)
.jpg)
.jpg)
.jpg)
.jpg)
.jpg)
.jpg)
.jpg)
.jpg)
.jpg)
.jpg)
.jpg)
.jpg)
.jpg)
.jpg)
.jpg)