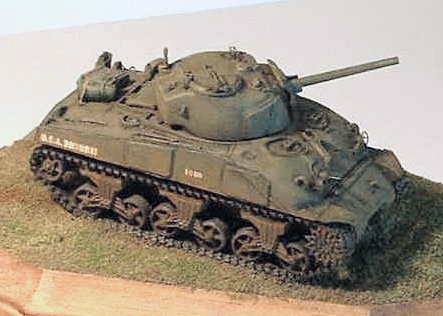
M4 Composite Hull Sherman
Manufacturer: MR Models (#7223)
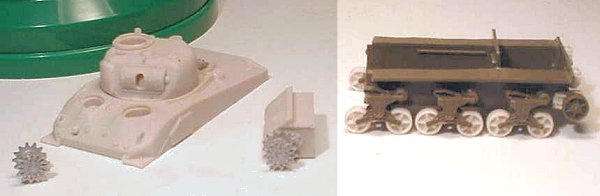
Resin, Plastic and White metal Conversion to ESCI M4A1
This is a multi-media conversion/upgrade kit (white metal and resin) produced by MR Models of Germany. It is designed to be used with the Italieri/ESCI M4 A1 kit. It comes with a replacement upper hull, a replacement turret, new bogey wheels, a turned aluminum barrel and various other fittings in resin and metal. Unlike most 1/72nd scale resin Sherman kits, it seems to be an entirely new moulding for the upper hull and turret. The moulding itself is excellent, holding such detail as subtle welding beading along the rear sides of the hull and realistic texture to the cast glacis and turret.
MR Models has obviously worked carefully to remove all of the problem areas of the original ESCI moulding from the mid-70s. For example, they have recast all of the bogey wheels to a more accurate size (the ESCI ones were slightly small) and included more accurately detailed hubs. The turret has better detailed as well, and the internal mantlet (i.e. the gun-mounting beneath the armoured mantlet) has detail comparable with a 1/35th scale kit. This is good since the MR Models kit comes with two versions of the early "narrow" mantlet (one with extensions on either side of the gun, the other without) which would show the sides of the internal mantlet.
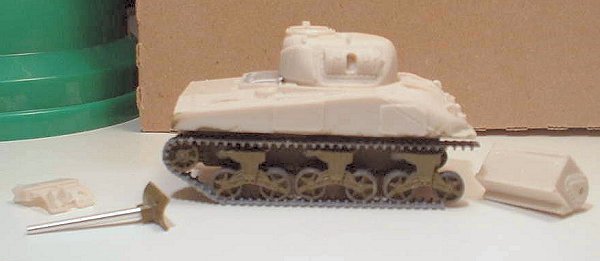
MR Models has also addressed the overly tall stance of the ESCI kit. The instructions call for the builder to use the lower hull sides and bottom of the styrene kit, but require that the top 5 mm be carved off the top of the sides to bring the sponsons closer to the top of the tracks. The builder also has to cut off the lower hull sides forward of the front bogie assembly. This is to allow the one piece resin transmission cover and drive wheel mountings to be fitted (very nicely cast). It is also necessary to carve off the mountings for the idler wheels at the rear and replace them with a two piece, detailed replacement unit. These modifications make the assembly of the lower hull and running gear rather complicated. I approached it by assembling the bogies and tracks (the MR kit uses the ESCI hard tracks) first, without the transmission cover and drive wheels.

Once I had the main body of the running gear assembled and painted I glued the two piece, white metal drive wheels together (careful to line up the teeth) and added the individual track links around the wheels. I then dry fitted the drive wheels glued them into place by the track lengths from the front bogey wheel and front return roller.
A kind of odd choice by MR Models is that the turret they have chosen to include with the M4 Composite Hull has no pistol/shell ejection port or turret loader's hatch. I really questioned the lack of a port, since there were a reasonably limited number of these turrets produced (late 1943-early 1944) and the photos I found in the Squadron Sherman In Action book showed only composite M4s with the port. Fortunately, on page 32 of Steve Zaloga's The Sherman at War (2) The US Army in the European Theater 1943-45, there is a photo of a composite hull M4 of 2nd Armoured Division, nicknamed Dodo, which, indeed, has no pistol port. From the photo you cannot tell if Dodo has a turret loader's hatch, but reviewing Hunnicut, I came to the conclusion that the no port/no loader's hatch combination was possible.
Since Dodo did not have the early narrow mantlet, I used the Italeri/ESCI wide mantlet, with an opening drilled out for the co-axial machine gun. The turned aluminum barrel fits the ESCI mantlet well but may be a bit long. I probably could have recessed it into the turret a few more millimetres.
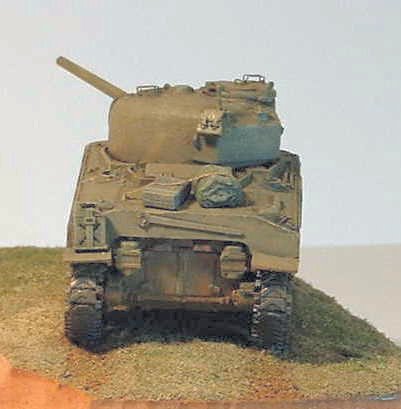
Unfortunately the MR Models hull is hollow, the turret is moulded as a "plug" (i.e. not hollow) - as a result, there is really no option but to build it with the turret hatch closed (the commander's hatch on the Sherman is really wide so even a sticking a figure in won't hide the lack of an interior). The MR Models kit calls for the use of the original ESCI commander's hatches which I thought were little soft on detail (the conversion provides white metal hatches for the driver and radio operator positions).
Once I had assembled the main components, I painted the vehicle with Humbrol's Olive Drab #155 (I had already painted the track assembly - Olive Drab for the metal parts and medium grey for the tracks themselves). I then added etched brass details (such as lift rings, headlight and periscope guards etc.) from the Extratech set produced for the Revell M4 A1. Following this, I used a wash of Olive Drab darkened with flat black around those areas which would not get a lot of wear. With this two-tone base I carefully dry brushed the model with Olive Drab considerably lightened with Humbrol 83 Ochre. This highlighted high wear areas and brought out the fine texture of the cast areas of the tank.
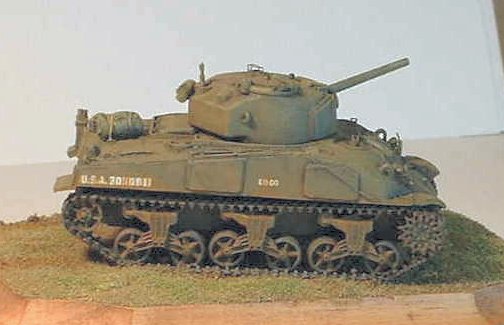
To finish, I added the serial numbers (from my decal box) and nickname (from some poor quality rail road transfers - it's tough to find 4 "D's" and 4 "O's" on any one decal sheet). I then did some light weathering and muddying-up using a wash of medium brown on the tracks and lower hull. The tracks also received a bit of work with a soft pencil to simulate the bare metal of the chevrons. Some stowage from various sets was then added and "tied down" as much as possible - this is a real problem in small scale. It is difficult to make tie down ropes look right.
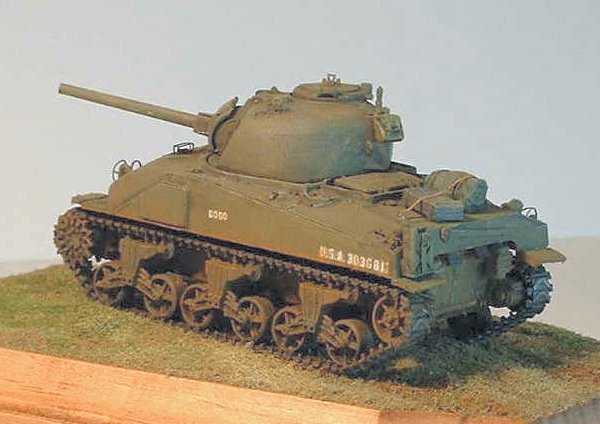
The final step was to prepare a base, flocked with rail road turf, a mix of brown turf, yellow and green grass. I built this up over a couple of hours and, while it was still moist with liquid white glue, pressed the model into the flocking. This helps it to settle into the turf in a realistic fashion. I then used the medium brown wash again to mark the path of the tank.
AMPS, April, 2003
For those of you who aren't familiar with AMPS (Armor Modeling and Preservation Society), the organization has developed and uses a very detailed judging system. Unlike most competitions, pieces are judged not against each other (i.e. 1st, 2nd, 3rd) but against a fixed set of criteria (and are awarded a gold, silver or bronze). They judge only your work, not how it stacks up against other models on the table. These criteria are available on the AMPS site (http://www.amps-armor.org/contestRules.asp). A really great feature of this judging approach is that not only do the judges (usually a team of four or five) take a good amount of time examining your work, but they also provide written comments sheets indicating the score you received in the three major criteria categories (9 sub categories) and why. These are necessarily brief (i.e. seam lines on engine deck, decals silvered on turret, etc.) but usually of great use to the modeller who wants to improve and do better on the next model. I have found (after attending two AMPS shows) that I do a lot of self-inflicted head-slapping when I read the judges' comments!
I took three models to AMPS this year. The first, an Eastern Express T-34/76 in German colours, was a bit of a throw-off - I didn't expect it to do very well but it was ready to go. The second was an Attack/Part Aufklarungs 140/1 which is (or will be) covered in a separate build article here on "On the Way". The M4 Composite, however, was my best work (in my opinion anyway). Even though this year I was entering the "Advanced" category rather than the "Intermediate" I really expected to get at least a bronze and maybe even a silver medal.
Well, I was in for a shock. Here are the results of the judging taken from the scoring sheet (comments from the judges’ individual tally sheets are in italics):
Initials |
Score (out of 10) |
Comments |
TB |
|
Silvered decals Gap, tracks skewed, silvered deals |
CW |
7.0 |
Excellent, fine detail, need to work on finish Gap behind final drive, track (skewed?), streaks in paint, weathering not uniform |
JL |
6.5 |
Nice – watch basics, sink marks in hull, gap @ transmission gap @ transmission, silvered decals, luv those brush guards |
BG |
7.0 |
Whoa, what a difficult thing to try – nice job on the finish |
Total = 20.5 out of 30
(with 4 judges the lowest score is dropped, if 5 judges are available, highest and lowest are dropped)
I came within a half point of a Bronze medal! I was not pleased. However, here is where the AMPS system is different from other contests. When I got home from Havre de Grace (a quick 8 hour drive straight north back to Ottawa), I actually read the comments and looked critically at my model.
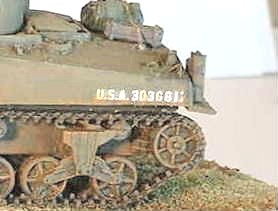
The "Gap" - yup, it was there. When I joined the resin transmission housing to the ESCI hull I hadn't cut the plastic quite straight and it left a gap. I had forgotten all about it (apply open hand rapidly to forehead - slap - ouch).
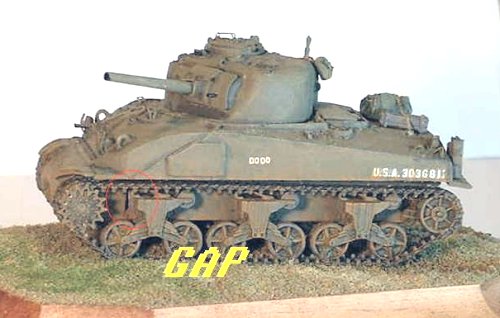
Tracks - once again, a fair call. There was definite toeing out of the starboard track when looking from straight ahead (slap to forehead once again).
Silvered decals - this one I didn't even have to think about. I had used some old Nitto decals for the serial number and USA marking on the side. They had silvered and when I weathered the tank it got worse (slap).
Streaked paint - I was convinced this was unfair until I noticed said streaking on the rear of the tank on either side of the engine deck - pure sloppiness on my part! (Slap, slap)
Weathering - kind of a mixed signal here, one judge liked it, one didn't. I'll be more careful (i.e. subtle) next time. (Half slap)
Sink marks in hull - the hell you say! It's a resin kit, it didn't come out of a mould that would use push pins to release the sprue. It isn't possible! It isn't ... wait a minute ... hey look, sink marks! They are on the ESCI hull, port side, behind each bogey assembly. Cute little circles just above the trailing bogey wheels. I never even noticed them! (Slap, slap, slap).
So there you have it - the AMPS judges caught me on every one of my goofs and marked me accordingly. It's up to me now to learn from my mistakes and become a better modeller. If you get a chance, go to AMPS or an AMPS regional show and get your kits judged - it's hard on the ego sometimes (as I certainly learned) but it gives you what you need to get better at your chosen hobby.
| Back to MR Models Kit List | Back to Home Page |