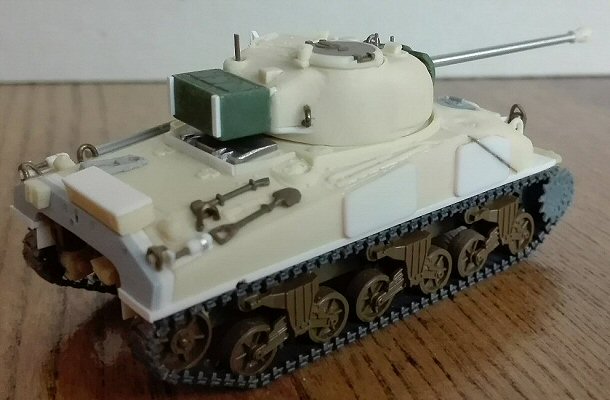
To
field as many 17pdr armed Fireflies as possible, the British also
used the M4 “Composite hull” (which they called “hybrid”)
in addition to the Sherman Mk I and Mk V. At the time of writing,
the M4 Composite hull/Sherman Mk I Hybrid is not available as a 1/72
plastic kit. There are two options to get one: the first is joining
a cast hull front from a M4A1 76mm to a M4 kit. The second is using
a resin conversion set. I was considering the first one when a friend
donated me the MR Modellbau conversion kit.
The set is designed for the Italeri M4A1 kit. This seems to be a strange
choice to me, because there are better kits to use as a starting point.
In theory, every M4 and M4A1 has the correct lower hull. However,
always better to check the details: this particular Italeri kit has
the correct belly maintenance plates for a M4A2 or a M10.
The resin set is composed by an upper hull with a turret, a set of
14 open spoke wheels, a pointed cast transmission cover and smaller
resin pieces such as bins, smoke dischargers, fenders, exhausts, air
filters, grouser storing cover, a telephone box, muzzle brake, turret
bin and the new idler supports. In my kit, the mantlet was the standard
M34A1 one and not the Firefly version. I’ve checked the photo
of that item on the MR Modellbau site and found the mantlet to be
correct, so I think my problem was due to a packaging mistake.
Other little parts are made in metal: sprockets, hull hatches, air
intake cover, idler pins and the track tensioner tool.
There
are also some surplus parts: a US type all around vision cupola hatch,
a US type loader oval hatch, a MG support and two little items. Unfortunately,
some pieces were also missing: the gun cleaning rods, spring towing
device and its hook, a fire extinguisher and a resin piece which is
listed as “25 - stowage and gear” but not shown in the
instructions.
The details look well done. The hull cast front is well depicted,
better than another conversion set I’ve seen.
My (usual) first step is identifying the variant proposed. The M4
Composite hull was built by both Chrysler and ALCO. It was the last
75mm armed M4 type produced and arrived on the production line in
the second half of the 1943 (August for Chrysler and October for ALCO).
Ignoring the very first tanks produced, the early Composite hull had
the "no pistol port low bustle turret" while the later ones
had the high bustle turret with the oval loader hatch. There also
were some differences between the two plants. From a 1/72 perspective
I think one can ignore the smaller ones, but he has to pay attention
to the more obvious differences :
- Chrysler:
rear towing hook absent, sprockets wheels with spokes, notched sandshields
supports, right forward appliqué armour with clipped corner.
- ALCO:
rear towing hook present, sprockets wheels without spokes, notch
less sandshields supports, right forward appliqué armour
with rounded corner.
Both
versions were randomly mixed in the batches T261894 - T263893 and
T269094 - T271093, although in my photos, I have seen Hybrids only
with 263xxx and 269xxx numbers.
The tank proposed in the conversion kit is a Chrysler. The resin hull
doesn’t have the sand skirts support strips.
Although at first glance, the resin parts look well made with crisp
small details, a closer observation revealed air bubbles, resin excrescence
and two serious errors: the hull dimensions and the turret layout
and alignment.
As usual,
I wanted to depict a Normandy campaign tank. I used the Hunnicut book
and this very good website http://the.shadock.free.fr/sherman_minutia/index.html.
Here
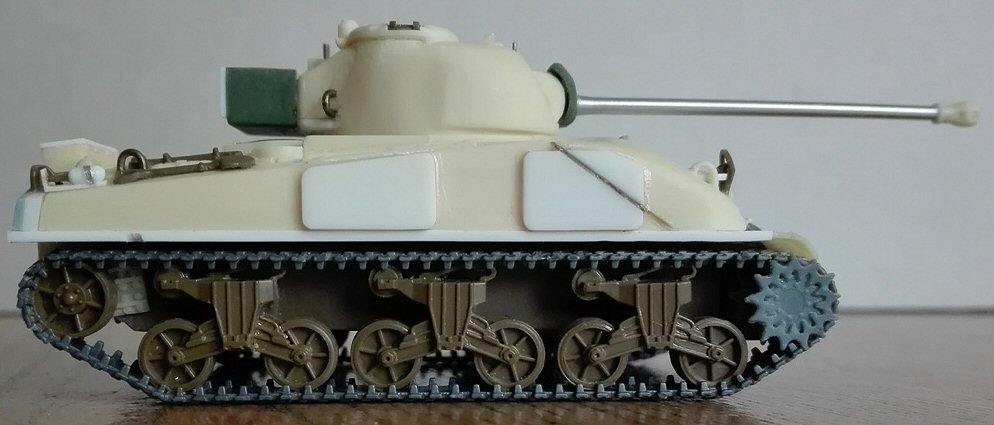
is what I did : |
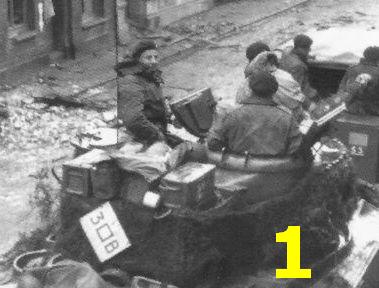
Turret
The turret depicts a high bustle turret, so it has the pistol
port (correct), but it doesn’t have the cast-in armour (not
correct). This turret type was effectively used for the Firefly
but, having already its own loader hatch, as far as I know, this
was retained without modification (see photo #1).
If the kit turret is used as a high bustle type, the hatch must
be changed and the lower bustle edge needs to be rounded (the
turret one, not the radio box).
If the turret is converted in a low bustle type, the hatch has
to be retained. Luckily I had a spare radio box, so I could convert
the turret in a low bustle type because the photo of the tank
I’m trying to depict had it.
|
|
I
say “luckily” because I had however to remove the radio
box and rework the turret, because my resin turret was cast obliquely
oval.
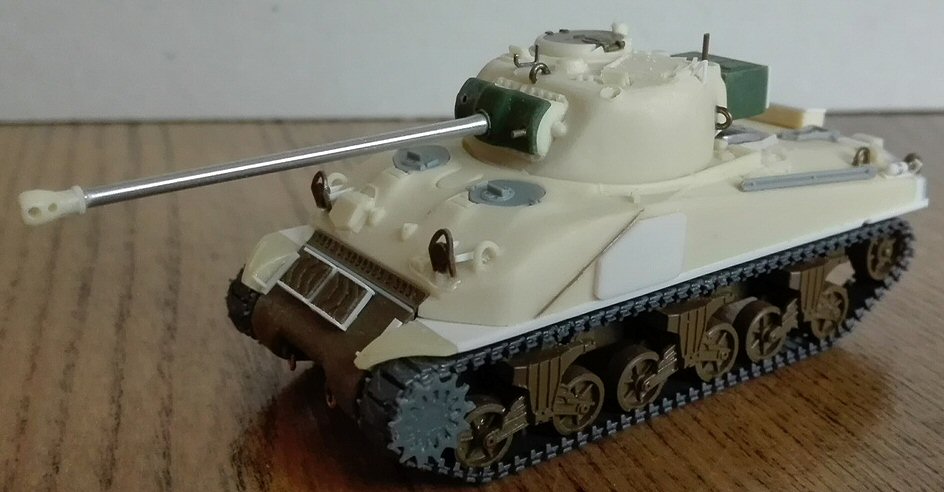
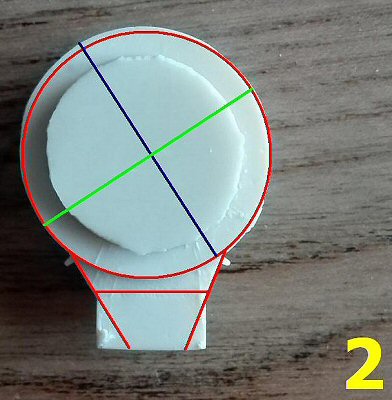
In photo #2 I show a red circle to enhance the general oval form; just
check the longest diameter the blue line) against the shorter one (the
green line).
The bustle also resulted asymmetrical.
|
 |
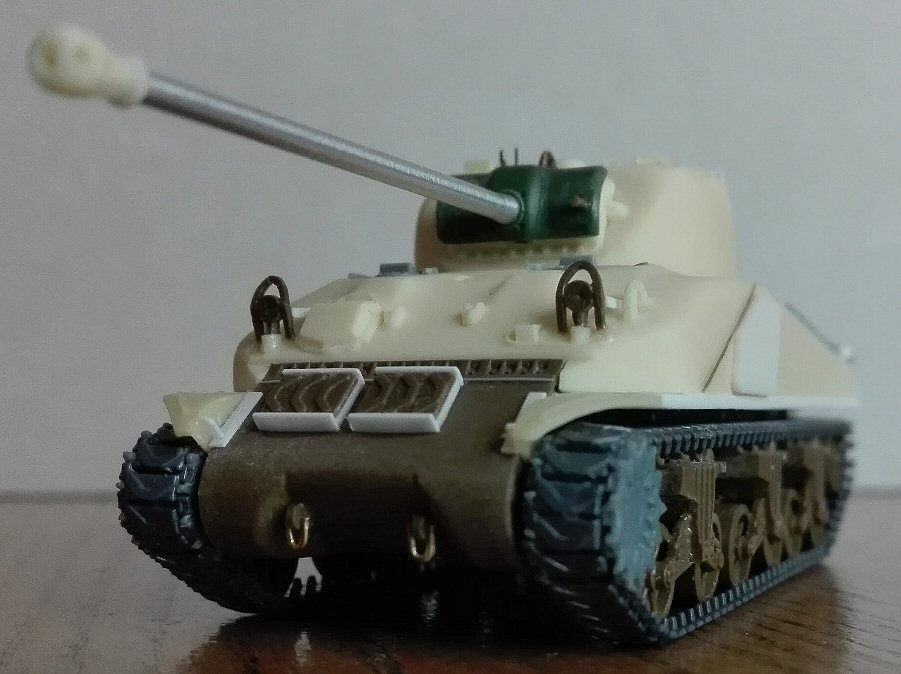
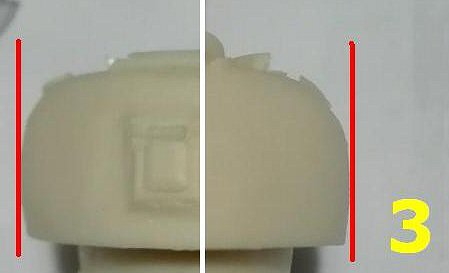
| Furthermore
the forward half of my turret had bulging sides, not vertical ones (see
photo #3). Anyway this could be a “una tantum” problem not
shared by every turret cast by MR Modellbau. |
 |
- A
careful filling and filing job was needed to restore the rounded
shape, to get the left forward side vertical and to shape the cast-in
armour on the right forward side.
- The
interlock, which goes in the upper hull hole, was also made more
round, adding plastic where needed.
- I
removed the pistol port.
- I
removed the radio box and then I reshaped the bustle adding plastic
on the bottom.
- I
replaced the lifting points with metallic wire.
- The
cast on gun mount is the late M34A1 type without the lateral flange
and needed a bit working of the sides, which weren’t parallel
when seen from above.
- Due
the packaging mistake mentioned above, I had to replace the standard
M43A1 mantlet supplied by MR. Luckily I had a UM spare part, so
I used it as a replacement.
- Since
I removed to the original radio box to change the bustle layout,
I added a UM radio box from my spare box.
- The
loader hatch received its stop made by thin plastic sheet.
- The
squared bracket behind the hatch (removed during the bustle reshaping)
was made in plastic.
- The
aiming device was made with a shaped staple.
- The
turret bin (34) was sometimes attached to the radio bustle. This
gave a strange stretched silhouette to the turret (in my opinion).
I didn’t use it, anyway if used it should be shimmed because,
being correct in height and width, it is a couple of millimetres
short in depth.
- I
added an interlock made by plastic sprue to the turret to avoid
it accidental falling out of the hull.
|
|
MR
Upper hull
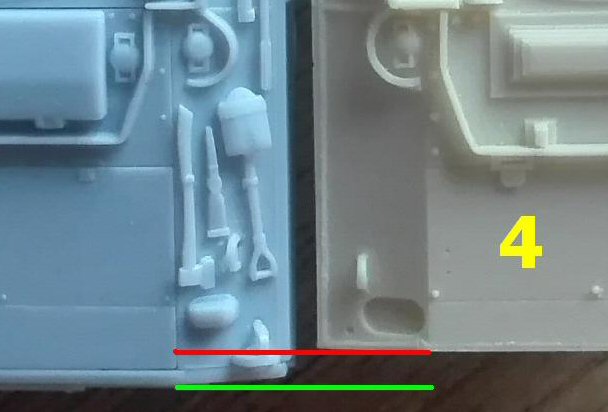
Comparing
the hull with both photos and drawings revealed the upper hull being
too short in length and height. The length shortage is in the engine
compartment and is made very visible by the two oval holes which are
almost attached to the rear plate, a simple comparison shows this isn’t
correct (see photo # 4 with a Heller hull).
|
 |
-
I
lengthened the hull shimming the rear plate by 1.5 mm plastic
sheet. Shaping the shim in place, I realize how much the welding
seams are stepped (they were more flush). Carefully I had to
smooth the welding seams by a cutter and sanding paper. I glued
a spare rear plate from the Heller M4 kit (but any other plastic
piece would be the same) obtaining the extra 2.5 mm needed.
-
Two interlocks were filed for the turret.
-
The rear lifting points, filed away during the sanding job,
were replaced by metallic wire.
-
The telephone box is a bit too tall. I lowered it before gluing
in place.
- The
appliqué armours are well done, but unfortunately I had
to them file away because the hull sides were not parallel and
straight. The sides were slightly curved inside. The difference
was perceptible for the naked eye. After having flattened the
sides the hull resulted slightly slimmer, but still within my
tolerance range.
-
I replaced the appliqué armours with new ones made
by plastic sheet. The right dimensions of the hull plates
can be found here
|
 |
-
The transmission cover had some resin excrescences (due to some
cracks in the mould I suppose). To use it I’d re-sculpt
the details. I choose to keep the Italeri one, adding the cast-in
bullet splash and modifying the towing points. The bolt heads
strip was cut off from the Italeri upper hull and glued to
the resin upper hull.
-
The upper hull is missing the sand shield support strip height.
This is visible also on the lower edge of the cast front. The
forward corners cut look small when compared to photos of the
original tanks, with the fixed fenders placed a bit too high.
I filed off the fenders and I restored the hull edge.
-
I replaced the welding seam lines between the cast front and
the welded hull by gluing and sanding down some stretched sprue.
-
I glued a large piece of 1.0 mm plastic sheet with a cut at
the rear. This restored the more correct dimensions, the sand
shields strips and the fixed fenders.
-
Having
corrected the upper hull to attach it to the Italeri hull the
way shown on the instruction didn’t work, so I chose another
method. The lower hull sponson floors were removed cutting horizontally
the wall and the two hull halves now joined well. During this
modify the ejector pin marks were filled and sanded.
-
The
engine deck hinges and bullet splash guards are not symmetrical.
While I kept the hinges as they are, I replaced the bullet splash
with thin plastic strips.
-
The
crew hatches are made in metal. They are not bad, but having
a couple of better Dragon ones from the spare box I preferred
to use these.
|
 |
- The
air inlet cover is a metal part. Mine had a hole due to a casting
problem, I filled it. During sanding, I realized the piece also
needed some shape adjustments.
- The
Firefly travel gun lock placed on the engine deck was also used
on the hybrids, but some retained the original one so is important
check the original tank one wants to depict. For mine I used a Dragon
spare one being the kit one missing (anyway in the MR one doesn’t
look well in the photo on the maker site).
- Based
on the photos consulted the trapezoidal stowage bin (for greatcoats
according to the technical drawings) was seldom used so I left it
in the spare box.
- The
missing gun cleaning rods set was replaced by a Dragon spare part.
- I
added the four shackles made by metallic wire.
- I
added to the transmission cover the two track links racks myself
by using six Italeri spare links and plastic sheet. Apparently there
were two layouts: horizontal just below the bullet splash lip (sometime
symmetrically, sometime shifted to the right) or vertical at the
centre.
- Often
forgotten details are the fire extinguishers. I scratchbuilt a couple
with their housings (not so hard to do) and then they were placed
on the engine deck rear corners.
- The
horn and its brush guard were removed on most of the photos I’ve
seen, but its presence is confirmed on some. The tank I'd made didn’t
have it so I left it on the sprue.
- The
engine deck rectangular bin looks a bit short and wider when compared
to the photos I have, so I filed the sides to make it 13 mm wide
(I scaled it from a photo so it could be not exactly correct, but
checking with the crank hole now it look better) and I added a new
cover with plastic sheet.
|
 |
| Italeri
lower hull
The
Italeri lower hull needed the following correction of the following
errors:
- The
maintenance belly plates layout was changed by thin plastic sheet.
- The
two transversal rods were replaced by stretched sprue.
|
 |
-
The
MR air filters are as good as the Italeri ones. I kept them giving
a more correct position.
-
This time I tried to correct the bogeys height. After having assembled
them with the wheels well glued on, I carefully cut off the arms
with the wheels by a thin sharp blade. I filed off 1.0 mm from
the bogeys bottom and then I glued the bogeys to the hull. For
a better alignment I glued the arms in place at the end. The look
I'd achieve seems more correct in my opinion.
-
My hybrid being a Chrysler tank, I filled the interlock for the
towing hook by a plastic chip.
-
The idlers supports look quite well. The metal pins anyway didn’t
fit well, so I glued them to the idlers on the centred pin side
and filed away the others.
-
The smoke generators are well done and need only to be shimmed
for a better gluing to the hull.
|
 |
Wheels
- The
MR wheels are the open spokes type. They are quite well done, although
the holes between the spokes are filled (too deep to depict the
closed welded spokes). I used the Italeri pressed wheels, they aren’t
perfect, but they are the type usually used on the M4 composite/Sherman
hybrid seen in Europe.
- The
MR sprockets are correct for a Chrysler tank, but both had an irregular
sink mark in the centre. Having a couple of sprockets from an Extratech
kit, I used these.
- The
Italeri tracks are the rubber T48 type. I think they are quite well
done (better than others for sure). Being widely used on the Chrysler
hybrid Fireflies I used them. Luckily I had some spare links because
at the end I needed four extra links due to the altered layout of
the set. On the subject of the tracks as far as I can tell, most
of the Firefly hybrids photos I’ve seen show them with the
T48. To choose an aftermarket option I have to say that the remaining
few had the T54E1 type (and two tanks had a T54E1 track on a side
and a T62 track on the other!).
|
 |
Conclusion
I have
two opinions about this kit: the first is about the MR Modellbau kit
MR-72022 in general, the second is about this
specific MR Modellbau kit I'd got.
- First
the kit in general: although the hull and turret
small details are very good, these are obscured by the way the hull
rear is cut short. Additionally, I don’t think the turret
layout existed unless a photographic evidence shows up. Other peculiar
pieces need to be corrected or replaced, such as the NWE turret
bin. I suppose MR Modellbau still suggests the Italeri M4A1 as the
base for this conversion because it was the only choice available
when the set was released. However, the newer M4 or M4A1 (Dragon
or Heller) available today would be a better base if MR would adapt
their instructions. Additionally, MR wouldn't have to provide a
number of pieces already present in those plastic kits (such as
the wheel set and the transmission cover) and the modeller shouldn't
have to adapt the Italeri hull.
- On
the subject of my particular kit: the deformation
of both turret and hull sides, the wrong pieces and the missing
ones... I’d like to think this is due to a single unlucky
packaging problem. Anyway this conversion set is not cheap and I
think is a must to find in the box what is advertised.
From
both perspectives my opinion couldn’t be positive.
Thanks to Gianluca Trivero for donating this kit.
This
model can be purchased from
 |