|  
Kits used
a. Modell Trans Modellbau MT 72073 (resin w/ metal barrel)
b. Hasegawa Sd.Kfz. 234/1 MT53 (plastic)
Subject
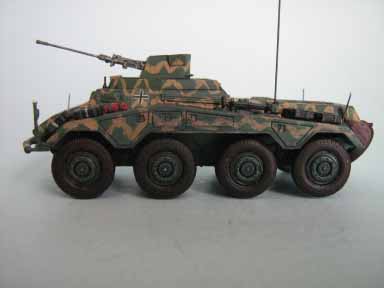
The Sd.Kfz. 234 with Schwebelafette has been a favorite of mine since
first seeing the photo in my Darlington Productions "Tech Intell"
Vol. 2 book. It was found by the allies late in the war and evaluated.
With only 2 photos of the exterior, and sadly none of the interior
(a line drawing is included from the ETO describing the gun mount),
it would have been a little hard to scratch build it; then photos
surfaced showing the mount in the Sd.Kfz. series halftracks that were
rearmed with the Schwebelafette named Sd.Kfz. 251/17. Luckily, Modell
Trans made the conversion set in resin! His conversion set is nicely
cast and detailed and includes the Sd.Kfz. 234 uper hull piece as
well as ammo storage for either vehicle (take note that in order to
fit the ammo into the armored car, I had to thin it down and split
it in half so it would lay against the walls and allow the gun full
traverse inside the armored car).
Build
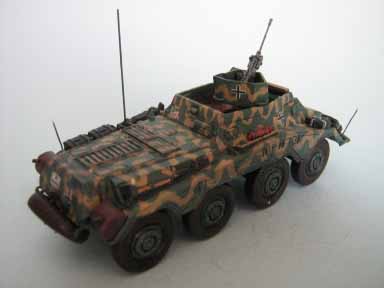
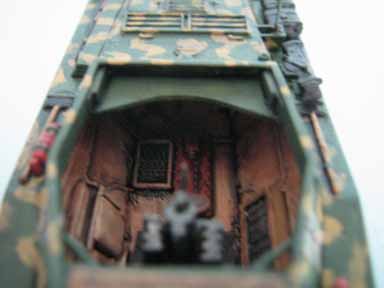
I built the armored car straight from the box with the exception of
the 2 ammo boxes, gun mount and upper hull piece which replaces the
Hasegawa one. Be carefull in fixing the mount to the interior, as
it will need to go slightly forward of the center line in order for
the gun to fully traverse.
The gun mount is nicely detailed 'as is' but if you want to properly
show it in an offset position, you will need to remove the ammo boxes
and seat mounting frames that are molded on the gun mount. The gunner,
loader and the 2 ammo boxes actually traverse with the gun. For the
2 seats, you will need to take some wire and use it to mount the seats
to the gun mount (in the position you decide to set the gun in). Also,
you will need to take some thin plastic rod to replicate the gun's
upper receiver pieces. On the halftrack version, there can be seen
to be more rods on the lower front of the receiver that holds an additional
armored plate in the front of the gun shield that further helps to
protect the gunner. It is not mentioned on the Modelltrans instructions
(it should be for the halftrack version) but it is not evident in
the photos of the armored car version, so I left it off of this model.
Detailing
The armored car is pretty well detailed to begin with. I only had
to do the following to enhance my kit:
a. Replace width indicators with solder wire
b. Add 2 hand holds to the upper front resin piece (they are at a
45 degree angle in front)
c. Add 'wooden barrel protector' (seen in b/w photo). I made this
from a plastic U-beam and rounded/weathered it to look like wood.
Recommendations
I highly recommend this conversion kit (or kits, to build both the
armored car and the halftrack)! |