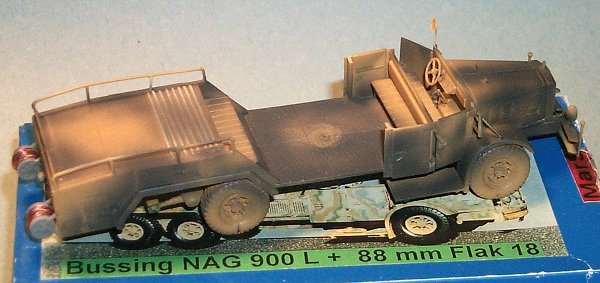
Büssing-Nag 900L Flak 18 truck
Manufacturer: MarS
by Stephen Brezinski, Portland, Maine USA
A Little History
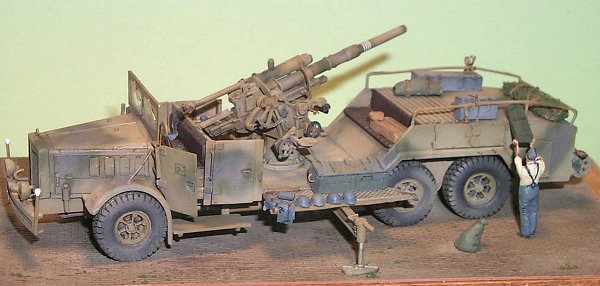
This World War 2 era German self propelled Flak truck was based on the Büssing Nag truck company’s 9-ton truck chassis. Its purpose was to provide a very mobile antiaircraft artillery unit that could quickly move to an area with a minimum of set up time. Its cousin was the very similar Vomag Company self propelled Flak truck with almost the same body and gun mount. Whether this truck ever saw service is presently in doubt. One account I have heard is that they all were destroyed before deployment when the factory where they were built was bombed, or perhaps the factory they were protecting was bombed. MarS’ instructions state that … were destroyed by bombing, while four survived and were destroyed in the final days of the 1944 - 1945 Soviet assault on Budapest, Hungary. (Where I understand the unit armed with Vomag Flak trucks was also destroyed. Likely the same unit?)
The Kit
The kit comes separated into a ziplock bag of truck parts and one bag of 88-mm Flak gun parts; all in a cardboard box which is all typical of MarS kits. There are approximately 80 tan resin parts (there were actually so many tiny parts I gave up counting them). Resin casting is the typical crisp, superb MarS quality. Clean-up of pour plugs and sprue was not to bad. Be very careful to wet-sand all parts flat and true.
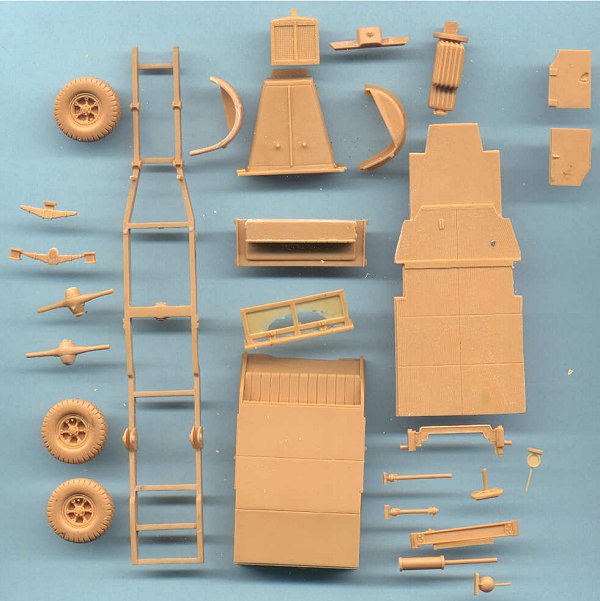
Above is a scan of many of the Vomag truck body and chassis. I did not want to show all the parts, as there were just too many. The tire tread is so perfect they look the tires came off a real truck and were shrunken down (Honey I shrunk the tires?)
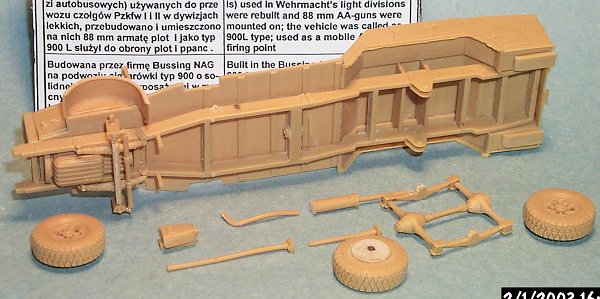
Above is a photo of the partially assembled truck chassis & body. Holes need to be CAREFULLY drilled on the rear springs for the rear axles (the rear suspension in the photo above is before the holes were drilled but it shows you where to drill). The instructions are not clear at all in how to handle the rear axles and wheels, what I chose to do was to carefully drill all the way through the suspension and slip the wheels on (after drilling holes in the wheels).


The instructions above are decent and certainly better than many other manufacturer’s and no instructions at all (no instructions are common to too many resin kits), but too many parts of this MarS kit are not portrayed and it is unclear as to where the go exactly!
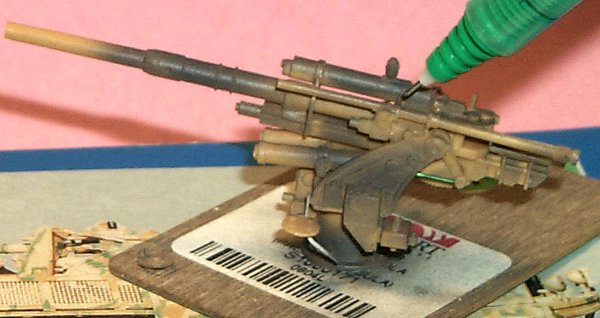
Above is a scan of the 88-mm Flak-36 assembly instructions. This is the same mount as on the towed version of the gun minus the cruciform stand. This gun is markedly superior to Hasegawa’s Flak 18 and Flak 36 kits in both detail and accuracy.
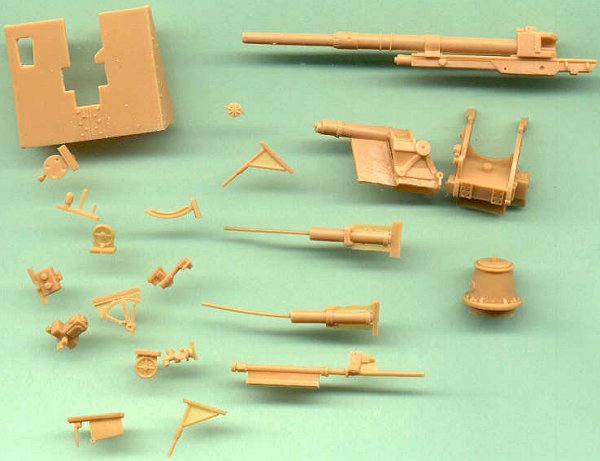
Above are representative gun parts (again this is not all the parts). Detail is superb. MarS is certainly a company to compare most other resin model companies against. The few long parts in the center of the scan that are a little warped can be straitened in very hot water and on a flat surface.
Some Construction Tips
Some of these construction tips apply to any plastic or resin model.
In these photos of the partially assembled kit I primed some areas with dark gray with the intention of scraping off the dunklegelb base coat in places to simulate more realistic chipping and wear. Unfortunately this method did not work well for me this time. The paint came off right down to the resin. The salt-technique would have been much better.
Painting, Markings & Weathering
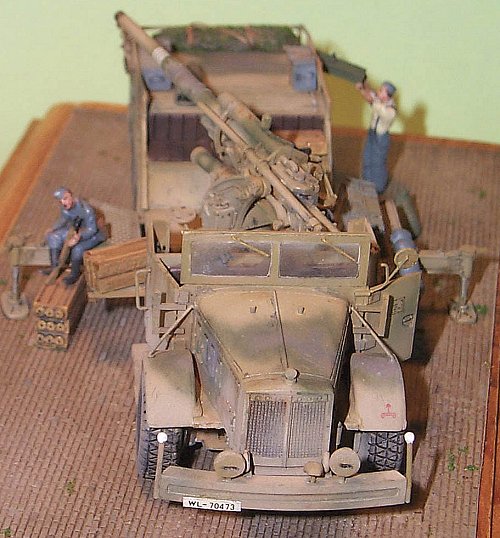
These vehicles were reported to have been built in 1944 so would have a dunkelgelb (dark yellow) base color, and possible a green and brown camouflage scheme applied in the field or at the factory. The Vomag versions were built prior to 1943 so should have initially a panzergrue (gray) color unless repainted in 1943 (I understand that not all rear area vehicles were repainted to the 1943 dark yellow standard.
While on the discussion of weathering and dust I have to interject an observation after reviewing over a hundred photos of WW2 era softskin windshields. I find it so common on softskin models to have bare "wedge or windshield-wiper shaped" clear areas on an otherwise filthy windshield glass. Yet, in the photos I found only about one or two out of 100 windshield that had these clean wiper-shaped marks, that’s only 2 to 3 %. Most windshields had clean windows, or were dusty with a clean circular area where it looks like the windshield had been wiped by a rag. I suspect this is because in the 1940’s they did not have windshield washer sprayers, and using the wiper on a dry dirty windshield is a good way to scratch it up.
Its pretty common to see these clean wedge (windshield-wiper) shaped areas on softskin models though, say 50% of models I have seen. In 2002, a truck model of mine was weathered with only a clear circle in the windshield, only to be faulted by a contest judge for having paint "overspray" on the windshield edges. Perhaps my technique was not as convincing as it should have been? On this MarS truck model I opted for the wedge-shaped windshield clear spots though now regret it with a feeling of caving-in to peer pressure.
Perhaps we as judges need to think "out of the box" more. I advocate that we not fault for adding these shaped areas and do not fault for leaving them off, only judge how well they are done. An art teacher of mine many years ago told me "Before you can paint, you first must learn to see." I believe this applies to modeling as well. Now I will get off my soapbox (an American term for preaching).

In the photo above of the right side cab area, note the misalignment of the bottom of the driver’s door with the center column; an fortunate assembly error on my part! The figures and infantry accessories are from Preiser. Though the kit comes with a nice gun shield, the earlier produced Vomag trucks did not have the shield and as the vehicle was designed as a rear area Flak unit, I left my shield off as well.
In the front end photo above, note the black wash to the tire tread to add depth, the infamous clear windshield-wiper shaped areas on the glass.
Conclusions
This was a great model of a unique and interesting vehicle that I highly recommend. It is very complex and has an imposing number of parts so it is perhaps better for an intermediate or advanced level modeler. Instructions could be better and several (not all) mistakes I made I can attribute to unclear instructions. I cannot say too often to dry fit as often as possible before gluing.
References
Good reference photos I could not find for this Büssing Nag truck. Except information with the MarS instruction sheet a number of photos and some information was found for the similar Vomag Flak truck only.
| Back to MarS Kits | Back to Home Page |
| Back to Kit Reviews |