|
HISTORY
The iconic American tank of World War II, the M4 Sherman was a successful but not particularly innovative or powerful design. Best known for its mechanical reliability
and ease of operation, it was a solid, incremental improvement over the M3 Lee/Grant series tanks it replaced. Designed in 1940, the Sherman still compared favorably
with most of its German rivals when first deployed in 1942, but the tank was to become badly outclassed as more advanced types entered the battlefield. Nicknamed
Ronsons (after the cigarette lighter) for their tendency to burn after a single hit, the medium Shermans were distinctly inferior to the heavier German Panthers
and Tigers they faced in Europe after 1944. Nevertheless, Allied forces built around the Sherman eventually overwhelmed the panzers with a combination of carefully
planned tactics, air support, and most of all by sheer numbers; while total Panther/Tiger production amounted to about 2,100 units, the Sherman reached a total
production of over 50,000 vehicles. Obsolescent by the beginning of the Korean War in 1950, later models of the tank saw service with the U.S. Army in that conflict
as well.
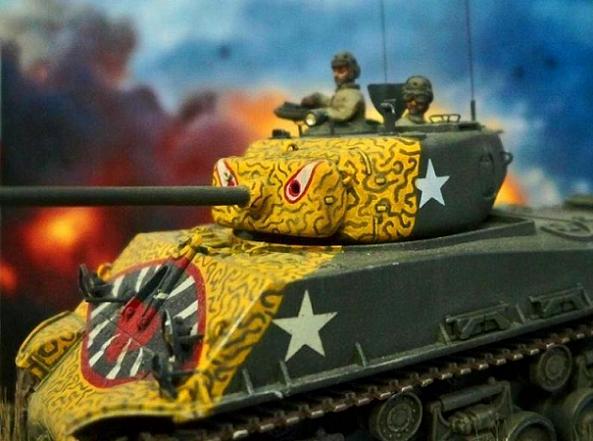
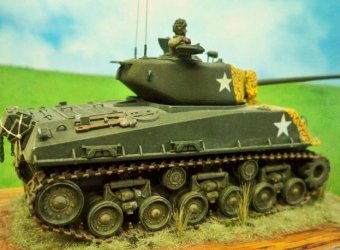
The tank depicted here is one of the well-known "tiger face painted machines of the 89th Tank Battalion, U.S. 2nd Infantry Division, Korea, during Operation Ripper
in 1951. Ripper was a massive United Nations offensive launched on March 6, 1951 intended to destroy the Communist Chinese and North Korean armies around Seoul,
Hongchon, and Chunchon. It followed up on Operation Killer, which had pushed Communist forces north of the Han River, and sought to bring UN troops up to the 38th
parallel. The offensive opened with the largest artillery bombardment of the Korean War. U.S. forces crossed the Han and, along with South Korean units, advanced
quickly to liberate Seoul just over a week later and with Hongchon and Chunchon falling soon thereafter. Although again outclassed, this time by Communist T-34
(85mm) tanks, the 76mm gun armed Shermans performed well. By the time Operation Ripper concluded on April 4, UN forces had succeeded in taking all of their main
geographic objectives, although most of the Chinese and Korean forces had escaped to fight another day.
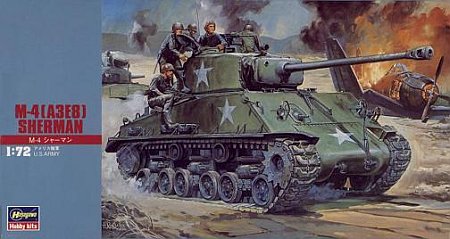
THE KIT
Hasegawa's 1/72nd scale Sherman was one of their earlier releases, dating back at least to the early 1970s (when I built my first one). It is an inexpensive, easy to
assemble kit with good detail and sharp moldings, although its single piece rubber band style tracks and mediocre crew figures are definite weaknesses. The model
represents a M4A3E8 (Easy Eight) Sherman with the Ford GAA V-8 gasoline engine, welded hull, with widetrack Horizontal Volute Spring Suspension (HVSS) and fitted
with the 76mm M1 gun in an early T23 turret. Until Trumpeter's M4A3E8 release in 2007, it was the only Sherman of this variant available in 1/72 scale.
The problem is, its not really 1/72 scale. To start with, the turret is a little big, scaling out to 1/71. The hull is about a millimeter too wide, also scaling to
about 1/71. This doesnt sound like much, but the Hasegawa designers, apparently noticing the discrepancy, narrowed the horizontal upper side fenders to try to
compensate for the too wide hull, so while the overall width is approximately correct, the hull is still too wide and the fenders are noticeably too slender. The
overall length of the hull is off as well, being about 1/68 scale. The running gear come in at approximately 1/70, making the model stand about a scale foot too high.
These scale issues, because they also involve proportion problems, are basically unfixable... but if you can live with the inaccuracies, the completed model does look
like a Sherman!
CONSTRUCTION
Construction of Hasegawas little M4 is conventional, starting with the lower hull and bogey wheel assemblies followed by the upper hull and turret. Despite the scale
issues, everything fits together nicely. Parts are sharply cast and well-appointed with mostly accurate details. The .50 cal machine gun for the turret is quite nice
(although I ended up not using it), and the delicately cast vent screen on the engine deck is a thing of beauty. There are simplifications such as the exhaust pipes,
pioneer tools, and lifting points molded directly to the hull and turret parts, but the overall effect is good.
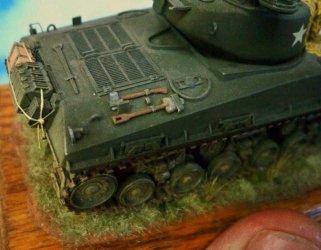
I decided to make some improvements, but first the old stuff had to be cleared away. The exhaust pipes were left unchanged due to their inconspicuous location, but
those molded tools on the hull just had to go. I also scraped away the solid-molded lifting points on the hull as well as the inaccurate little nubs for mounting the
headlights. The tow mounts on the final drive housing (kit part No. 16) were cut away too. On the turret, I removed the solid-molded lifting rings as well as the
oversized mounting points for the .50 cal machine gun and the spotlight.
Replacements for these poorly done details were mostly scratchbuilt. Starting with the hull, I made new lifting points from bent wire and stuck them into small holes
I had drilled into the deck to accept them. Tiny dabs of Squadron Green Putty applied to the joins represent attachment welds. Similarly, lift handles were added to the
engine deck doors using smaller diameter wire. The shovel and axe on the right side of the rear hull came from an ESCI 1/72 scale M4A1 Sherman kit, as did the track
tensioning wrench on the upper rear of the engine deck and the forward hull mounted tow points. That excellent kit also contributed the headlights, which were improved
by boring out the plastic faces and inserting MV Products glass lenses. I discarded the kit tail lights in favor of new ones made from plastic rod. Guards for the hull
lights and tool mounting clasps were fabricated from lead foil taken from an old wine bottle cut into thin strips and bent to shape. This real metal material is a great
way to simulate scale sheet metal components, but I had to make sure to paint them carefully so that none of the bare metal remained exposed to the air. This is
important since the alloy used for wine lead can oxidize over time, making the parts look like some sort of weird metal cauliflower... not very realistic!
The small stowage rack on the rear of the model mounts to the deck with thick tabs which are supposed to fill the large unrealistic notches cut into in the armored
hull to accommodate them. It doesnt look quite right, but I left them alone and mounted the kit rack as designed. The rack itself is a little chunky, so I thinned
it and replaced the solid sides with open supports made from strip plastic. As for stowage, the kit provided none except a completely unconvincing rolled tarp
intended to be mounted on the engine deck, so I had to look elsewhere. I tossed the tarp and added four jerry cans from Hasegawas 1/72 Field Camp Equipment Set.
These U.S. style cans are well executed, but I improved them by replacing the solid plastic handles with wire. The K-ration box was made from a 1/35 scale Verlinden
paper part reduced in a photocopier to 1/72 and wrapped with lead foil straps. The stowage was completed with an old Fujimi 1/76 ammo box, a length of model railroad
chain and some beige sewing thread rope to secure the items in place.
Moving on to the turret, I replaced the lifting rings on the turret sides and top with bent wire and added one on each side of the gun mantlet as well. As with the hull,
they went into small holes drilled to accept them, the joins dressed up with green putty welds. I also added a pistol port to the left side of the turret. I dont know
if some turrets were manufactured without them, but the Hasegawa turret didnt have a pistol port at all. I made the little door from a square of scrap plastic with
the sides beveled. This was then framed with a fairing of Squadron putty. The kit spotlight was replaced with one from the ESCI Sherman with an MV Products glass
lens and mounted with a bent wire. The .50 cal machine gun and its pedestal mount were improved with plastic rod, sheet, and wire detailsalthough I later removed
the gun when I added the crew figures, leaving only the pedestal. The storage rack for the machine gun on the turret bustle was scratchbuilt from plastic sheet. The
turret hatches were enhanced with small diameter wire handles, and the same material was used to fabricate the periscope guards. Wire was also employed for the
antennas, with the aerial spring bases simulated with wire shaped around a pin. Other turret details included plastic mounting strips for the gun mantlet canvas
cover and a tiny emergency gunsight made from wine-lead sheet.
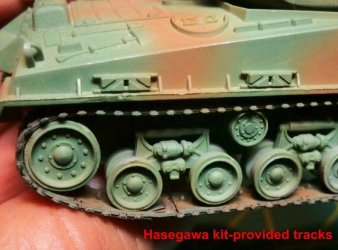
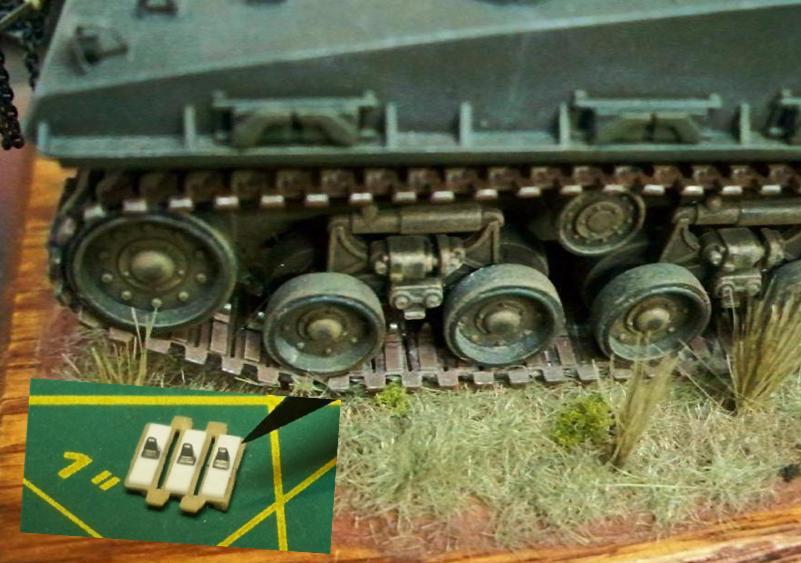
The most significant change I made to the model was to improve the tracks. The parts provided by Hasegawa are those one piece soft
plastic lengths typical of 1970s-era tank kits. Impervious to polystyrene plastic cement, these things have to be assembled by fitting tabs on one end through holes
on the other, then melting the protruding tips to secure them. Then they must be stretched over the completed sprockets and road wheels like rubber bands. I dont
know why this approach was so popular with manufacturers; I remember the frustration as a kid of ruining tracks when I couldnt properly control the melting, or
breaking them under the tension of fitting them around the wheelsand then not being able to repair them because the tabs had snapped off! Even if they survive the
assembly process, the soft material used is not very convincing; these elastic tracks don't bend realistically at the hinges between links, and they tend to bow in
the center where they wrap around the sprockets. Flexible rubber just doesnt look like steel link!

The soft kit track parts are apparently intended to represent the Horizontal Volute Spring Suspension (HVSS) T-80 all steel, double-pin
type tracks, but they bear only a passing resemblance to the real things. While detail on the outside of the kit parts is reasonable, the inner surfaces are completely
smooth except for the guide teeth. They are also a bit too thin for the larger than 1/72 model. Since I couldnt figure out a way to make these look right, I hoped to
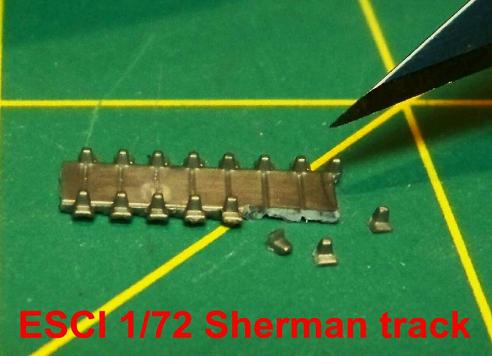
replace them with the excellent hard plastic tracks from the ESCI M4A1 kit I had been raiding for parts. Unfortunately, this was not possible as the ESCI Sherman tracks
were wrong type. The T48 rubber chevron tracks for the Vertical Volute Spring Suspension (VVSS) in the ESCI kit had double sets of guide teeth framing a central wheel,
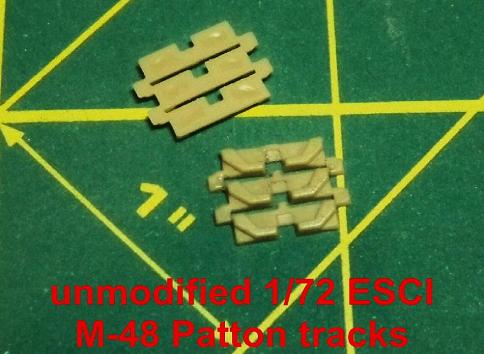
but I needed tracks for the HVSS type, which had a single row of guide teeth sandwiched between paired bogey wheels. Searching through my stash, I found an ESCI M-48
Patton kit with T97E2 tracks that I thought could be adapted to resemble Sherman T-84 rubber chevron units. These were of course a bit too wide for the smaller Sherman
and they had no detail on the insides, but the link and length tracks were nicely detailed on the outer surfacesand they were made of hard plastic! To make the Patton
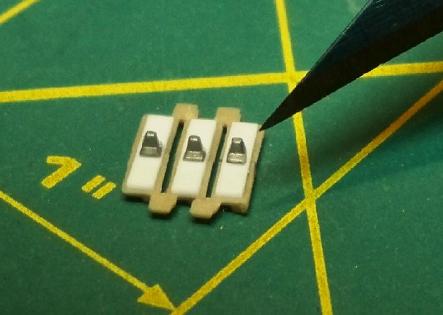
tracks resemble the Sherman T-84s, I cut them lengthwise down the middle and removed the center section to narrow them. Cementing the halves back together, I added
small.010 X .060 inch plastic strips across the inside surface to simulate individual links. Finally, individual guide teeth cut from the ESCI Sherman tracks were added
to the centers of the strips. The resulting tracks are a little overscale for 1/72, but since the tank itself is also oversized, they look about right.
I used the Patton tracks to improve the spare track links mounted on the hull sides too. The spares are nicely done, but for some reason
Hasegawa chose to depict the rubber chevrons on them as depressions in the links. This is completely wrong, so I added rubber chevrons shaved from Patton parts to correct
them. It also makes them match up better with the new tracks.
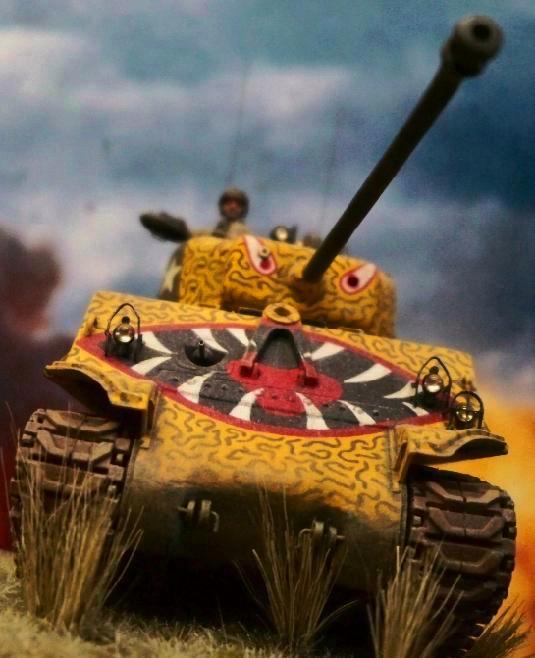
COLORS AND MARKINGS
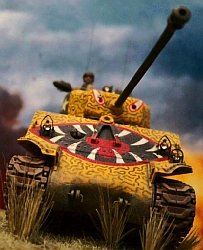
I built this tank to represent one of the famous tiger face Shermans of Company C, 89th Tank Battalion, U.S. 2nd Infantry Division near the Han River, Korea during
Operation Ripper in March, 1951. According to Zaloga and Balins Tank Warfare in Korea 1950-53,
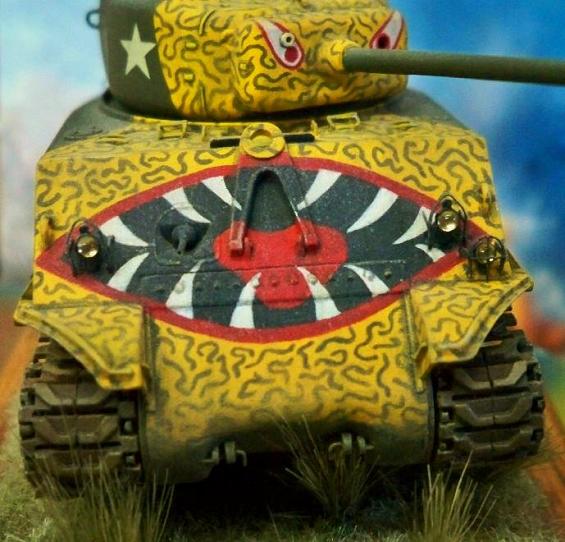
This was one of the first examples of the tiger faces and was designed by Lt. Fred Wilkins and painted by Sgt. Joe McCoy. The scheme included a basic yellow background
with small squiggles in olive drab or black. The yellow extended a short way back on the turret (about 18-24 inches) and about 18 inches on the hull sides.
The outlandish paint schemes seen on many vehicles participating in Operation Ripper were apparently intended to both spook the supposedly superstitious Chinese and
Koreans and boost the morale of their own crews. The idea may have been to take advantage of Chinese astrology, 1950-51 being a Metal Tiger year. If so, they got it
wrong; 1951 was indeed a Metal Tiger year, but Chinese astrology is based upon the lunar year which ran from February 17, 1950 through February 5, 1951. By the time
Operation Ripper was launched on March 6 the lunar year had moved onto the Year of the Rabbit! Of course they could have adjusted the schemes, but somehow
rabbit-painted tanks just wouldnt have been quite as intimidating...
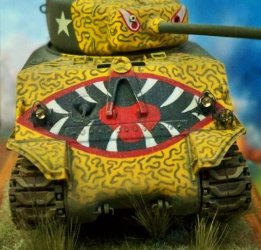
Applying the dramatic tiger face was not as difficult as it may appear. There are aftermarket decal sheets available to accomplish this and other Korean War tigers,
but applying decals over large surfaces tends to cause no end of problems (at least for me). Besides, the simpler schemes such as this really arent that hard to paint
freehand. So, as with the original, this tiger face was hand painted. Theres no trick to it, just work slowly with well thinned paints. Following a base coat of Model
Master Olive Drab (FS34087) and applying the kit decal stars, I airbrushed a coat of flat yellow over the fronts of the hull and turret. Next, the black mouth was
applied by brush, followed by the white eyes and teeth, then the red tongue, mouth, and eye outlines. Olive drab squiggles applied with a fine brush over the remaining
yellow completed the scheme.
Weathering was minimal since the tiger faces were painted immediately before Ripper, and photos of these tanks at the time show fairly clean vehicles with just a light
covering of road grime and dust. I contented myself with a thin dark gray wash and some tan paint dust.
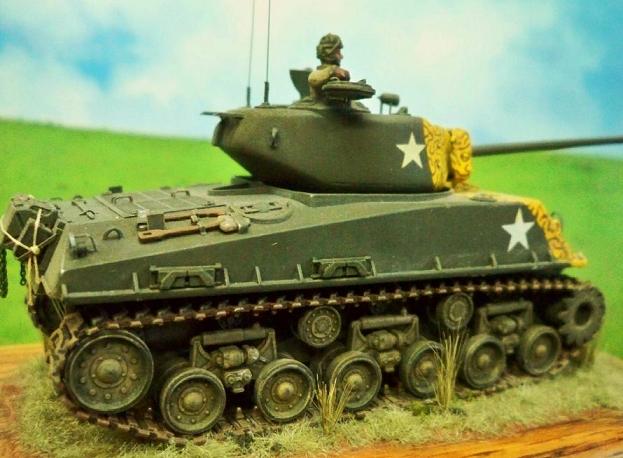
FINAL CONSTRUCTION
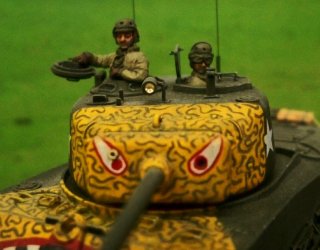
The kit supplied crew figures were crudely done, so I tossed them and initially completed the tank with the hatches buttoned up. I later picked up a set of Milicast's
resin "American AFV Crew in Casual Poses #2" whose World War Two-era uniforms also work well for Korea. Labeled as 1/76th scale, the figures measure 25mm high, making
them about 5 feet 11 inches tall in 1/72nd scale... or 5 feet 10 inches in 1/71, or 5 feet 9 inches in 1/70, depending on how you scale the vehicle! The excellent but
slightly exaggerated sculpting of these tankers suits them well to this overscale Sherman, so I opened up the turret hatches and dropped them in.
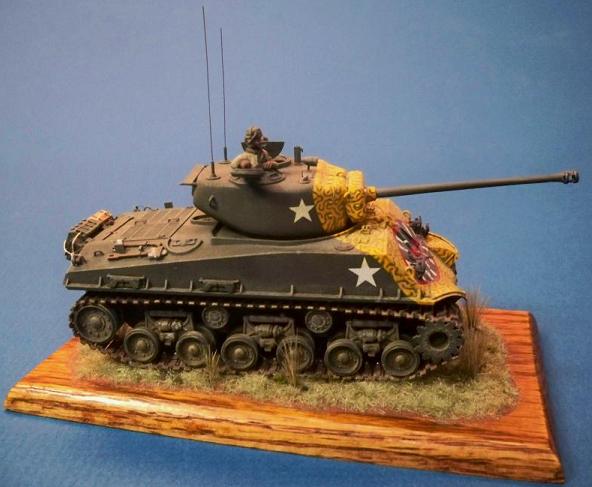
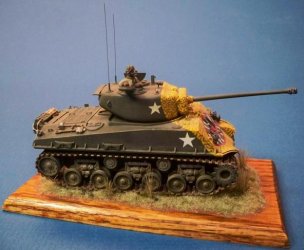
The weird scaling of this model makes it look odd next to my other, more accurate, 1/72 Shermans, so to make the difference less conspicuous I put it on its own base.
The wood is a decorative oak wall light switchplate which (to the dismay of my wife) I liberated from its former use and covered with Das Pronto modeling clay.
Woodland Scenics model railroad static grass and weeds, along with a bit of sand and few small pebbles, complete the groundwork.
CONCLUSIONS
Hasegawa's 1/72 Sherman is a well detailed, inexpensive, and readily available kit, but it suffers from scale/proportion issues and poor tracks. The only M4A3E8
Sherman available in the scale when I built this one way back in the early 1990s, it has since been eclipsed by more accurate M4A3E8 releases by Trumpeter, Dragon,
and UM (Unimodel). Any of these would be a better starting point today for a late model M4. Still, if you aren't too hung up on accuracy and are willing to do some
extra work, Hasegawa's venerable kit can be built into a good looking little Sherman.
REFERENCES
[1] Sherman - History of the American Medium Tank, R.P. Hunnicutt, Presidio Press, Novato, CA, 1978.
[2] Armour of the Korean War 1950-53, Simon Dunstan, Osprey Vanguard No. 27, London, 1982.
[3] Tank Warfare in Korea 1950-53, Steven J. Zaloga and George Balin, Concord Publications, Hong Kong, 1994.
Review sample purchased by the author.


|