 |
Crusader Mk.III | |||
| Kit #07228 | Review by: Michael Johnson- madmike(at)iinet(dot)net(dot)au | |||
|
Crusader Mk.III | |||
| Kit #07228 | Review by: Michael Johnson- madmike(at)iinet(dot)net(dot)au | |||
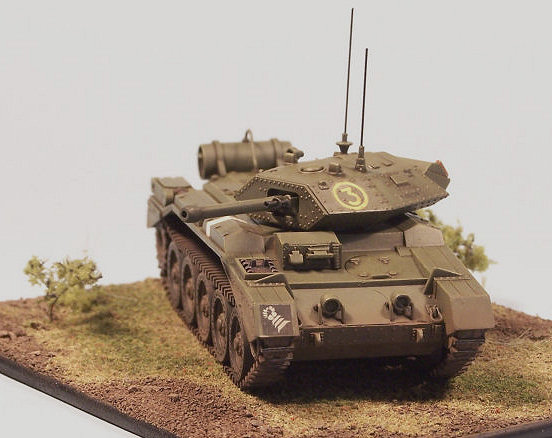 |
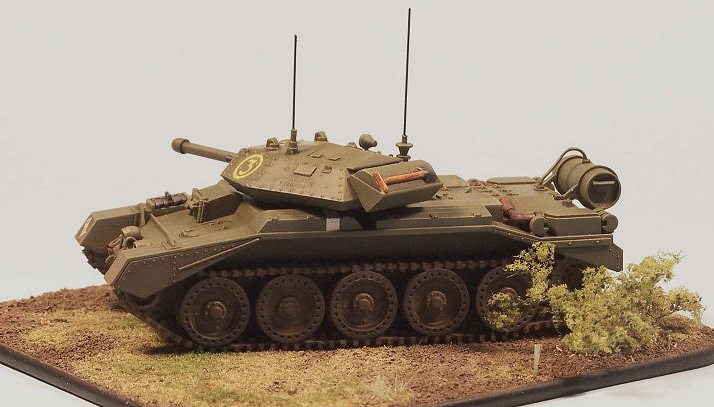
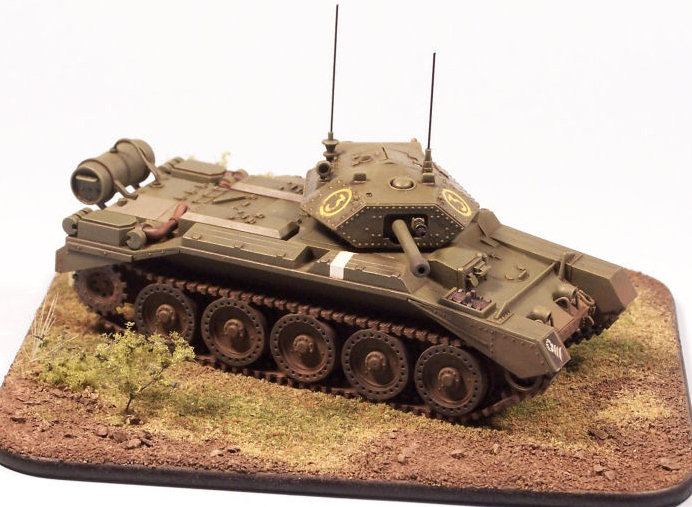
| The Kit Comes in a typical top opening box containing several sprues in light grey plastic, along with Hasegawa’s standard soft vinyl track. A small decal sheet provides the builder with two options, however the desert based vehicle requires full length sand skirts which are not provided in the kit but could be scratch built without too much difficulty by those keen to do so. An easy to follow instruction sheet rounds out the kit contents. Due to the age of the kit, several parts require cleaning up, including mould part lines and injector pin marks. The glacis plate and the top of the turret also would require filling due to several sink marks. In actuality one shallow sink mark on the mantlet could not be filled easily without loosing raised rivet detail. After subsequent painting it can hardly be seen. Hasegawa released many 1:72 AFV kits during the 70’s and 80’s and this one has been reviewed as being one of the better ones.
Construction I normally start with the turret on my armour builds and this project was no exception. After filling of some parts due to sink marks, assembly of the turret proceeded quickly and without much issue. Some of the joins required some sanding and filling but overall everything went together very well. I did drill out the antenna base supports so to accept wire antennas and scribing along the base of the oversized spade on the top of the rear turret so that it appeared to be a separate item and not part of the turret armour. Hull assembly was smooth with no major issues except for minor parts clean up and that included the rear mounted external fuel tank which was not attached at this stage.
Painting and Decaling Now that construction was finished I could settle down to painting. I followed my normal painting procedure for armour and sprayed the turret, wheels, track assembly and the upper and lower chassis assemblies Tamiya spray can flat black. The synthetic lacquer lays down nice and smooth without obscuring surface detail and provides an excellent base for subsequent paint layers. As I was building a Crusader based in North Western Tunisia I needed to determine the correct paint colour. Based on information sourced from a helpful armour modeller and the internet, I settled on Humbrol 86, Light Olive. Vallejo Russian Uniform was a near perfect match, so I could at last make a start on the final paintwork. I glazed over the black with multiple thin coats until good colour density was achieved and then glazed lighter shades of the Light Olive (lightened with yellow) from the inside of each panel out until subtle changes in the finish began to emerge. A pin wash of oils was added, followed by dry brushing to pull out all the raised detail. Finally a very light dry brushing of Citadel Codex grey was applied to all edges, high points and bolts. The tracks were then dry brushed with Vallejo Chocolate Brown and washed with blended Dark Mud, Dry Mud and European dust MIG pigments. Track contact points and teeth were then treated with a dry brush of Humbrol polished steel to impart a worn metal look. Humbrol metalcote polished steel also took care of the other wear surfaces and sprocket gear. Hasegawa decals are normally rather thick and hard to apply and these were no exception. However I bedded them down onto a puddle of Future and then used Gunze Mr Mark Decal Softener once the future had cured. Several applications saw the decals snuggle down and conform to the surface they were applied to. Fantasy Workshop white decal for the stripes on the chassis sides, which settled perfectly with out issue. A couple of coats of thinned Pollyscale Clear flat sealed the decals and some selective pin washes blended the decals into any raised details. At this stage I took the opportunity to weather the lower chassis, behind the road wheels. This was achieved by various blends of MIG pigments, notably dark and light mud and European dust. These were applied in both dry and water based wash form. I carried the mud mixes around the front and rear of the chassis as well, to complete the bulk of the weathering.
Tracks and Running Gear Hasegawa’s vinyl tracks are hit and miss at the best of times and these were no exception. They are nicely detailed but proved to be tricky to install and in hindsight I should have cut them into two halves and attached them that way. The good thing was that they accepted CA glue readily enabling each track assembly to be cemented to the top and bottom of the road wheels. Once the tracks and external fuel tank were installed, I added wire antenna’s to the turret mounts and the Crusader was ready for final weathering which consisted of dry applications of Europe dust along the sides front and back of the chassis.
Overall Hasegawa’s Crusader is currently the only choice for the 1:72 Modeller, although Airfix do offer a 1:76 kit which, although old now, is still reckoned to be an accurate build. Regardless of the reported turret accuracy, it is a great build, that with only a little work builds up to a nice little model with minimal fuss and thus can be recommended. The only goof was mine, in that there should have been red/white/red stripes on the chassis not just white. Never mind.
|
| Back to Hasegawa Kit List | Back to Home Page |
| Article Last Updated: 13 March 2009 | Back to Construction Reviews |