
Stug. III Ausf. D
by Jim Matthiessen
I recently received a surprise while visiting a fellow small-scale armor modeler. He showed me a plastic injection molded StuG III Ausf. D. I have been buying and building small scale armor for many years, and had thought that I had seen every kit marketed by the major manufacturers, and yet here was one I did not even know existed. Now sold under the Fujimi name and marketed as 1/76 scale, the kit was originally part of the Nitto product line.
I like StuGs, and I had been casually looking for a source of an early StuG III. I had assumed that if I wanted one in my preferred scale of 1/72 that I was going to have to go with resin. While there is an assortment of late production StuG IIIs and IVs available in plastic, the major manufacturers have overlooked the early StuGs, or so I thought. What made this Fujimi kit even more enticing was the size. When lined it up with ESCI’s 1/72 StuG III, the Fujimi kit is actually wider. With some work could the kit be modified to a passable 1/72 scale? That settled it. I had to own one, even after a warning from an internet message board that the kit was inaccurate due to improper angles of the various armor plates.
The first thing one notices is the excellent box top artwork that depicts a StuG moving downhill past a burning building. The artwork is detailed and is very strikingly done. It takes up the entire boxtop. In fact the kit designation appears in small letters in an unobtrusive corner. It is a huge improvement over the older Fujimi box art with the pathetically small, artsy, low-light soft-focus pictures that appeared a few years back.
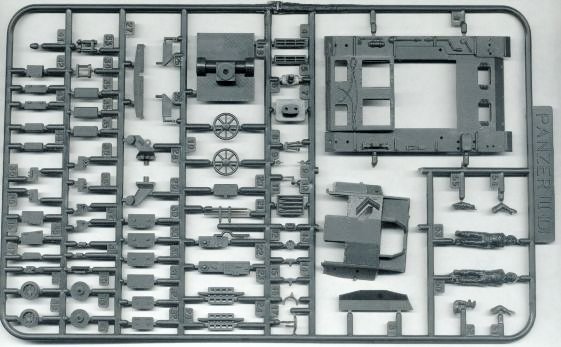 There are three trees of parts
finely molded in a dark gray plastic. Two trees comprise the
vehicle, and the third tree has hard plastic tracks along with a
second drive sprocket. More about the tracks in a bit. The kit
shares a common sprue with the Nitto Pz. III M/N kit because
turret side and skirt armor are molded on one of the trees. For a
kit that was engineered twenty-five years ago, the quality of the
molding is surprisingly good; very good, in fact. The detail is
very crisp and sharp.
There are three trees of parts
finely molded in a dark gray plastic. Two trees comprise the
vehicle, and the third tree has hard plastic tracks along with a
second drive sprocket. More about the tracks in a bit. The kit
shares a common sprue with the Nitto Pz. III M/N kit because
turret side and skirt armor are molded on one of the trees. For a
kit that was engineered twenty-five years ago, the quality of the
molding is surprisingly good; very good, in fact. The detail is
very crisp and sharp.
Superstructure panel lines are recessed, and there is a hint of weld seam marks in the appropriate locations. For comparison purposes I would say the kit is similar in quality to an average ESCI 1/72 kit. All of the hatches and engine access plates are molded as separate pieces and can be positioned opened. The hatches are molded rather thick and there is no detail on the hatch interiors. They will need to be sanded down, and some interior detail added if the hatches are to be positioned opened. The ventilation covers for the engine access plates are separate pieces molded with an undercut lip. They should look excellent once in place.
There is a small amount of interior detail provided; basically the floor of the fighting compartment and a detailed gun breach assembly and recoil mechanism. There is an attempt at transmission and engine detail, but it is rather simple and lacks detail. If the engine access plates are displayed open, a bulkhead between the engine and fighting compartment will have to be added as none is provided. The drive train detail comes at the expense of the hull bottom. The engine and transmission are molded as part of the bottom hull and wherever there is detail on the inside of the hull there is a very large negative impression in the bottom. No one would ever notice this on a completed kit unless it was turned upside down. The gaps are too large to fill, but they could be easily covered with sheet styrene stock.
 The kit captures the squat, complex
shape of the StuG III Ausf. D extremely well. I give it an
enthusiastic thumbs up, even in light of the faults.
The kit captures the squat, complex
shape of the StuG III Ausf. D extremely well. I give it an
enthusiastic thumbs up, even in light of the faults.
Even though there is a lot that is "right" about this kit, it does have its share of faults. If the list of problems seems long, keep in mind that most of them are minor or fairly easily corrected. A very nice looking StuG can be built straight out-of-the-box.
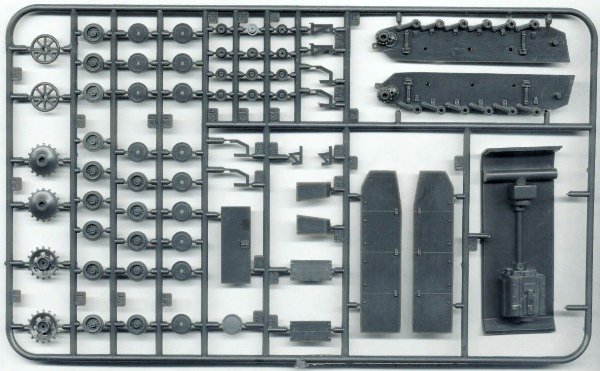
The running wheels should be replaced by ESCI units as the Fujimi molding do not exhibit good detail. What about the problems of scale by substituting 1/72 wheel units you ask? This will be addressed later in the review.
The front return rollers should be repositioned further forward. The position of the forward return roller is correct for an earlier StuG III, but not for the Ausf. D. The Pz. III Ausf. H chassis was used for the StuG III Ausf. D and had the front return roller moved forward to better accommodate the weight of the wider, heavier track used on that version. Filling the existing mounting holes and drilling new ones in the correct locations will easily fix this. The idler wheel is located too far forward and should be relocated about 1 ½ mm back. This may affect the ability of the hard plastic tracks to complete a full run around the suspension, but I don’t know for sure.
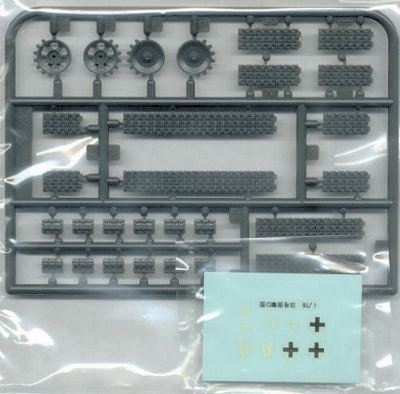 The hard tracks are a mixed
blessing. While they are preferable to vinyl tracks, the tread
pattern is frankly an awful representation of those of the Pz.
III series. The tracks are not molded with any gaps for the drive
sprocket teeth. Fujimi deals with this by supplying a second
drive sprocket that does not have any teeth molded on the arc
where the track would be in contact. With the exception of the
tread pattern already mentioned, the tracks are finely molded,
and even include double link sections that have been molded with
a curve to go around the drive sprocket and idler, a nice idea.
The center guide teeth are represented.
The hard tracks are a mixed
blessing. While they are preferable to vinyl tracks, the tread
pattern is frankly an awful representation of those of the Pz.
III series. The tracks are not molded with any gaps for the drive
sprocket teeth. Fujimi deals with this by supplying a second
drive sprocket that does not have any teeth molded on the arc
where the track would be in contact. With the exception of the
tread pattern already mentioned, the tracks are finely molded,
and even include double link sections that have been molded with
a curve to go around the drive sprocket and idler, a nice idea.
The center guide teeth are represented.
The main gun tube is too thin and looks more like a 37 mm cannon than the 75 mm howitzer it should be. The gun from an Airfix or Hasegawa Pz. IV F1 would make an acceptable replacement.
I was concerned about the superstructure. As mentioned earlier I had read an internet comment that the kit suffered from superstructure plates being at the wrong angles. I was pleasantly surprised to find that at first look there were no obvious errors. In fact, the superstructure matched up well with the plans I was using. A more thorough examination revealed that the middle of the superstructure is about one mm too high. The rear edge of the superstructure is the correct height. This causes the upper rear superstructure plates to slope downwards towards the rear of the vehicle at a slightly greater angle than they should. In addition, the gun side shields are too high in profile and should be sanded down a bit to lower their profile. So while the internet comment about incorrect plate angles was basically correct, in my opinion the errors are minor. It would take a well trained eye or a side-by-side comparison with scale plans to identify these problems.
The pioneer tools are molded onto the hull deck, but they are well cast and have good detail. There is a tow cable molded onto the rear deck, but any attempt to remove it will be hindered by the nearby access plate hinge detail.
The kit is marketed as 1/76 scale. So why is there a review of this kit in "On the Way!", a web site dedicated to 1/72 scale modeling? How does the kit really measure up? The following matrix shows kit dimensions, actual vehicle dimensions gleaned from reference sources, and the projected kit dimensions in both 1/76 and 1/72 scale. To arrive at the 1/76 projection, a conversion of 4 mm = 1 foot was used, which is standard 1/76 scale measurement. A steel 1/72 ruler was used for the 1/72 measurements.
| Kit Dimensions (Approx) | Actual Vehicle Dimensions | 1/76 Scale Projection | 1/72 Scale Projection | |
| Width | 42 mm | 9’ 7" | 10’ 6" | 9’ 11" |
| Length | 70 mm | 17’ 8" | 17’ 6" | 16’ 6" |
It is clear that there are some difficulties with the kit dimensions. The kit is too wide and too short according to both scale projections. In 1/76 it is close to being correct in length; in 1/72 it is close to correct in width. But overall dimensions do not portray the entire picture. With a kit like this determining scale is as much a matter of interpretation and art as it is science. The accuracy of scale drawings and reference material can have a major impact on any one person’s findings. When is a measurement within acceptable limits, and when is it not? While some modelers feel there is no room for any inaccuracy, I take the view that total accuracy is a goal that will never be achieved due to the limitations of the mold making art. The only question is what degree of accuracy a modeler is willing to accept.
In conclusion, when comparing the kit components to scale plans in both scales I felt that wheel diameter, suspension spacing, superstructure details, and other items matched up with 1/72 scale plans, not 1/76. For 1/72 scale, most of the length problem was aft of the superstructure. The rear deck does not extend over the rear hull as far as it should because the engine deck is too short. I plan on adding a spacer of about 8 scale inches just aft of the superstructure. While this will not totally correct the length problems, it will result in what I feel will be a very nice representation of a StuG III Ausf. D in 1/72 scale.
A special note of thanks to Frank Stewart for turning me on to this kit, and to Doug "On the Way!" Chaltry for allowing me to ramble on with this review. A special message for Doug: I do so build kits, I just don’t ever seem to finish any.
Drawings:
1. 1/76 drawing by H. L. Doyle enlarged to 1/72 scale. Bellona Military Vehicle Prints (out of print).
2. Sturmgeschutz III In Action, by Bruce Culver. Squadron Signal Publications.
3. PzKpfw. III In Action, by Bruce Culver. Squadron Signal Publications.
Reference:
1. Encyclopedia of German Tanks of World War Two, by Chamberlain and Doyle.
2. German Tanks of World War Two, by George Forty.
| Back to Fujimi Kit List | Back to Home Page |