|
Disclaimer:
I wrote the original review some time ago. After having posted
the turret shape error update, some feedbacks led me to a further
update with new photos.
The kit
looks good, with three grey mouldings (A and B for the hull parts,
C for the turret), the two hull halves and yellow DS flexible tracks.
The
Dragon Churchill Mark IV is proposed with the 6pdr gun, with the option
between two barrels. This mark had the same hull as the Mk III and
was used in Mediterranean Theatre of Operation and in North West Europe,
where it was also up-gunned with the 75mm. Although the Mk VII is
often referred to as the Churchill tank of the Normandy campaign,
on the base of sources consulted the bulk of the Churchill tanks in
that campaign were Mk III and Mk IV and only relatively few were the
Mk VI and the new Mk VII (get a look here).
The Mk VI was a Mk IV with a 75 mm gun and the differences between
an upgunned Mk IV are quite few from a 1/72 modeler point of view
(the rear louvers were 8 inches/203,2 mm wide and the rear plate protruded
a bit from the sides, the telephone box was installed on its left
side). 200 Mk VI were produced while of the Mk IV 1622 were produced
(and a lot of them were up gunned). An all round vision cupola was
introduced with the Mk VII and became available as a retrofit to the
former versions, so only the census (or “T”) number is
the sure way to distinguish them if the rear plate is not visible.
(For the list get a look here.
Anyway, one will notice that the Mk VI batches count less than 200
vehicles.) This obviously means that the conversion job is very easy.
The kit
general dimensions look correct from the sources used. The major problem
immediately found lies with the engine deck. However, after having
finished the assembly I felt that there was something in the general
look that left me unsatisfied without understanding exactly why... |
Finally
I could confirm my doubts just after having begun working on a third
kit to make a Mk V using other drawings for a new comparing and measuring
job. Although at first glance it looked right to me, now I could see
that the turret didn’t match the plan in the rear shape.
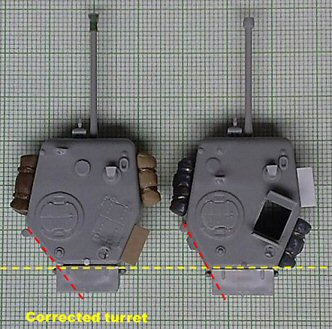
The
rear left plate angle is too big; this would make the left rear plate
a couple of millimetres too large. Additionally, to maintain the right
width, the whole turret rear was stretched. In other words the turret
rear is too long and this results in the rear plate shifting to the
left (see left : original turret and corrected for comparison). The
Churchill tank had an asymmetrical turret and this make the problem
not immediately visible; furthermore the older drawings I used weren’t
as precise as the later ones. I don’t care about a millimetre
discrepancy but an error which changes the shape of the turret goes
out of my tolerance range.
The
correction itself is quite easy to do and I applied it also to the
two kits I’ve already made (the ones visible in the original
article photos), so I can confirm that it is also possible to correct
an already assembled turret. |
 |
| Some
minor problems required a bit of basic workings. Here is what I did: |
|
Hull
-
The exhaust system is largely wrong. I carefully removed the two
longitudinal piping and new ones were made with rounded plastic
rod and covered with thin strips glued to form an inverted "U"
rod, following the photos of the engine deck.
-
The transverse piping was removed from the inside to save the cover
and made new with rounded plastic rod.
-
The mud dischargers are both wrong and simplified:
1. The external part of the device was made with a "L"
rod that had the vertical blade facing the outside and not the inside
of the hull. New ones were made with shaped plastic strips, glued
to the existing ones.
2. In the mud discharging holes, the tracks are visible, lying on
their rails. These were made with 1mm plastic strips glued to "L"
and were supported by their thin sloped plastic rods.
- Minor
details added were the holdings on the rear mudguards that secured
the items stowed, like jerrycans.
-
An easy modification was made by removing the front mudguards (a
common occurrence). On the horns, the track tensioners need to be
made from scratch. I used 0.5mm plastic strip, rods and four resin
hexagonal bolt heads.
- I
don’t know if the moulded on smoke dischargers' position is
really wrong. Anyway, in the photos I’ve seen showing them,
they are nearer the towing hook so I chose to replace them. After
having cut them off, I made new ones, with 1.0 x 1.0 mm and 1.50
x 0.50 mm strips 3.00mm long, in the new position. They are depicted
closed.
- The
conical bolt head forward on the right side air intake was at the
same height of the lower one nearer the escape hatch. I removed
and replaced it in the correct position.
|
_t.jpg)
 _t.jpg)
|
|
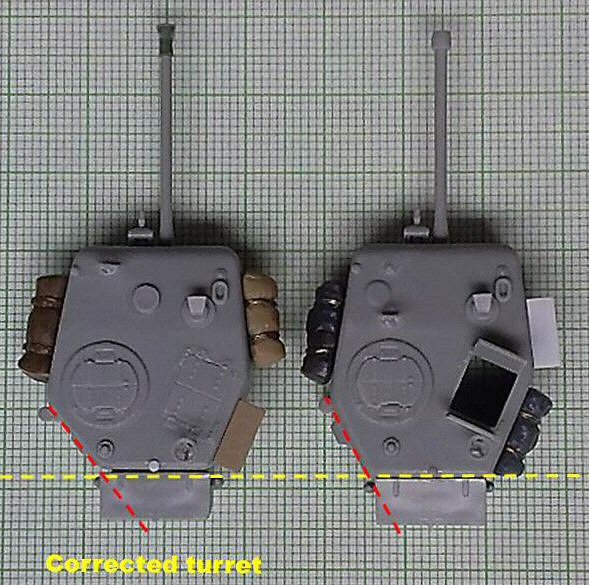
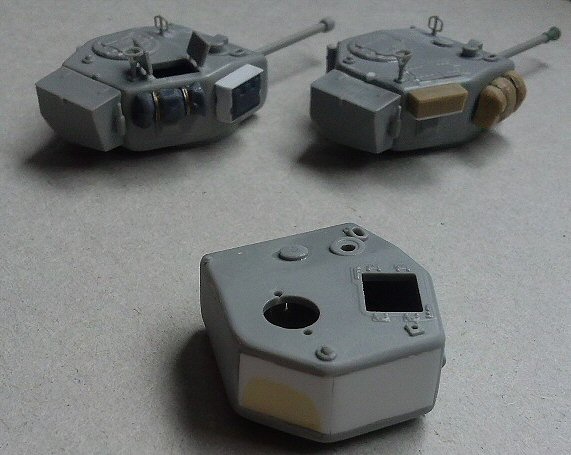
Turret
- First
of all, the correction of the body:
-
I removed the whole rear plate. This gave me the correct length
of the turret. I kept the hard edges to have better measuring
references.
-
I cut off the rear left plate keeping the roof and the floor portions.
The pistol port detail was carefully saved.
- The
lateral horizontal parts (roof and floor) were filed to reach
the rear plate width of 13.7 mm. This is easy; this equals the
bottom turret bin width.
-
The large holes were closed with shaped pieces of plastic using
a generous amount of cyanoacrylate glue. When dry I sanded everything
and rounded the edges. In the photo you see the modified turret
compared with an original turret.
-
I placed the pistol port and replaced the rear lifting point erased
in the first part with a short segment of stretched sprue.
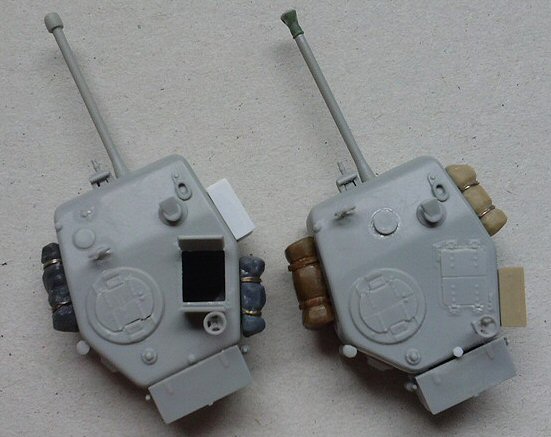
- The
kit turret layout is correct for a late production turret, only
the ventilator needs to be repositioned in a more central position
while the AA mount is missing (look here).
The only other missing detail I added is a little plate on the right
turret side, which is well visible here.
This closes an open thin ring that covers the turret base, due the
hull/turret interlocking system its addition is very difficult so
I choose to ignore it. The rear plate had a circular bolted plate.
Being hidden by the bin I chose to ignore it too. To make an earlier
turret layout the ventilator place is correct, while the rear overhang
bottom need to be reshaped. (Get a look here.)
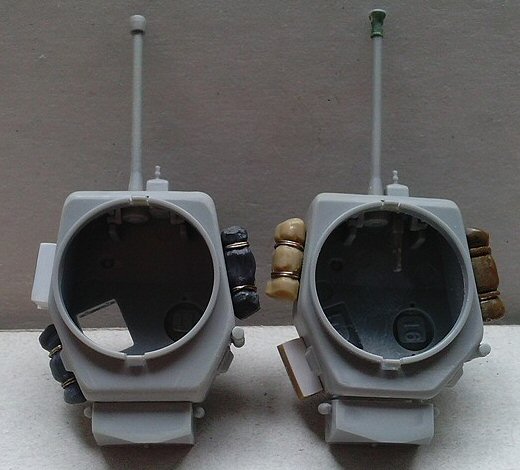
- The
cupola is wrong. It misses the periscopes placed between the hinges;
I made them with plastic rod shaped in place. The hatch wasn’t
rounded. It was like a square with two convex sides. I filled the
inner gap with plastic and cyanoacrylate glue and then I shaped
the new hole and hatch. The stoppers are shallow (also in the loader
hatch) so I made new ones with stretched sprue.
- The
bin was glued referring to the new exhaust piping system, a bit
higher than the former.
- One
of my two Mk IVs was up-gunned with a 75mm gun. A muzzle brake was
scratch built with plastic.
- An
optional aiming blade position (nearer the cupola), was adopted
on the other.
|
|
|
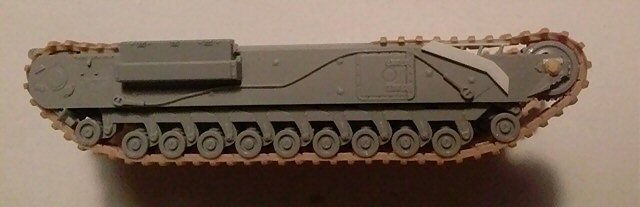
Wheels
and tracks
•
The wheels are well done, but the sprue attachments need to be carefully
cleaned.
• The sprockets are very good. However after some tests, I preferred
to remove the teeth
were the tracks lies over them.
• The tracks were glued to have a better look into the mud discharger.
Being the upper links enclosed in the hull (if the catwalks are not
removed) I cut off the hidden sections of track to have some spare links.
|
|
Painting
Dragon
suggests a dark greenish camouflage colour. The olive green S.C.C.
15 was used in the factories from April 1944 and I agree with those
who don't think that the already equipped units repainted their vehicles
with the new colour. This resulted in the old and new colours being
used simultaneously within the same unit, depending upon the delivery
date or if the vehicle was sent to a workshop for important repairing.
The former colour (used alone or with disruptive black pattern) was
the brown S.C.C. 2. This is a brown with a khaki hint and I didn't
find a "straight from the bottle" colour for this shade
on the market. What I found on the net (for example on Britmodeller)
are some recipes to mix it at home:
•
Using Tamiya colours:
mix
No 1 : 5 pts XF68 + 4 pts XF3 + 1 pt XF1
mix No 2 : 5 pts XF68 + 4 pts XF2 + 1 pts XF1
•
Using Humbrol colours: 5 pts 98 + 4 pts 29
•
Using Revell colours: 6 pts 84 + 5 pts 86
However,
I started with a colour chip from my personal mix, compared this with
the two colour photo's (found in the former site and on Military
Modelling) of
SCC 2 painted vehicles to make the colour myself.
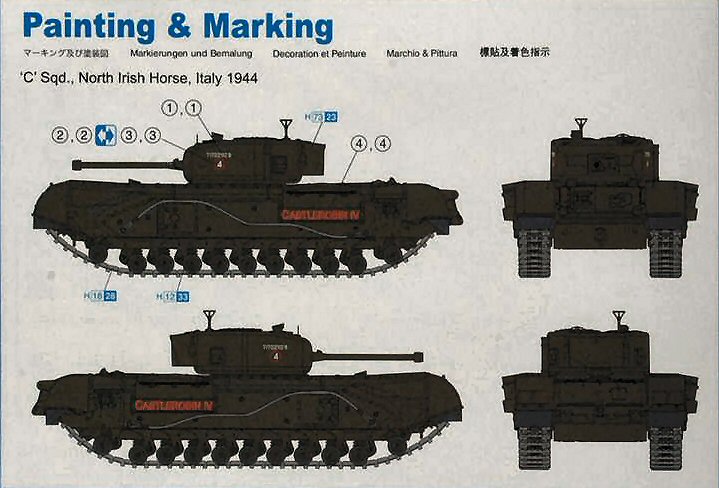
Decals
The decals
provided are incomplete depicting Castlerobin IV, a Mk IV NA with
heavy tracks from 25th Bde, North Irish Horse, (if used, the C Sqn
circle right colour is red, for the senior Regt). Not suitable for
a standard Mk IV like this.
|
 |
Conclusion
My first opinion has changed a bit now. I thought that the kit looked
good. After having discovered the turret error I was really disappointed.
What is strange is that this kit came thirty years after the old ESCI/Italeri
Mk III, it cost the double of that kit and it is made with a modern
technology. In such a case one could expect more attention by the
kitmakers.
Now my opinion reflects the experience, I still like it… just
because the turret error can be easily corrected.
From the corrected model we can obtain something different from the
out of the box, here some hints. The catwalks (track covers) sometimes
were removed (partially or completely). A close support Mk V can be
easily made changing the gun barrel with a scratch built one to make
the 95mm howitzer. Another easy conversion job is the adoption of
the hull appliqué armours visible on some reworked Churchill
tanks. Often spare track links were used to a best protection. The
Mk IV NA (with a Sherman M34 gun mount) can be easily made; anyway
Dragon has a dedicated kit in the catalogue.
Dragon makes also a Mk III, using the same hull and changing only
the turret moulding. This meaning that the correction described can
be used also for them.
Dragon also makes a Mk III, using the same hull with a new turret
moulding. This means that the corrections described above can also
be used for this version.
References
A really
good info source I used was the Tamiya photographic album no. 3. Highly
recommended!
The HMSO "Churchill Tank" book was also used.
A good
net source is here: http://www.armourinfocus.co.uk/a22/
|
.jpg)
.jpg)
.jpg)
.jpg)

.jpg)
.jpg)
.jpg)