Wirbelwind
Primary Manufacturer: Al.By (Kit No. CK01), plus many others.
By Dave Showell
As a small scale builder, of all the kits that ESCI put out during its prolific lifetime, the one that attracted me the most was its Flak Panzer IV Wirbelwind. It was exotic without being just a prototype and was used during the declining years of the Reich when desperation led to many innovative (if sometimes not very practical) vehicles. In itself, the Wirbelwind was quite successful, able to put up a wall of 20 mm shells for the protection of columns. Its thin turret armour offered at least some protection to the crew while it was able to keep up with other tanks over broken ground. There were never enough, of course, to combat the increasing allied air supremacy - a problem made worse by chaotic production channels in Germany.
The main problems of the ESCI kit, if you can find a copy of it now, are thickness of the turret sides and the 20 mm gun barrels. In this, ESCI was inhibited by the technology of injection moulding. Also, there are a few problems with the ESCI Panzer IV chassis. While you can thin down the sides of the turret, to me it always looks too chunky. The more recent Hasagawa kit of the Wirbel suffers from much the same problem (plastic thickness) and the "unsatisfying" rubber tracks. The actual quad 20 mm in the turret of the Has. kit is probably on par with the ESCI version, although I prefer the latter.
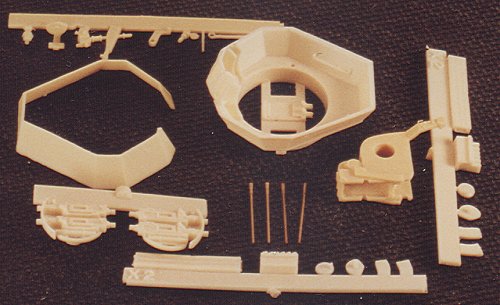
Having both the main stream kits, I was surprised to learn that Al-by of France had produced a Wirbelwind "Combi-kit." Combi-kits contain a full, injection moulded kit (usually by ESCI) plus a resin upgrade to create a new version. Currently they seem to have gone out of production as Al-by's supply of ESCI has run out. The WW Combi-kit consists of a full ESCI Panzer IV (in the original plastic bag and with hard track) and a baggy of resin and turned brass. Obviously it was Al-by's intention to fix the main shortcomings of the ESCI kit - the resin pieces seem to be based on the ESCI but improved. The turret walls, for example, are paper thin. The 20 mm guns are remoulds of the ESCI ones, but the gun barrels have been removed and holes provided for positioning the turned brass barrels (also provided in the Combi-kit). All the other ESCI WW parts are reproduced in resin, although some of them have also been thinned down.
While the Combi-kit offers a solution to most of the turret problems, the ESCI Panzer IV chassis is still not quite right. The Hasagawa kit is equally unsatisfying in my view (even without the crappy tracks). The answer? Well, fortunately Revell saved the day by issuing their excellent Panzer IV H just in time to meet my need. The Panzer IV H and J are truly masterpieces of small scale model engineering. The moulding is very detailed and the tracks are great. The only problem I considered was whether the Germans ever used the ausf H for Wirbelwinds. As far as I can tell, most Wirbelwinds were remanufactured from damaged tanks returned from the front. This is why in photos you will often (but not always) find zimmerit on the chassis but none on the turret. I know of at least one Wirblewind photo where there is no zimmerit on the hull. The H has no secondary muffler for the turret traverse engine (deleted after the G) and, at least later, all steel return rollers. (Ed.Note: the secondary muffler was only deleted on the Ausf.J.) Eventually I came to the conclusion that a Wirbelwind based on an H was possible and decided to proceed.
So with four kits in front of me, I set out to build one really good one. I started by assembling the hull and running gear. First, because with the Al-by/ESCI kit you can look through the turret to the floor of the tank, I felt I had to put something in. I kind of cheated by taking the interior of a Nitto 1/76 Panzer IV and sliding it into the larger Revell hull (the Nitto has the drive train going front to back and the patterned sub floor with cut-out for the revolving turret floor, absent of course in the Wirbelwind). It turned out later that it was highly unlikely that anyone could see the stuff inside, but hey, I know it's there.
Turning to the running gear, I became aware that later Panzer IV's had two different types of bogey wheel. One type has what seems to be a pressed steel hub with recesses where the bolts attach it to the suspension unit. The other has a flat ring around the outside of the hub through which the bolts attach (i.e. no recesses). Hasagawa has the former while Revell has the latter style. The photos I have of the Wirbelwind indicate that the Hasagawa ones were more likely to be found on that tank. I therefore used the Hasagawa bogeys on the Revell hull (the holes are a bit too big for the pegs but with some care it works out okay). I encountered no trouble lining up the Revell track with the Hasagawa bogeys. The Revell drive and return rollers are better moulded than the Hasagawa, and I think have to be used in order to fit the hard track properly. With the running gear complete, I then painted it (Humbrol 83 - Ochre) and weathered the track appropriately using a soft pencil. Later I went back and used a darker shade of yellowish brown (Humbrol 84 darkened with Humbrol Earth) around areas I would later highlight to give depth to the kit.
Next, I built the upper hull pretty much straight out of the box. I kept the hull hatches closed so I didn't have to worry about the interior driver or radio operator's position. I did have to fill the holes for the "schurzen" supports with contour putty, as well.
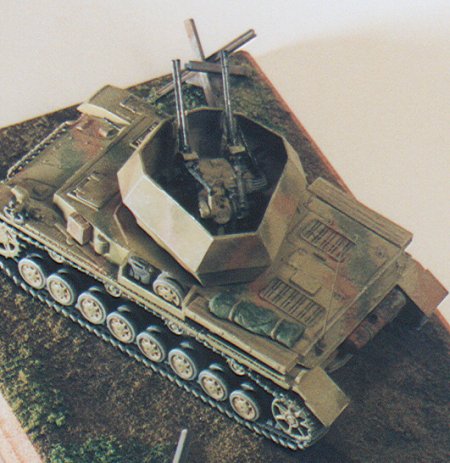
Moving on to the turret, I assembled the quad 20 mm. The one drawback to the gun is the rather crappy aiming reticule which was supplied with both the ESCI and Al-by kits. It is a flat, thick, solid disk. I thinned it down and hollowed it out but it still looks lousy. What it really needs is an etched brass aiming reticule. I've seen some of these somewhere (maybe on Sandman and Overlord's site) but haven't managed to get one. Care has to be taken lining up the turned brass barrels - if one is out of alignment it really shows up once you place the gun in the turret. The holes in the resin guns are not quite centred, so it can be a bit of a struggle to get them all straight. I then painted the gun (gun mounting Ochre, gun and barrels a dark "gun metal" colour. The magazines inserted into the sides of the gun I painted a semi-gloss black. I used a soft lead pencil again to indicate wear on exposed bits as a result of use.
So far, things had gone swimmingly. The turret itself, however, was a different story. One of the drawbacks to thinly moulded resin is that it warps. When I joined the top half of the turret to the bottom, the warping in the bottom half resulted in a deep "wow" on one side, where the bottom plate undercut the top plate. I only noticed the problem after having super glued the two parts together, so straightening the lower half under water was not an option. Actually, given that the thin resin would probably have lost its shape completely, I doubt if the "warm and straighten" approach would have been a good idea. Instead, I used contour putty to reduce the dented-in effect as much as possible. Held up to the light the "fix" is still noticeable but not blatant. The Al-by turret base is a little smaller than the Revell turret ring so a little care is required to ensure that it is centred properly. Before gluing the gun into the turret, I added some gear around the interior - a Sturmgewher 44 from the Fujimi infantry set and some personal gear from the Revell soft plastic German Artillery set (a very useful package for spare gear). Once again this is difficult to see once the gun is in place.
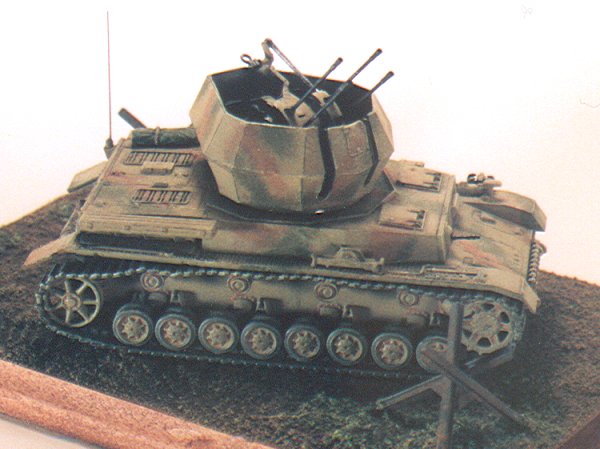
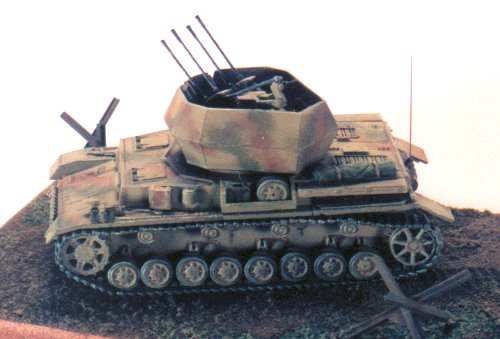
I painted the model with Humbrol 83 Ochre, then once gain used a darker shade around areas that I wanted to stand out. The green camouflage is Humbrol 159 olive drab (I think) lightly dry brushed on in a feathered pattern. The brown is Testors Brown also dry brushed on. For me, the key to German three colour camo is subtlety - you want it to blend in under a coat of dust, not stand out too much. I used a darker green and a darker brown to outline bolts and other protrusions on the hull. Finally, using a very light off white Humbrol paint (Humbrol 71 - could be canvas or buff?) I dry brushed a light covering of dust. This also tends to "touch" the very tops of bolts, handles, edges and other protrusions, highlighting them nicely.
My final steps were to: add a stretched sprue antenna to the rear, port side using the antenna mount from the Hasagawa kit; add one spare bogey and a jerry can to the storage rack on the port side; add a wire handle/crank to the jack; put a rolled tarp on the rear deck (Leva); and add the long rectangular spare barrel cases to both sides of the hull. The Al-by recasts of the latter have handles at each end, so you have to make certain that they are right side up. These barrel cases are kind of curious in their attachment. I have to assume they were welded horizontally above the air intakes to provide a little extra space to the back deck so that crew member passing ammo or someone with a rangefinder would have more room. There was no photo evidence of markings so I left the tank unmarked.
The base is a piece of "bass" wood from the local Michaels Craft store. I put on flocking to represent dirt and scattered grass, glued down the tank and added the anti-tank barriers from an ESCI accessories set. About two weeks later I took it down from a shelf and found, to my disgust, that the "bass" wood had warped up like a potato chip - it was really bad! So I removed the tank and tossed the base to the side, thinking I'd find another base later. A week later, I picked it up and found that the base had returned to its original shape - no warping at all! I haven't yet re-glued the tank, I'm waiting to see if it warps again at the next full moon.
So, in total, I used parts from five different kits: the Revell Panzer IV H, the Hasagawa Wirblewind, the ESCI Wirblewind (used a couple of parts from the old plastic version, like the ammo racks with spare magazines), the interior stuff from the Nitto Panzer IV, and the Resin kit from Al-by.
| Back to Kit Reviews | Back to Home Page |
| Back to Al.By Kit List |