|
CPL Overby's Motor Pool |
Panzerkampfwagen III Ausf. E |
|
Kit #MP001 |
Review by Rob Haelterman |
|
As far as I am aware, this is the only kit in this scale of this vehicle, and as early war Panzers are not that hot a topic these days, it might be some time before we get an injection molded kit to satisfy our “needs”. And an early war vehicle this really is, as the production stopped shortly after the outbreak of World War Two.
The
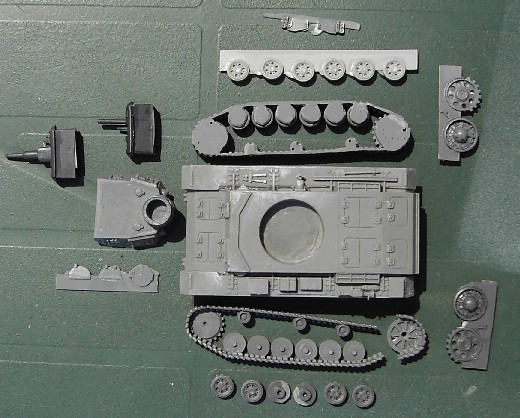
kit comes in a very sturdy cardboard box, in which the smaller parts
are packed in a small zipper bag. You get 27 pieces in total (or 28
if you count the round disk of resin, which is presumably to help
you position the turret and – if you so desire – allow
it to turn). There were no instructions in my example, but the kit
is simple enough to be assembled it without. Quality
of the casting is very good, with almost no bubbles, warping and minor
flash. Some pieces require some cutting, though, to get them from
their “carrots”. Crispness of the details is acceptable
to very good. The resin is quite soft and easy to work with. The
tracks are common parts with the StuG III
Ausf A kit from the same manufacturer and the complete running
gear consists of a preassembled part with the inner wheels and tracks
to which you have to add the outer road wheels, idler and drive sprocket.
These parts are based on the Esci kit, and
as such share the lack of staggering of the road-wheels between left
and right hand side. You might also notice on the pictures that the
first return roller is positioned for the later, 400mm wide tracks
(in use from the Pz.Kpfw. III Ausf. H onwards).
This is a consequence of the same molds being used for the various
Pz.Kpfw. III variants in the range. While the width of the
tracks does not really bother me, the first return roller can be easily
positioned more to the rear with some minor surgery on the track links.
I am also planning on removing the chevrons from the track pads, as
these only appeared with the Ausf M in 1943. I’d
like to add, that in reference [2] a picture can be found of an Ausf E in N.Africa with a repositioned
front return roller, so you can always depict the vehicle after upgrades. The
lack of detail on the inside of the tracks is a bit more difficult
to remedy. Out of the box, the inner parts of the wheels would attach
to the hull by their molding carrots. There is very little of the
suspension left on the hull sides. One might envisage scratch-building
the various axles and mounts, or hide this feature amidst the tall
grasses of the Polish plains. If you choose for the first option,
then you should also slightly modify the shock absorbers that are
present on the hull sides, as these are of the later type. The
hull is a solid block and compares very well to scale drawings, except
for the positioning (and shape of some) of the tools on the fenders
and the shape of the front tow shackles. You might also want to clean
op the area where the nose plate meets the side armor. All hatches
are molded closed, but you get a spare set of lateral escape hatches,
in case you would want to drill out the openings. Otherwise it would
always be a very welcome addition to the spares box, allowing you
to backdate other variants. On
the top of the hull you find a turret splash guard. Officially this
was only standard from the Ausf. F onwards, but is not impossible that it was available
as a retrofit. Then again, it is easier to sand of than to add yourself,
so it I not really a nuisance if you are aware of it. The
turret correctly captures the shape of the earlier models, and there
is not a lot to correct here. You might want to replace the left signals
port on the turret roof (which appeared with the Ausf.
F) with a signals “tower”, and some small details
(grab handles, etc). The nice thing is that you get a single casting
for the closed (two-piece) commander’s hatch, and two pieces
(with interior detail) if you want it to be in the open position.
In the latter case you would need to drill out the opening in the
copula or use a “half-figure” as the rest of the turret
is a solid piece. Surprisingly
you get two options for the gun and mantlet.
One for the regular gun tank and one for the Beobachtungswagen
that derived from this tank. I say, surprisingly, because the possibility
of building this variant is not mentioned in or on the kit. These
pieces are very nice, although the frontal flaps just need to be a
little more domed. As
already mentioned, the positioning of the tools is not conform my
references (Achtung Panzer) and you would need to add headlights, a
starter crank cover and smoke candle rack from the spares box According
to my references, the overall dimensions and proportions are accurate
with a tolerance of 1 mm. No
decals or are included. Overall,
given the retail price of this kit, it is great value for money and
it surely fills a gap for the early war years. My main criticism being
the lack of detail on the hull sides for the suspension and wheel-mounts,
which is quite visible and not that easy to correct. Apart from that
it will build into a very respectable model. PS:
the pictures show some parts after removal from the trees and/or cleaning
up. The broken track is my doing, in order to make it a bit more
easy to clean up the rear side. References: [1] Achtung Panzer #2 –
Panzerkampfwagen III, by DaiNipponKaiga [2] Sd.Kfz.252,253 & Early 250, Archive Part
1 (Volume 3), M. Kögel, Total Detail |
|
Back to CPL Overby's Motor Pool |
Back to Home Page |
|
Last updated: |
|