|
This brief historical excerpt from feldgrau.net:
"The Leichtes Sturmboot 39 was essentially a small, high-powered assault craft used for river and small waterway crossings and assaults. They were also employed on
security and anti-partisan patrols along river ways in occupied territories. Leichtes Sturmboot were very fast, able to achieve about 30mph with the use of an outboard
motor extended from the rear of the craft. They were without much protection or firepower though, aside from the possibility of an attached MG at the bow of the vessel
and the weapons of the men inside. Leichtes Sturmboot 39 were transported into battle by most German construction and assault engineer units and were used to
spearhead river and small waterway assaults, usually in conjunction with an attempt to form a bridgehead for the construction of a bridge. The craft could carry 6 men
or about a half-ton of weight. Hundreds of Leichtes Sturmboot 39 were built and used during WWII".
A preview of the kit along with instruction photos can be seen here on OTW.
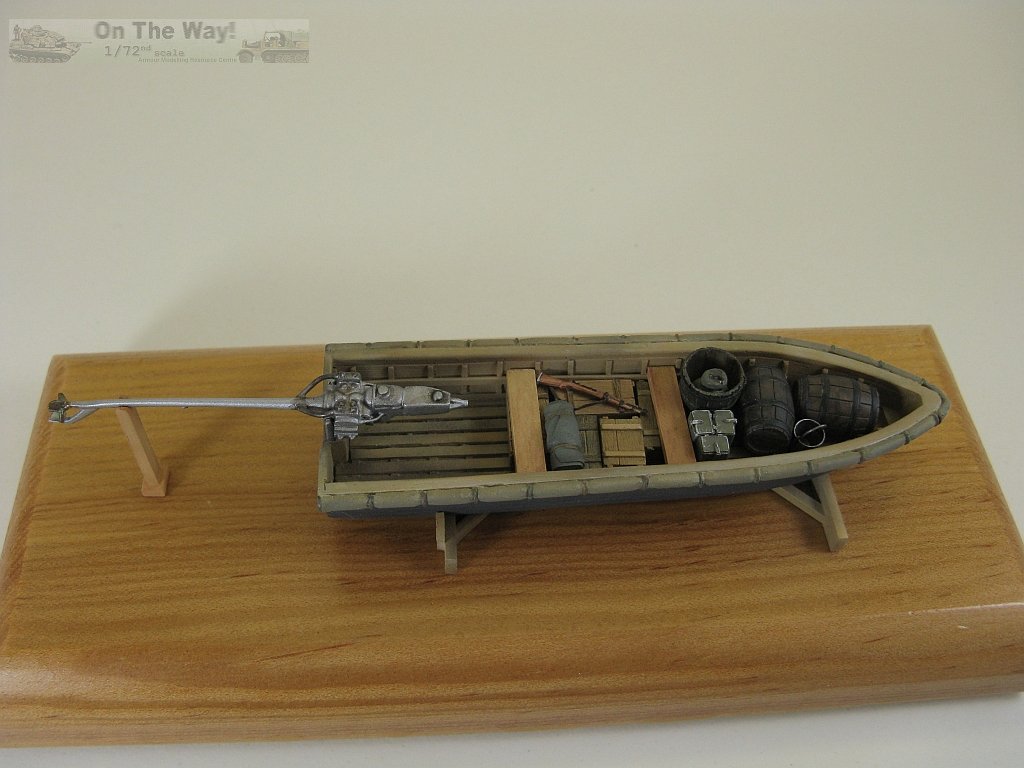
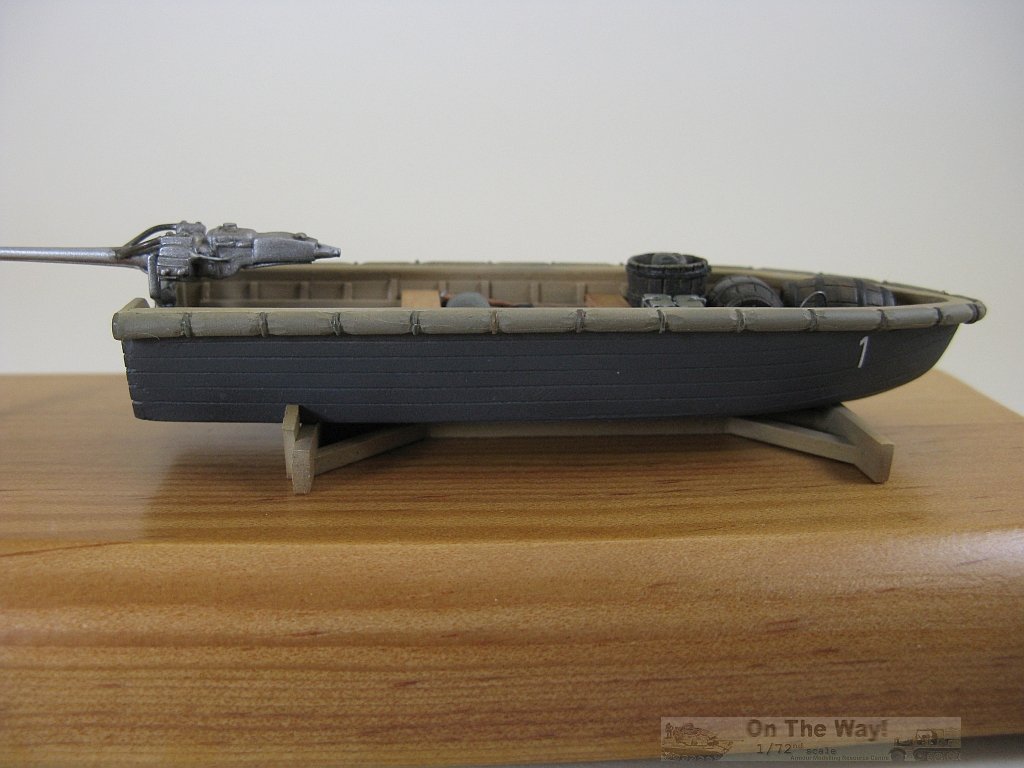
With a mere four parts to the boat, construction is rather straight forward.
Fit between the hull and transom was dodgy requiring much sanding, trimming and
test fitting to get the parts to join without too much of a seam. Also, the transom plate was not to my liking, exhibiting a few sink marks. Practically
all period photos I found lacked transom bumpers, so I decided to remove the bumpers and sand the transom
flat. This also required removal of the bumpers that ran past the end of the gunwales. Plank lines were re-scribed and some scratchings with a hobby knife replicated wood grain.
The floor boards are nice although there were small amounts of excess resin between the odd board that was removed with some scribing. A few tiny pinholes were
discovered at the primer stage where the hull met the transom. These were easily filled with Vallejo Plastic Putty.
The bar on the inside face of the gunwales has a square cross section. My reference picture (below) shows it to be wider with a rectangular cross section. So the kit's
representation was cut off and replaced with some flat styrene rod.
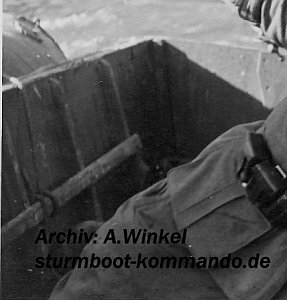
It also looks to me like the kit's rib spacing is a tad too wide. Not having any proper plans to work from, I left the ribbing as is.
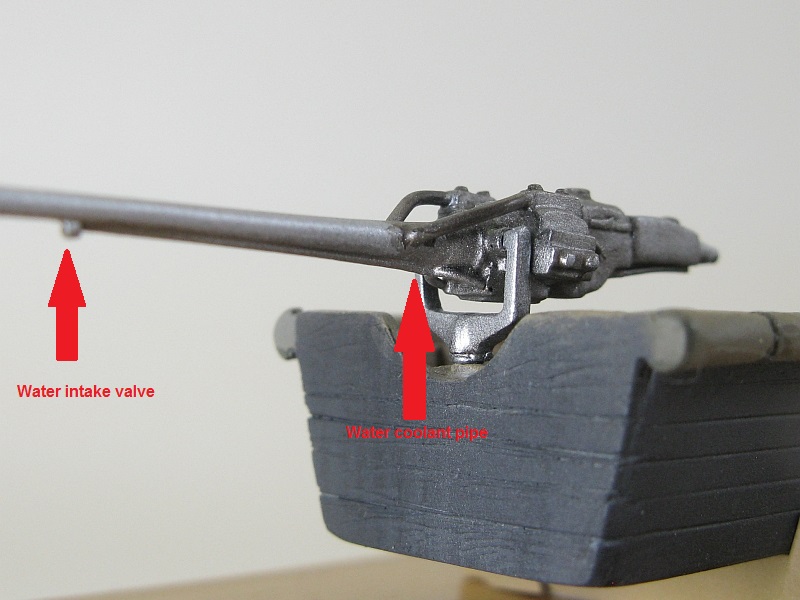
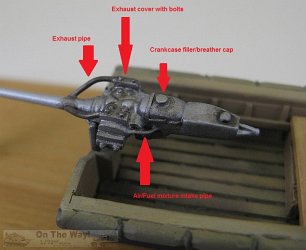
The motor is the weakest link. It is very basic and lacks a lot of detail. Below ia a list of changes/fixes perfomed:
- There were a few small voids in the casting that required filling.
- The prop shaft cover is incorrect. The kit represents it as two circular cross sectional pipes, of different diameters, with a
step where they meet near the mid-point. Reference [3] shows what it really should look like, therefore I replaced it with a piece of stretched sprue which was
subsequently shaped according to the walk around photos. The prop was removed to be added later, and its guard was also removed and added to my new shaft cover.
There is a small plate at the end of the guard. The kit's version is much too thick, and incorrectly shaped, thus it too was replaced with a new one made from a
small piece of plastic sheet
- The prop's blade shape is not the best. Unfortunately it was too small to attempt a scratch built replacement and I couldn't
find anything small enough in my spares box.
- A pair of intake/exhaust heads are missing, so they were added from square plastic rod, shaped to match the curve of the crankcase.
To them I added air/fuel mixture lines and exhaust pipes.
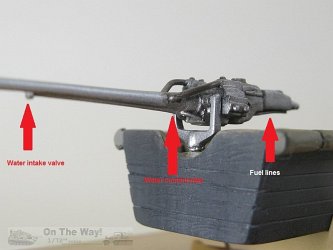
- On the underside of the shaft cover is an intake valve and associated piping used for cooling. These were replicated with
stretched sprue, as was a pair of fuel lines on the underside of the gas tank.
- With disks punched from plastic sheet, bolts were added to the top of the crankcase, intake/exhaust heads, and added the
absent oil filler/breather cap.
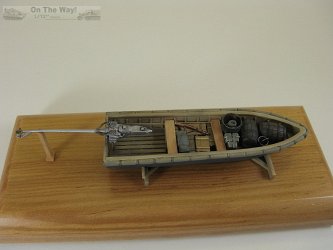
The included figure looks acceptable. As I'm not a good figure painter it was not assembled. To add some interest to the model I searched for some cargo to add. I settled
on a set of Armand Bayardi large wood barrels, wood crates, plus a wood and a metal pail. I fashioned a sack from two part epoxy putty and placed it inside the wood pail.
To round out the cargo load a set of three resin 5cm metal ammunition containers from Planet Models, a resin tarp from Value Gear, and a K98 rifle from my spares box
were added. I also decided to add a couple of board seats fashioned from flat plastic strip wide enough to fit between the ribs. As the kit does not supply a stand,
one was scratch built.
With the cargo load sorted out, it was on to painting. As mentioned in the preview, decal or marking suggestions are not given. I settled on a natural wood interior,
khaki bumper pads and
panzer grey hull. A spare decal supplied the numeral "1" on the hull. The engine was done in Alclad aluminum and stained with Tamiya Brown Panel Liner.
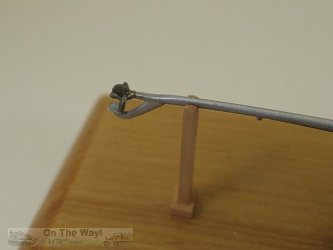
Final work involved gluing into place all the cargo and the engine. In an attempt to make the engine installation easier I decided to add it to its mount
ahead of time, but in doing so I wound up gluing the engine in the totally raised position. This forced me to scratch build a wood support to place under the prop shaft.
Oh well... I'll chalk that booboo up as a brain freeze moment due to my advanced years.
A quick mesurement with a ruler show that the kit is very close to 1/72 scale, as shown below:
| Actual | 1/72 | Briga Kit
(not incl. bumpers) |
| Length | 5.98m | 8.3cm | 8.5cm |
| Width | 1.58m | 2.2cm | 2.2cm |
Conclusion
With only a few minor issues this is one of the better cast resin kits I've seen with only the engine being a bit of a let down. With some extra detailing
a nice display worthy model can be constructed.
References
[1] GB Modelli web site (contains some useful period photographs)
[2] svsm.org (walkaround of the Kowats K4R4, Leichtes Pionier-Sturmboot 39 engine)
[3] wasserwacht-utting.de/chronik/ (Sturmboot 3-view drawing with dimensions)
[4] Waffen Review Band 84, 1. Quartal 1992, Journal-Verlag Schwende GmbH, Schwäbisch Hall, Germany p.31-52
Review sample supplied by Georgio Briga of GB Modelli (aka Briga).


GB Modelli (aka Briga) products are available at

|
.jpg)