Airfix


www.onthewaymodels.com

WWII RAF Vehicle Set
Bedford Truck

Set #: A03311 Review Carli Danilo 172normandyafv(at)gmail(dot)com
Edited by Marc Mercier

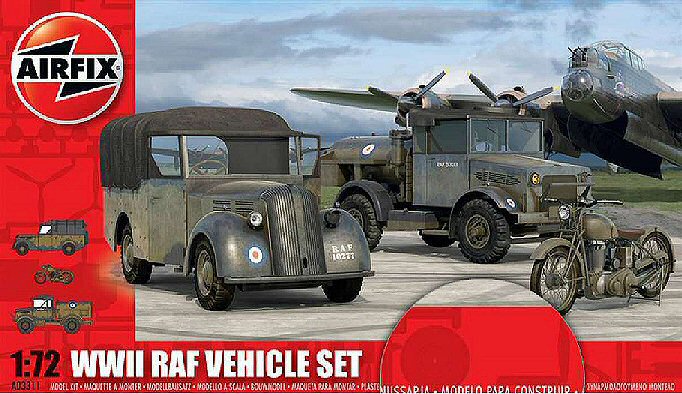
The majority of the Airfix vehicles are in 1/76 scale, although some are meant to be placed near a 1/72 plane, so this kit looks to be in 1/72. It gives us two trucks and a motorcycle. They are supplied as a RAF airfield complement and you can find them also in the larger BOMBER RE-SUPPLY SET with other items. Anyway, these vehicles were used also by the army.

The grey plastic is soft and reacts very well to liquid cement. The transparent sprue is made from a “glasslike” fragile plastic and particular care is needed when cutting off the pieces. The moulds are well done; flash free and the details are fine. The instructions are simple and a colour profiles page is given apart. Sadly, no crew figures are given. The decal set is thin and matt, the type I prefer. Everything indicates that this is a good kit, and it is quite true. I liked the kit so much, in the end I bought two…

Trucks are not as glamorous as tanks and good info is less available; a little research however is due. At the end I found some helpful information to make my models and to review the kit.

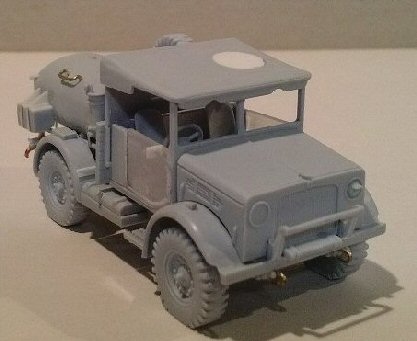
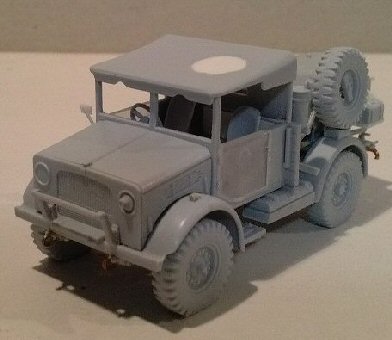
Bedford MWC/MWD

This truck was produced in quite a wide choice of specific uses:

MWD – 15 cwt truck with GS body
MWC - Water tank truck
MWG – Self-propelled 20mm automatic gun
MWR - Radio truck
MWT – Antitank
MWV - Signals Van
MWK - Light Machinery

The kit depicts a late type chassis. Two variants are given, the MWD 15 cwt GS and the MWC 200 gallons water truck. On the net there are a lot of photos taken of restored vehicles. These can be used, but pay attention because some restored vehicles are not historically correctly or in post WW2 conditions.
This particular vehicle type, the 15 cwt, was called a truck. Heavier vehicles were called Lorries. This difference is also noticeable in the WD number prefix: Z for the trucks and L for the Lorries. If a truck was a van the WD number prefix was V, if used as an artillery tractor the WD number prefix was H.

The scale model dimensions are quite correct. Some problems arose measuring the model because I don’t always understand where the measurements begins and ends (is there a towing hook? a spare wheel? and so on…).
I divided the Bedford truck review in three parts: the MW body, the GS body and the 200 gallons body. Very useful photos of vehicle under restoration can be found on hmvf.co.uk site.

The kit is quite well done and the only imprecision I’d find regards the 15 cwt type (see below); there are some smaller ones (as in every kit) which I ignored; anyway I felt some working was necessary to have a more detailed model. Here’s what I did:
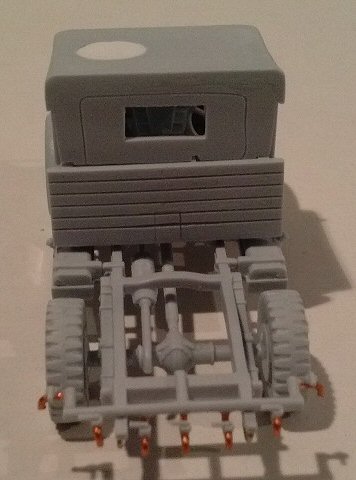
MW Body

  • An engine is included, only to be hidden under the bonnet; however, you now have the possibility to show it during maintenance or leave off the bonnet sides, a practice often seen on desert pictures. In this case, some extra detailing will be required.
  • The radiator mesh isn’t perfectly right: most of the photos I’ve seen show it as a squared mesh fastened on the outside of the radiator opening. Its reproduction in 1/72 is very hard to do because an aftermarket PE mesh would hide the radiator opening (I tested it), so I kept as it is and the model looks better.
  • There is a good amount of ejector pin marks to be sanded down here and there. In some cases they need to be filled with a little drop of cyanoacrylate glue. A patient check job is needed to find them. Some pin marks are situated in the wood stripes engraving and those lines must be re-engraved.
  • The gear lever stands up from an oversized squared hole. I closed it with a thin plastic piece.
  • The handbrake near the gear lever is missing. I made it with some stretched sprue segments.
  • The steering wheel rod is a bit short. It looks to be in a very unnatural position for the driver having to stretch forward. I replaced it adding the support plate using plastic sheet and stretched sprue.
  • Behind the passenger seat there was a stowage bin. I made it with plastic sheet (it looks better with some soft items stowed inside).
  • A handle and a rounded tank were added in front of the passenger seat, just to put something in the cabin, a little poor otherwise (adding some personal item like helmets, backpacks, rifles and so on would look better).
  • Other items that can be added are a fire extinguisher (the cylindrical brass type) and two rifles with support, visible in the photos of the restored vehicles. I saw these on some restored vehicles (although not all of them) and I think they are correct. Anyway I choose not to add them to my models until there’s more evidence.
  • I made the four towing points with metallic wire.
  • On the front mudguards top, two lights were reproduced with vertical pins. I added some thin stretched sprue segment to have rounded items (like the real lights) the rear was sanded down to have a half egg shape.
  • The axle track dimensions are different from the front one. I didn’t find their dimensions; anyway I have no reasons to think they are not correct because other trucks had the same feature, for example the CMP C15 rear axle track was 76 mm shorter than the forward one.
  • The wheels are already flattened where they touch the ground. They are also a little bulged and in my opinion they look a bit deflated. I sanded down the bulging to restore a normal section of the tyre. Speaking of dimensions, they were of the 9x16 size. This means a 34” wheel diameter which means 12.0 mm in 1/72, as they correctly are in this kit.
  • The front part of the fabric top was softened with cyanoacrylate glue in the forward recessed part and sand paper on the corners. The lower edge was thinned otherwise it hides the stowage bin. I removed the hip ring: judging by the photos I’ve seen, it was not so widely used and it seems only used in very late batches. The rectangular hole needs to be closed with a piece of transparent plastic. As per the windshield I’ll glue it in place after having painted the vehicle.
  • I'd cut off the doors transparent parts, which weren’t glass windows: they were made in soft plastic.
  • If visible (because not covered by the spare wheel or hidden by the fabric cover of the GS body), the squared hole in the rear of piece C19 needs to be closed. I did so for my MWC, and then I restored the wood stripes engraving and removed the spare wheel support.
  • In the photos I’ve seen, the water truck MWC didn’t had the bar with the towing hook at the end of the chassis. I'd cut it off for my model.
  • And lastly, I made the mirror on the driver side with some thin stretched sprue segment and a little plastic rectangle.

As already told, the chassis is of the later type. Converting it in an earlier type (always use a photo as reference) is quite simple: don’t use the doors. They were made in some flexible fabric sheet and when not used, were rolled and fastened to the piece C19 in place of the two walls which need to be erased. The full windscreen used by the mid 1943 must be replaced by two little glasses (called aero screens) without the frame and hinged at the base. Both lights could be identical,
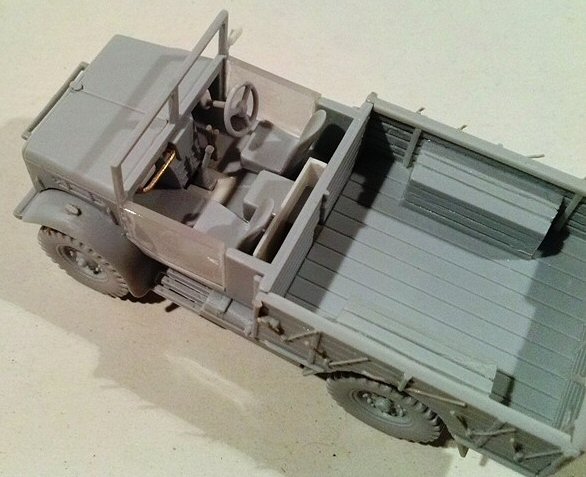
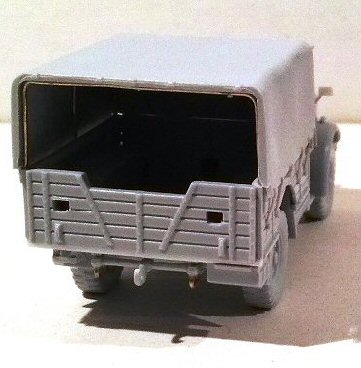
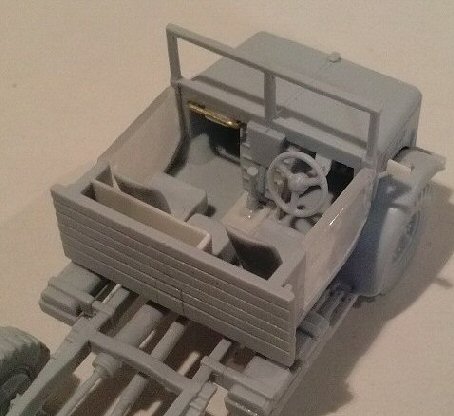
 but the dashboard could be different.
For a vehicle produced before the mid 1940 the slots in the bonnet sides need to be replaced by PE mesh.

Of course the conversion in an early vehicle is a must for a model which depicts a BEF or North African truck. However, some of these earlier vehicles survived to be used in later campaigns as visible in some photos (see for example IWM B10148 where both types are depicted together in Normandy).

The kit gives us two rear bodies, so the spare one is useful for other projects.

MWD 15 cwt GS body

The MWD was the GS version truck, where GS means Generic Service. The GS body was the same wooden type used also by other 15 cwt trucks like the Morris CS8 and the Fordson WOT2. It was very similar to the 2A1 type used by the CMP cab 11 (both C15 and F15). The Airfix GS body anyway it isn’t exactly correct. The rearward part is longer than the forward one while in almost every photo I’ve seen the sides were symmetrical. I didn’t find the original dimensions, anyway the similar 2A1 body was 79”, 3/8” (28 mm in 1/72 scale). The GS body length reported in a forum (taken from a restored vehicle) states it was 79”, ¼” (27.96 mm in 1/72 scale). The kit length is 29.5 mm so it should effectively be longer. Correct or not, I shortened the body, visually the sides now are symmetric and in my opinion the body looks better.

Adding a plank per side to the modified body, fixed with three fittings, the MWD body became the body for the MWR (but it will need the wireless sets).
A MWD walk around is here: http://www.net-maquettes.com/it/pictures/bedford-mv-15cwt-walk/ .

  • On the sides there are two supplementary walls. I didn’t find evidence of these walls on the photos I’ve seen. I can only think it is a specific modification by Airfix or a device of another type of body (see below). Being not visible in the photos, I made my model without them.
  • I kept the kit floor planks layout although in some photos the planks look to be placed in a different layout.
  • On the floor under surface there are four ejector marks. Three of them will be hidden by the fuel tanks and a box. I filled and sanded down the last one.
  • The rear door is not symmetric. I don’t know if this is correct (but I suspect it isn’t), however I left it as it is being not so noticeable.
  • The GS body was made in wood. I engraved the wood stripes on the smooth inner sides. If the body is left completely closed by the canvas cover, this engraving job is not needed.
  • The wheelhouses are not rectangular, their correction is clearly possible, but the thing is only noticeable if the canvas cover is not used. Seen from the opened cover it isn’t and this being my choice I left them as they are.
  • For the correct alignment of the sides C22/C23 and the rear B22 I used slow drying glue to have the time needed to correctly place the pieces, after having dry fitted the wheel cover boxes.
  • The fabric cover was kept in shape by a frame made of metal pipes. The sagging cloth between these pipes looks wrong (because of the shortened body) and has to be sanded down.
    After having cleaned the inner side, the fabric cover lower edge was thinned from the inside, and then I made the frame with metallic wire and stretched sprue. The six pins hanging from the lower edge of the cover were cut off and to make things easier, these parts of the frame were made with stretched sprue segments glued to the body sides repositioned to adapt to the new sides' length. The frame was visible if the fabric was removed or if the rear was left opened. Judging by the photos I’ve seen, while in the desert a lot of trucks removed the cover altogether and sometimes even the frame; in NWE the body was normally kept covered.
  • The cover was held in place by a wire that was made with thin stretched sprue segments. The original wire went up and down, passing through four little hooks on each body's side, in the middle the wire passed under the central frame interlock. While gluing the segments, I had to pay attention to replicate the effect (the upper end will be glued to the fabric cover after the interior will be painted and glued in place).
_____________
_____________

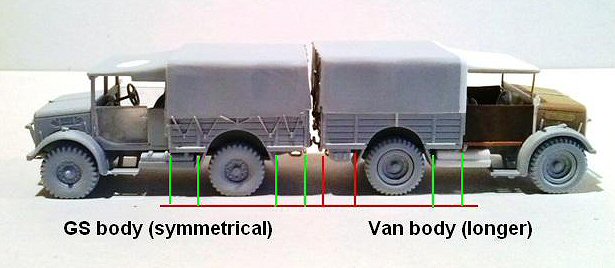
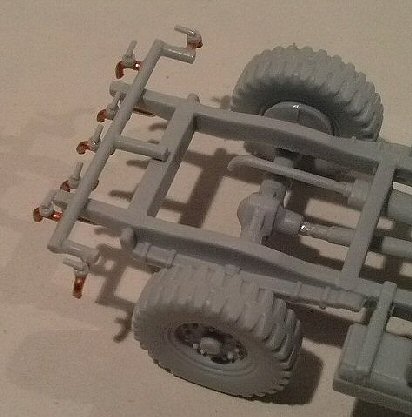
MWV 15 cwt GS

About the GS body, as I mentioned earlier “almost every” because the body replicated by Airfix was effectively used. You can see it here http://www.mapleleafup.net/forums/showthread.php?t=14884 and here http://ww2talk.com/forums/topic/37910-bedford-census-number/ .

It was the Bedford 'Van 15cwt. 4x2 GS'. The only batch (410 vehicles) I found related to this type had the WD numbers V770401 to V770810. The first vehicles produced had the bonnet mesh sides, while later ones had the bonnet slots.

I planned to make my second kit as a MWC water truck. However in my spare box I had an unmade 1/76 Airfix Austin K6 left over from the emergency kit, because the crash tender depicted is a post war civilian vehicle, not usable in a WW2 contest. I noted that the chassis dimensions are very compatible and after having cut the Bedford one to the required length, with a bit of working on the available parts and some plastic sheets/rods (and two little PE mesh for the bonnet sides) I found myself with another Bedford MW early chassis (more or less). I choose to make a 'Van 15cwt. 4x2 GS' by mating the new home made chassis to the spare GS body. The GS body length was kept as it is. I like to recycle and I consider this an interesting experiment.

I know it is out of the review contest, so I mention this just to show the difference between the two bodies.

About the Van GS body these are the differences:

  • The frame interlocks on the body sides were absent so they were removed. Where needed, I re-engraved the plank lines. A central fixing was added with a thin plastic stripe.
  • The fabric cover was lengthened with plastic sheet, while the rear was filed to make it vertical. The weaving pattern was sanded down.
  • The fabric cover was fixed permanently so, on the sides, the wires to keep it in place were absent. The edges were sanded straight.
  • I don’t have idea about how the interiors looked like, so I kept the fabric cover closed (not impossible in this case).
_____________

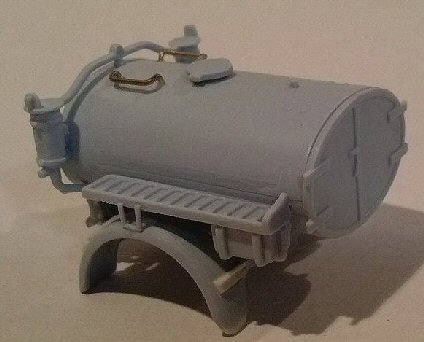
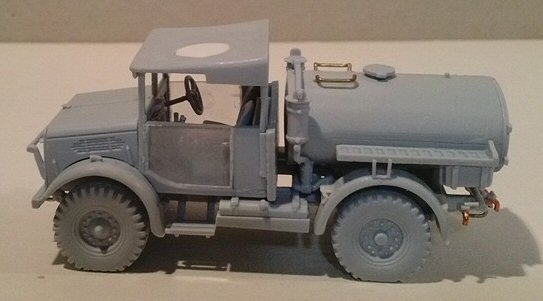
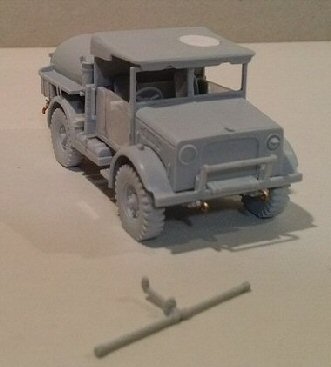
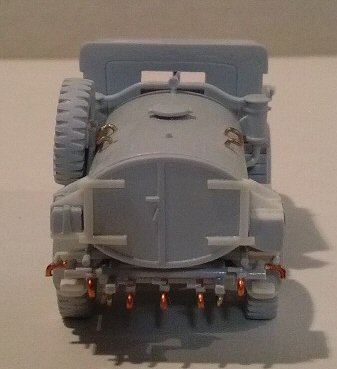
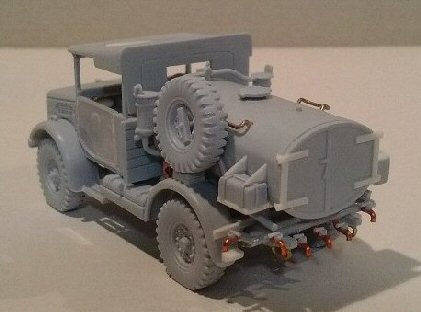
MWC water truck

This was the 200 gallons tank water truck. On the Bedford truck, two tank types were used: an early type with an oval section and a later type with the two vertical sides flat and the horizontal sides domed.


The kit depicts the early type with the oval section. This tank was used on both MW truck types (early and late). This tank type was also used on the Morris truck. Having said this, I consider the model depicted with the early tank on the late chassis as the mid production type, the early type being the early tank on the early chassis and the late type the late tank on the late chassis. Some useful photos are here: http://www.maquetland.com/article-phototheque/3770-bedford-mwc-water-bowser-hendon.
_____________

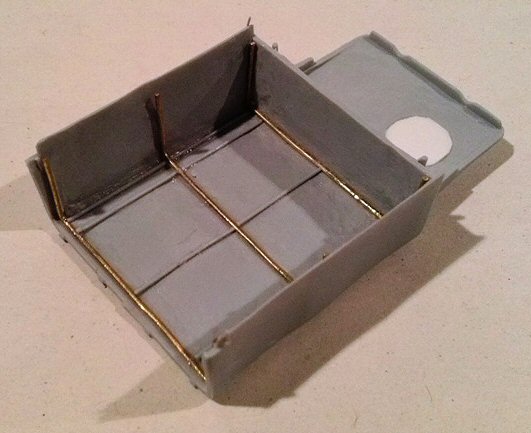
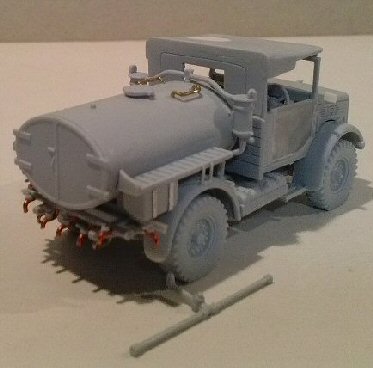
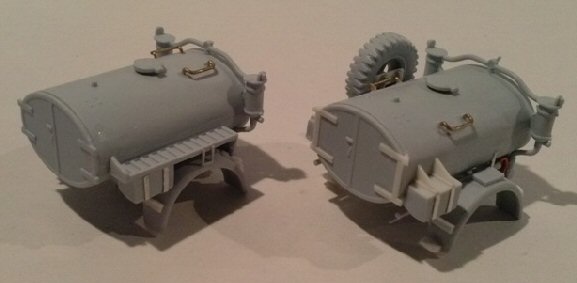
MWC early tank

The tank body is quite well done; the only really visible error is the height of the lateral catwalks position, which needs to be lowered. This correction apart, a minimum of detailing is needed.

  • Carefully cut off the top cap which was thinned and glued over a smaller disc to have the correct “mushroom” shape.
  • After having cut them off, I repositioned the catwalks a couple of millimetres lower, just above the line of the lower hinge.
  • The height of the boxes placed under the shelves was lowered consequently.
  • The supports which lean on the mudguards were steps. I cut them off and made them with stretched sprue.
  • The mudguards rear ends were lowered with a piece of plastic shaped in place.
 
  • The mudguards frame was detailed with thin plastic stripes.
  • On the front side there were two steps. I made them with plastic.
  • The two reliefs looking like the squared parenthesis near the cap were two handles, to make them more realistic I replaced these with metallic wire.
 
  • The piping which leads the water into the tank (B15) is a bit long; I shortened it to 8mm.
  • The piping, which leads the water out of the tank, is missing. I used stretched sprue to make the tube and metallic wire to make the taps. Some system's variation on different vehicles can be found; anyway most of the ones I’ve seen had the layout I made (which I think was the standard).
 
_____________
 _____________

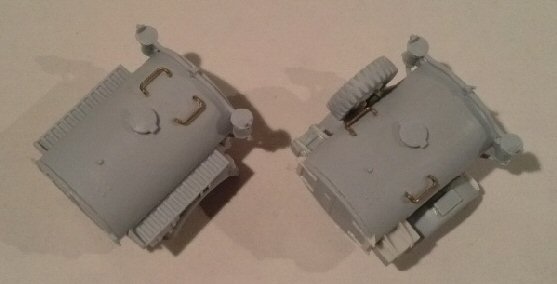
MWC late tank

As already told, I bought two kits. This leaves me with a second tank. I thought to try the conversion into a late tank. I’ve seen photos of this tank type only on the late MW truck. Useful photos can be seen here: http://hmvf.co.uk/forumvb/showthread.php?15406-Bedford-MWC-66144-water-tank/page3 .

  • I carefully cut off the top cap which was thinned and glued over a smaller disc to have the correct “mushroom” shape.
  • I removed the shelves and then I reduced the tank's width, flattening the sides. I find the dimension scaling a 1/35 scale drawing and it should be quite correct.
  • The rear doors hinges on the late version were attached on different locations. So, I replaced them with thin plastic stripes, one just above the upper hinge and one just below the lower hinge.
 
  • The mudguards rear ends were lowered with a piece of plastic shaped in place.
  • On the left mudguard was the spare wheel base and on the right a generic use base. Both were made with plastic.
  • The piping leading the water into the tank had a different layout; I used stretched sprue and metallic wire to make it. They lay along the tank sides fastened to two supports made with thin metal stripes.
 
  • With two stretched sprue segments I made the spare wheel support.
  • I made new handles with metallic wire which were placed rearward the upper cap.
  • The mudguards frame was detailed with thin plastic stripes.
  • On the mudguards there were two steps, I made them with plastic.
  • Just like the early tank, the piping which supplied the water is missing. See above.
 
_____________
  _____________
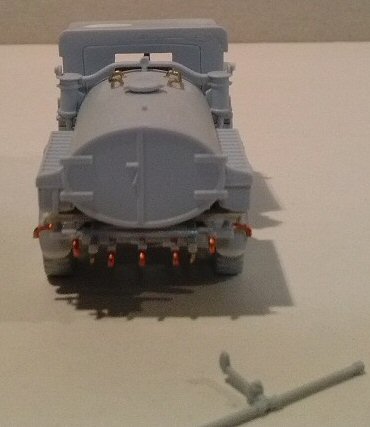
Sometimes, on the rear of the tank (in the very late batch I think) there were two “horns” which supported a frame for a fabric cover as for the GS MWD. I didn’t find information about its true purpose: hiding the MWC identity or keeping the water fresh in the cover's shadow. Anyway it wasn’t always present and I didn’t want hide the tank, so didn’t add this detail.
Now I only have to choose which one to use and which one has to go in the spare box...
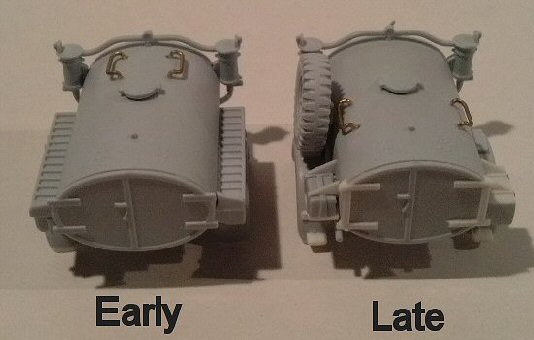
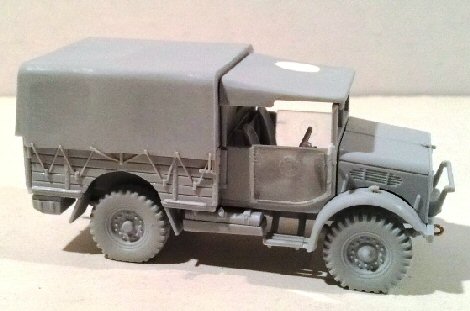
______

Conclusions

In my opinion, the MWD kit has a correct late MW body and a correct GS Van body. The problem is that, until now I’ve seen GS Van bodies only on early MW bodies. Having said this, the 15 cwt truck is well done and the modelling possibilities are very wide. Since correcting the flaws is very simple I consider this the possibility to choose between two 15 cwt types working either on the MW body or on the GS body.
Concerning the MWC, only the catwalks positions look really bad and here also there is room for conversion. At the end I consider this kit useful. Additionally let me point out that it was used in almost every WW2 front and in the Korean War: captured Bedford trucks were used in North Africa and German beute Bedford trucks were photographed on the Russian front, making this a very interesting kit.

Preview sample purchased by the author.

This model can be purchased from Tracks & Troops

Back to :

Airfix Kit List
Construction Reviews

Back to Home Page

Article Last Updated: 22 July 2016