| INTRODUCTION
This 1/72 scale model kit represents an American made diesel engine
powered version of the M4 Medium tank of World War 2 armed with the
medium velocity M3 75-mm gun: an M4A2(75). This version served from
1942 till the wars end with the British in Afrika, Italy and Northwest
Europe; with the Poles in Italy; with the Soviets, with the US Army
in training stateside; and with the US Marines in the Pacific theatre.
The ARMO
M4A2 kits I understand were released years ago prior to the more recent
releases of styrene plastic M4A2 kits from Dragon Models Limited (DML)
and from UM. This conversion kit is meant to be mated with the lower
hull of a venerable ESCI M4A1 or a rare ESCI M4A3, “donor”
kits; the only good 1/72-scale M4 kits available in plastic for a
long time. The ESCI M4A1 has been re-released by Italeri. It may also
work with the newer DML, Trumpeter or Italeri wargaming M4 kits.
Many
of the assessments of this particular conversion kit should also reflect
other 1/72-scale Sherman kits offered by ARMO.
On
the small box the kit comes in is this small black & white photo
of the model; actually a photo of the full kit of this ARMO model,
not the conversion kit “for Italeri model”. In this box
we actually only get a turret, upper hull, main gun and etched brass
parts; there are no cupola hatches, tracks, lower hull suspension
bogies or wheels.
THE KIT PARTS
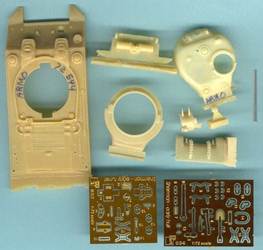
1. The kit contains seven amber cast resin parts, a turned aluminum
75-mm gun barrel, and two small etched-brass frets (provided by Part
Company) labeled "early hull" and "early turret".
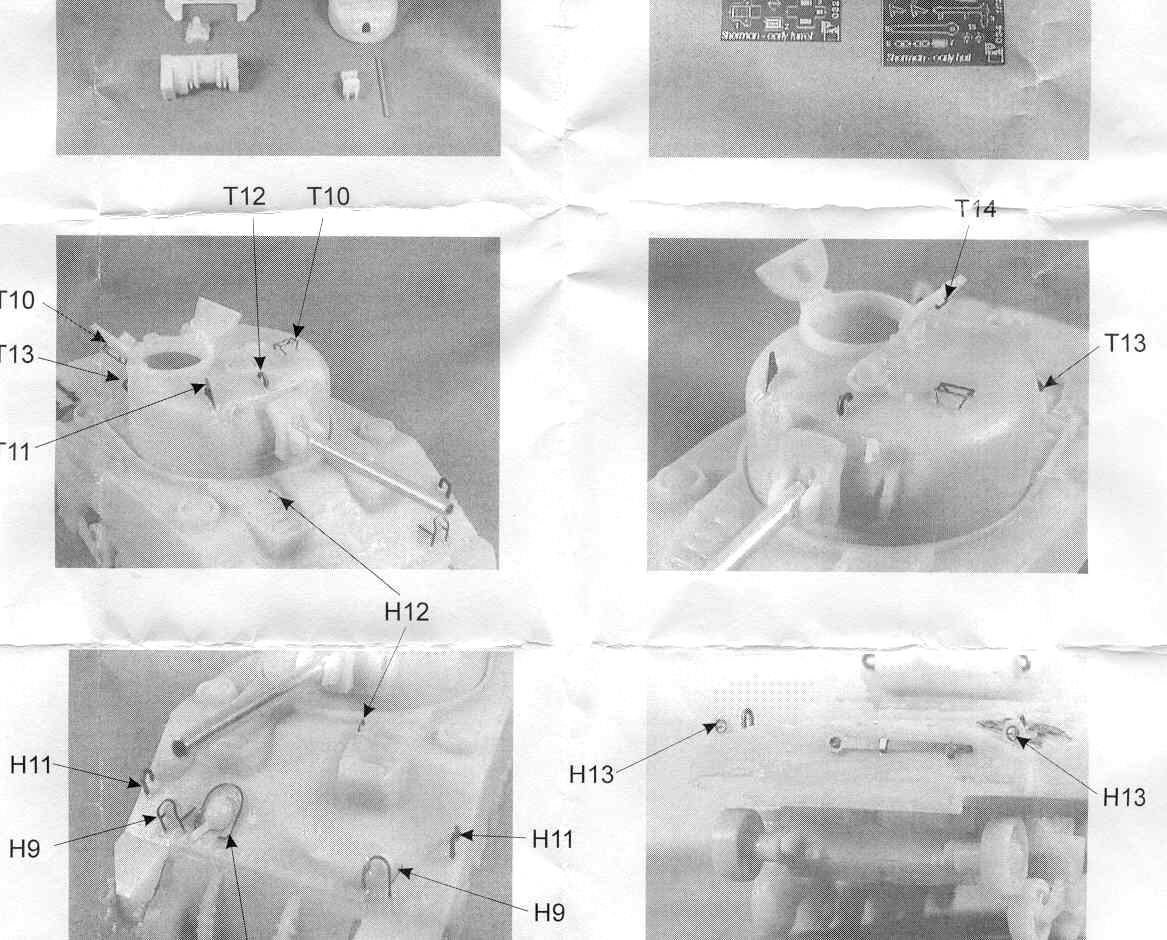
2. At upper left are the two etched brass frets supplying all the
useful parts that can be done in brass (it also has a bunch of other
less than useful parts in my opinion, but fewer superfluous parts
than other etch brass frets available for the 1/72 M4). The indispensable
parts for a good display M4 are the headlight and periscope guards,
and the 50 caliber AA gun parts. Since this model has no AA machine
gun, use these brass parts on another model. I would also not bother
with the lifting rings, shovel, and sledge hammer as they are too
flat. Many of the early Shermans also did not use periscope guards
(partsT10 and H16).
3. Just below the brass frets is the initial style three-piece bolted
differential housing, the hull machine gun mount and the M34 mantlet
with the little armor wings. At far left is the aluminum gun barrel,
a nice addition.
4. At lower right is ARMO’s cast resin version of the M4A2 hull
with the characteristic engine deck grate; the primary external differences
between the M4A2 and the M4 are the engine deck and the rear plate,
otherwise they look alike. We notice some handtools cast onto the
hull. The driver and co-driver hatches are molded shut. Parts like
lifting rings and headlights and some tools are meant to be acquired
from the etched brass fret or the plastic ESCI kit. The fuel filler
caps appear way too small.
5. There is no applique armor over the sponson ammunition racks or
the driver’s hoods indicating an early M4A2 hull. The driver’s
hoods are the cast style. Hypothetically this hull could be mated
with a 1/72-scale Hasegawa or Mirage M3 lower hull to create an initial
production M4A2 if it had the direct vision (DV) driver’s hoods.
6. At lower center is the rear plate with the external engine muffler
mounted on it characteristic of the diesel engine M4A2.
7. At lower left and in the center are the turret’s cast resin
upper and lower halves. The turret is a low-bustle type with no oval
loader’s hatch and there is no applique armor over the turret’s
right side, both indicating an early M4A2 turret. The commander’s
cupola has no mounting point for an AA machine gun. There is no hole
in the roof top for a smoke discharger common to UK Shermans.
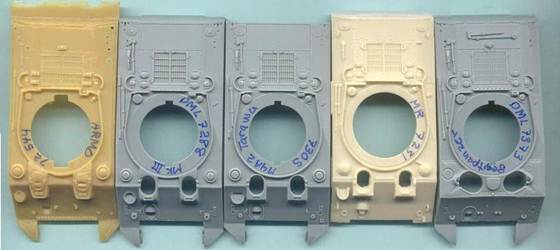
8. Here is a comparison of the resin ARMO upper hull, (at far left)
alongside M4A2 hulls from DML and from MR. The overall shape looks
accurate and it is cast well.
9. The Driver’s hoods offered on the ARMO hull is a cast steel
type that best matches a Ford produced hull, based on information
in the Sherman Minutia website.
10. The fuel and oil filler caps on the engine deck are significantly
too small and look to be based on the ESCI kit. I find it interesting
in that the hull has an oil filler cap in the center of the engine
deck to the rear of the engine grate that is common to late war M4A2’s
not early hulls such as this one. The rear mushroom vent behind and
to the right of the turret ring is also too small.
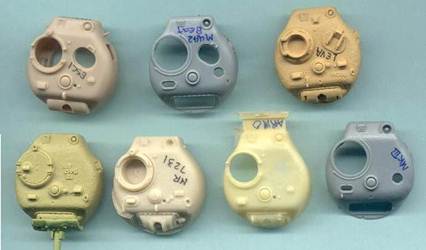
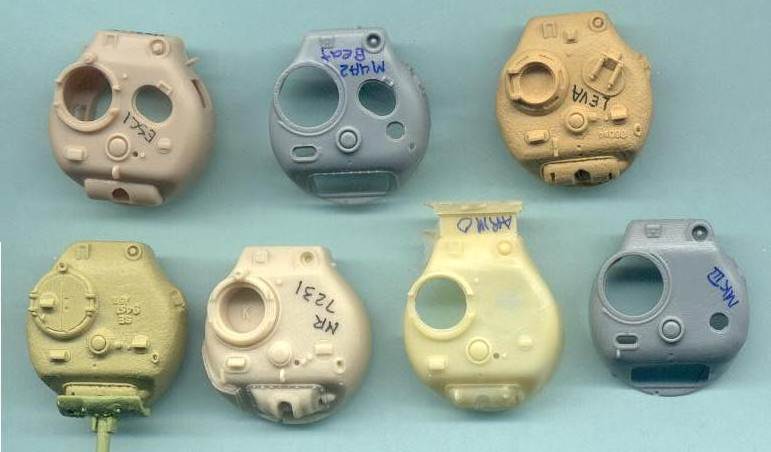
11. A comparison of Sherman tank turrets shows the ARMO turret (@
bottom, second from right) to be an early low bustle type without
a loader’s hatch. As no cupola hatch is included in the kit
I presume we need to acquire the hatch from the ESCI donor kit or
from an etched brass fret.
12. Of the three other resin turrets shown here, ARMO is the only
one molded hollow. The turret roof ventilator dome looks more accurate
that that on the LEVA and MR turrets and closely matches that on the
ESCI and DML turrets.
KIT INSTRUCTIONS
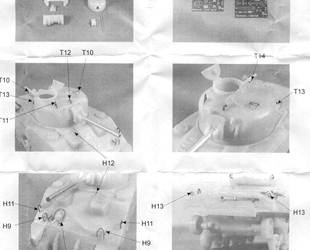
13. ARMO’s assembly instructions are a series of black &
white photos of their kit with part numbers and arrows for the etched
brass parts. These are some of the most clear assembly instructions
for a 1/72-scale resin AFV kit producer.
14. Keep in mind though that these instructions here show a full M4A2
model kit, not this conversion kit which is meant to be mated with
the lower hull of a plastic kit. Items showed in these photos not
actually included within this conversion kit are the cupola hatches,
the lower hull, idler and road wheels
PAINTING
& MARKINGS
- No
decal markings are supplied which is typical of resin model kits.
One of Dragon’s M4A2 kits, and several aftermarket decal producers
can supply extra markings for an M4A2 used by the US Army in training,
UK or Polish forces, or Soviet markings (I’ve not seen any
photos of the M4A2 with this style driver’s hoods used by
the US Marines).
- There
is no painting guide supplied with the kit. My references indicate
this tank should be finished in olive drab and with the rubber of
the roadwheels painted in dark gray. (Remember to wash all parts
in warm water and mild detergent before assembly, and again before
painting.)
CONCLUSIONS
Being based on the old ESCI/Italeri Sherman kits, this conversion
kit carries over some of the errors of the plastic kit such as the
small fuel filler caps and small rear right mushroom vent. In my opinion,
it is a good M4A2 kit that I recommend for an intermediate or advanced
modeler if you wish a good display model. Now that we have the UM
and DML full plastic kits, and wargamer kits from Italeri, and Hat
I am curious how these complex resin Sherman kits will sell?
I recommend
something like Mr. Surfacer 500 to give a rougher cast-metal texture
to the turret, rotor shield (gun mantlet) and the differential housing.
REFERENCES
- M4A2
Sherman, Part 1,
by Wojciech J. Gawrych, Armor Photogallery #11 Model Centrum Progres,
Warsaw, Poland. This is one of the best books available for explaining
and detailing a small-hatch M4A2.
- Sherman
Minutia website This is the best on-line reference for the details
of the Sherman tank variants; not as much of vehicle combat history
though.
- Polish
Armour 1939-1945,
by Krzysztof Barbarski, Osprey Vanguard 30, (1982). ISBN 0 85045
467 0
- British
Sherman Tanks,
Armor At War Series 7062, by Dennis Oliver, Concord Publications,
(2006) ISBN 962-361-131-5
|