|
Kit Compare & Contrast: US Army M12 Gun Motor Carriage kits in 1/72 scale
ESCI M12 Kit no. 8362
UM M12 GMC kit no. 211
UM M30 Cargo Carrier kit no. 226
Based on the M3
Medium tank chassis, the M12 GMC provided the WW1 era 155-mm gun with
mobility. The 155-mm M1917 gun was a US built version of the French 155 mm
GPF gun. Before being shipped to Europe the M12 and M30 vehicles were
upgraded with the heavy duty VVSS bogies with trailing return roller. The M12
is often lauded for its use in direct fire bunker busting in France and
the Siegfried Line, 1944. Because of a limited ammunition storage the M12s
were accompanied by the M30 Cargo (ammunition) Carrier. A moniker for this AFV
was King Kong which seems very appropriate to me. The closest Axis
equivalent of this self propelled artillery may be the German 15cm Sd.Kfz. 165
Hummel.
A Look At The Box Art
I like to look
at the kit box art as it is supposed to give you a good idea of what is in the
box, it should portray exactly what is in the box. At times the box art may
also help with kit assembly and painting and markings, but do not always trust
it. More than once I have bought a model based on the name and box picture to
find it was not what was actually in the box. There were three variants of the
155-mm M1917 gun used on this chassis so there may be slight detail variations
between the model and the reference photos.
This ESCI M12
model is a fairly old 1/72-scale model kit compared to the recent UM release, I
think from the 1980's, I know I have had my kit for almost 20 years. At this
time I have not yet found this kit to have been re-released by Italeri, but
there are still many available in collections and on line.
The old ESCI
M12 kit portrays the vehicle in travel mode with the large gun in the travel
lock. On the left side of the gun is a small shield that provides the gunner
with a little protection while he is firing in direct fire mode. The
differential cover at the nose is the 3-part bolted together type common to the
M3 Medium tank and the early M4 Sherman. On the glacis, below the gun travel
lock is a ventilation dome similar to that on the roof of the M4 tank hull.
Though based on the M3 medium tank chassis, I've read that in preparation for
the invasion of France it has been upgraded to the heavier duty VVSS suspension
with the trailing return rollers like that found on the M4 Sherman.
The track looks
to me to be rubber block based on the color but the chevron tread looks more
like the steel track chevron. The yellow track impression at the lower left
corner indicates this model comes with the hard plastic link & length tracks
The roadwheels look to be the open 5-spoke type which is not what is included
in the actual model kit. In the actual model the headlights are very
simplified compared to this depiction.
The vehicle in
the boxart is painted in olive green and with simple white stars, a vehicle
serial number, and a unit number. Except for the portrayal of delicate parts I
feel this is a pretty good representation of what is in the model kit, and it's
a pretty good representation of the M12 GMC.
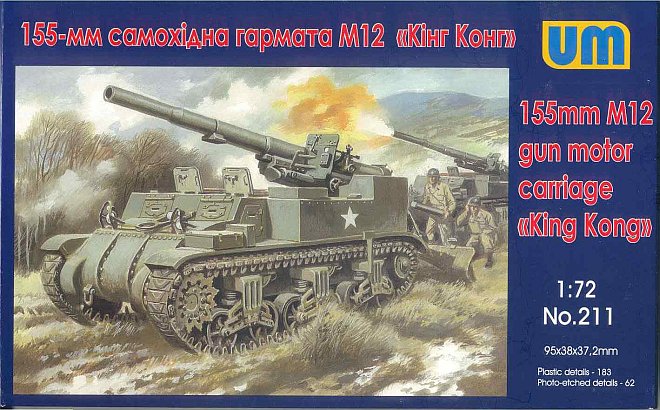
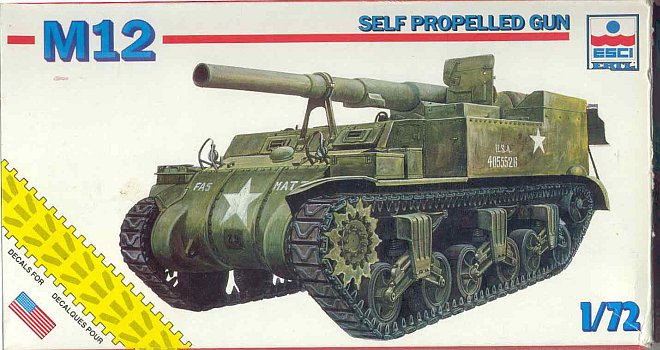
The box art for
UM's M12 shows the same basic orientation of the vehicle except in firing
mode. I recommend we do not use this painting as a diorama reference: the
concussion of the firing gun to the rear could seriously incapacitate the crew
in front, but this does make for a dramatic painting. Odd, the gun is firing
but does not seem to be recoiling?
This M12
painting appears to have the same features as that depicted on the ESCI box art
though with fewer markings, and the driver and commander's hatches are open
(the hatches are molded closed on the model kit). In the rear we see the
recoil spade down and dug into the ground.
In my opinion,
based on my references, this artwork is a pretty good representation of an M12
GMC. The kit parts appear to match my M12 references and the box art but
without assembly we won't yet know how well the boxart matches what is in the box.
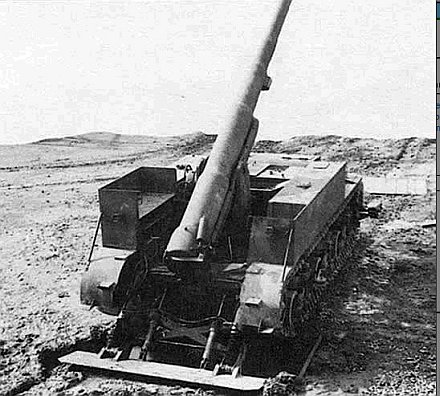
Here is an old
government photo of the M12 dug in for firing with the gun elevated. We don't
see a lot of fine details but we get a good idea of what it looks like in
action. There is no ammunition in the racks or any equipment. The sheet steel
for the ammunition bins is a lot thinner than that rendered in the plastic kits
from ESCI and UM.
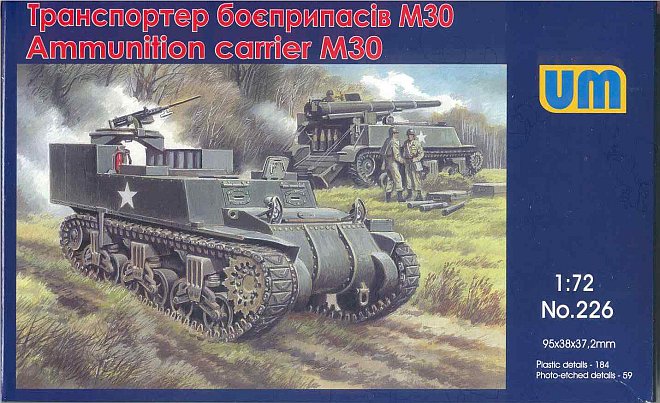
The box art for
the UM M30 kit shows the cargo (ammunition) carrier for the M12 GMC with an M12
in firing position in the background. The superstructure looks very similar to
that of the M12 except the rear area has tall storage bins and an AA machine
gun ring similar to that found on US Army cargo trucks and the M3A1 halftrack.
The tracks portrayed on the UM boxart and the ESCI M12 boxart are the T48
rubber block with chevron pattern though the historical photos I have show them
with the flat T51 rubber block style track.
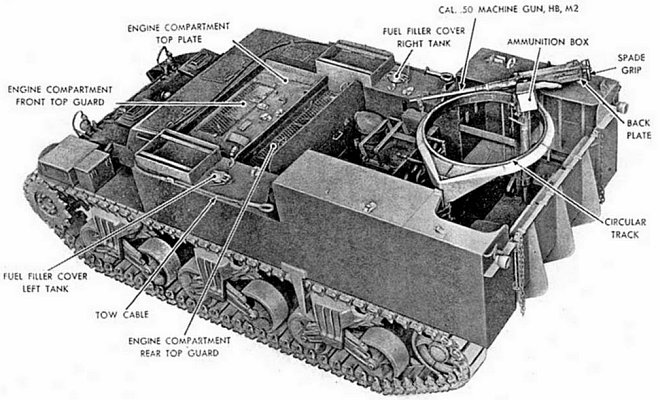
This US Army
photo is a great photo for detailing the M30. I have seen the M30 made by
converting the M12 kit but keep in mind this is a lot more challenging than
just removing the gun and mount. For example, the superstructure is lengthened
and no longer has the rear mudguards.
The Kit Parts
The ESCI model
kit number 8362, has 112 tan colored injection molded styrene plastic parts on
two sprue, not including the track. Three crew figures of 11 parts are
included. There are no resin or etched brass parts.
I have not seen
this old ESCI kit re-released by Italeri yet. Molding quality is very good
though details are simplified compared to contemporary kits from the likes of
Heller, Revell and Dragon. Depending on the period your ESCI kit was made, it
could come with reasonably good hard plastic link & length tracks, or the
infamous stiff polyethylene band track that resists glue.
Molding quality
is good with no significant sink holes or other defects. Parts are a little
thick such as the vertical braces around the gun pedestal base (part 28) and
the ammunition bin walls.
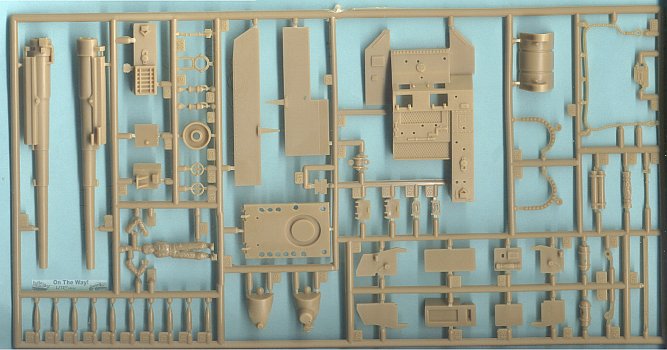
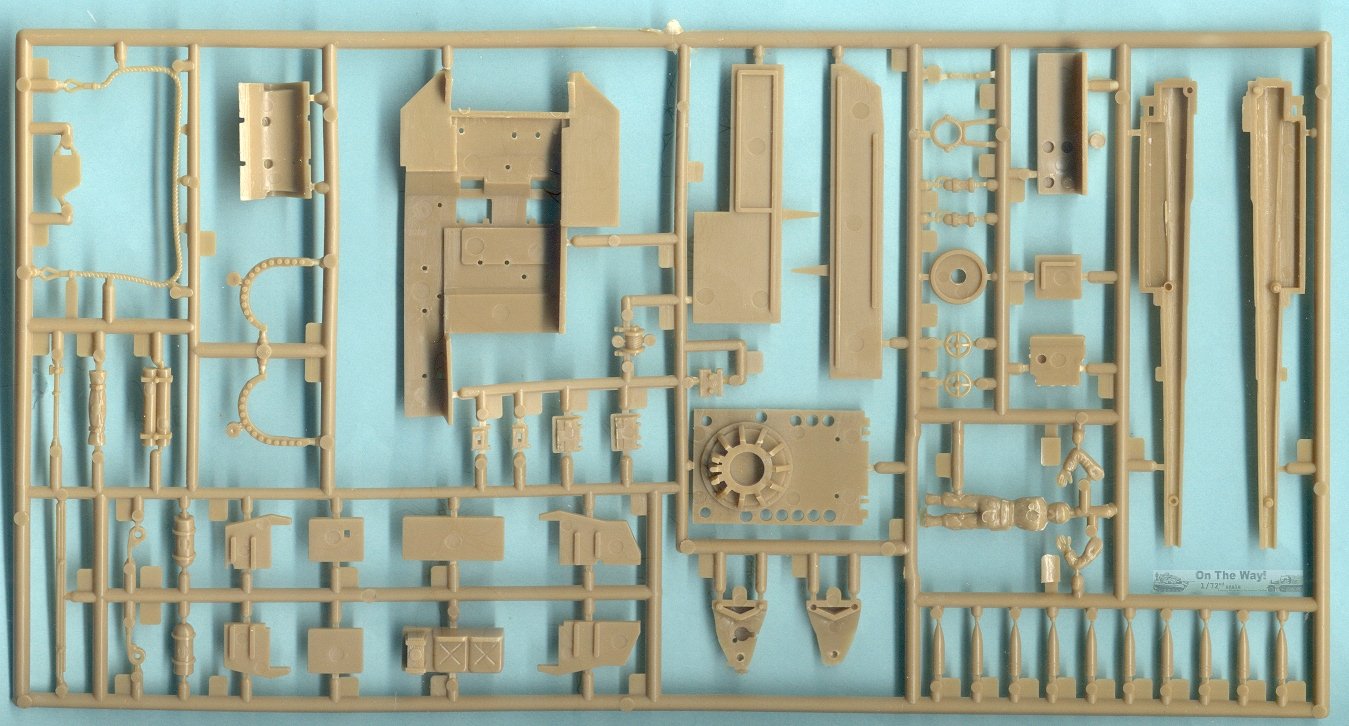
Above and below
are a top and bottom view of one of the two sprue in the ESCI kit. The gun
barrel is broken into two major parts (1 & 2). At the bottom corner are
ten 155-mm projectiles. One of the three figures with separate arms are also
on this sprue. I prefer how ESCI did the 3-piece bolted differential cover
(parts 51, 52, 53).
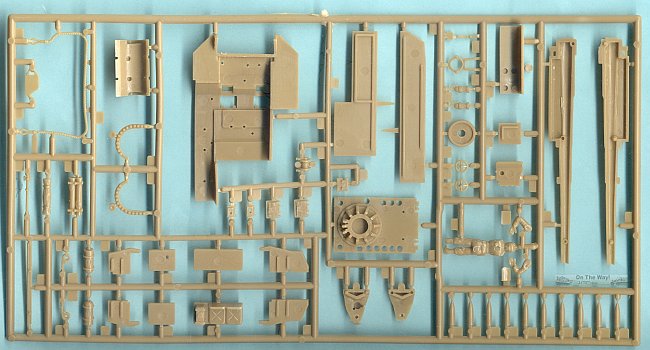
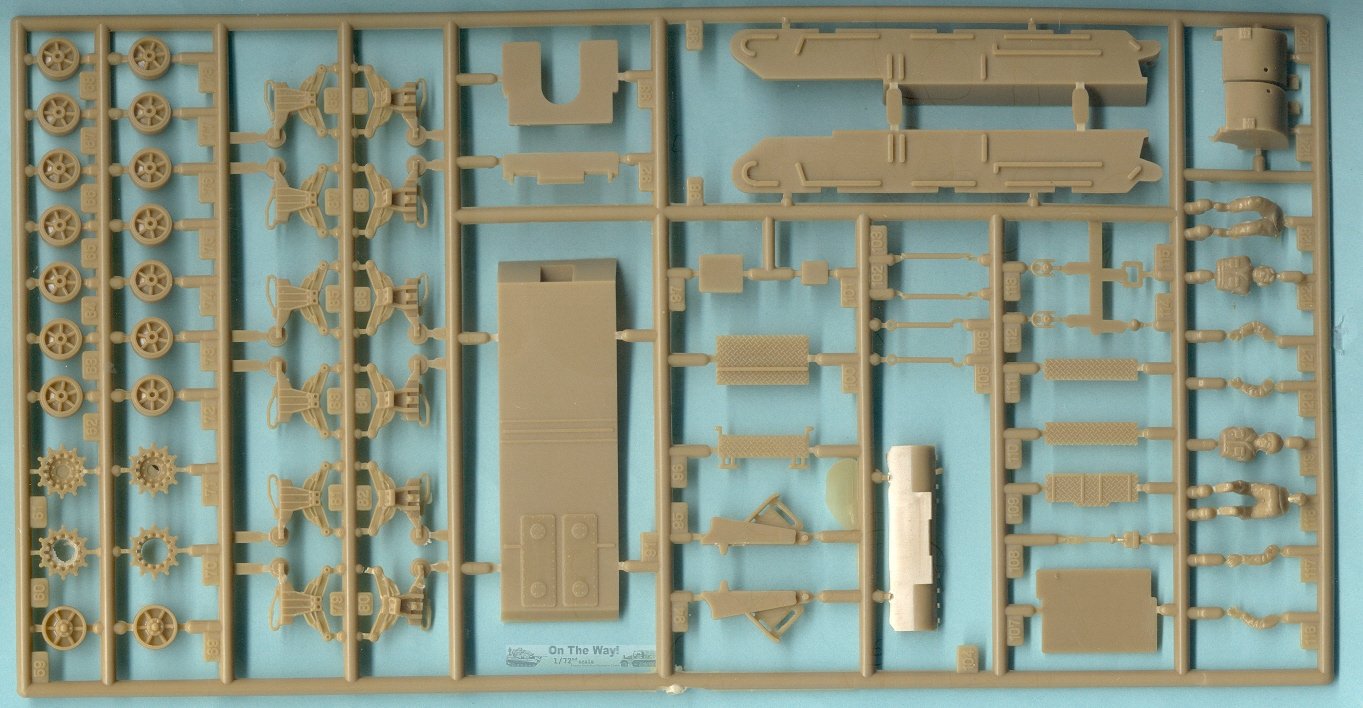
The 2nd ESCI
sprue pictured below contains the VVSS suspension and lower hull parts. The
VVSS bogies are the same as that in other ESCI Sherman models but the lower
hull parts are different and particular to this model kit.

The UM M12 GMC kit no. 211 model consists of 169 green colored
injection-molded styrene plastic parts on eight individual sprues, and one
etched metal Fret-F of 30 parts. The M12 kit has three sprue common to the
other UM Sherman family kits (sprues A, B and sometimes E) and six sprues
common with M12 kit (two sprue A, and sprues B, E, and two sprue D). There are
no crew figures. There are about 38 extra parts, the result of UM making
modular kits, using common sprue over for multiple variants of the M4 Sherman
tank.
The two sprue-A
with the VVSS bogies, wheels and track have been reviewed in other UM Sherman
kit reviews (such as at http://www.172shermans.com/kitreviews/UM/T1E3_prev.htm
and http://www.onthewaymodels.com/reviews/UM/SBrezinsk_UM_385_preview.htm
) so I will not go into it again here other than to reassure that the problem
with the roadwheels (parts 5A) have been corrected and they have the correct
five spokes.
The UM M30 kit
226 has about 180 green injection molded styrene parts with a small fret-F
of etched metal parts, the same fret as that in the M12 kit. The molding
features and quality is the same as for the M12 kit and other UM Sherman kits.
Like the M12 and other UM Sherman kits there are many unused and extra parts
left over.
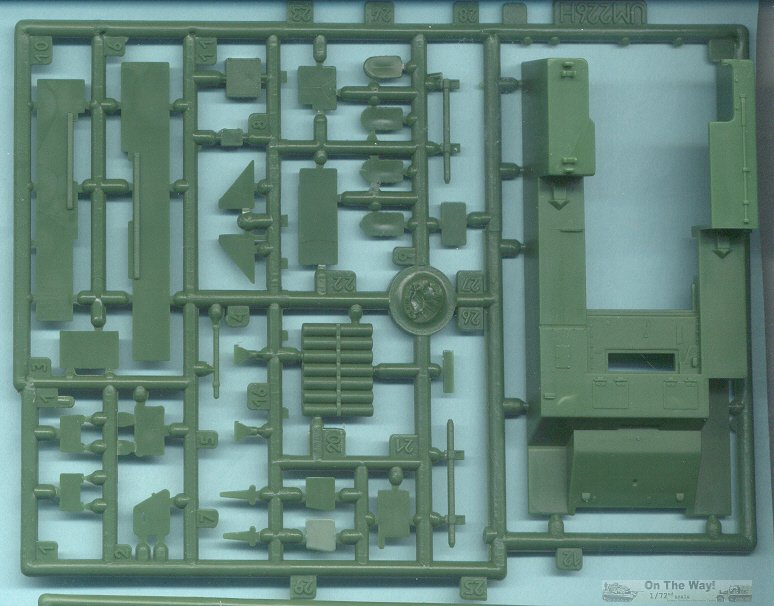
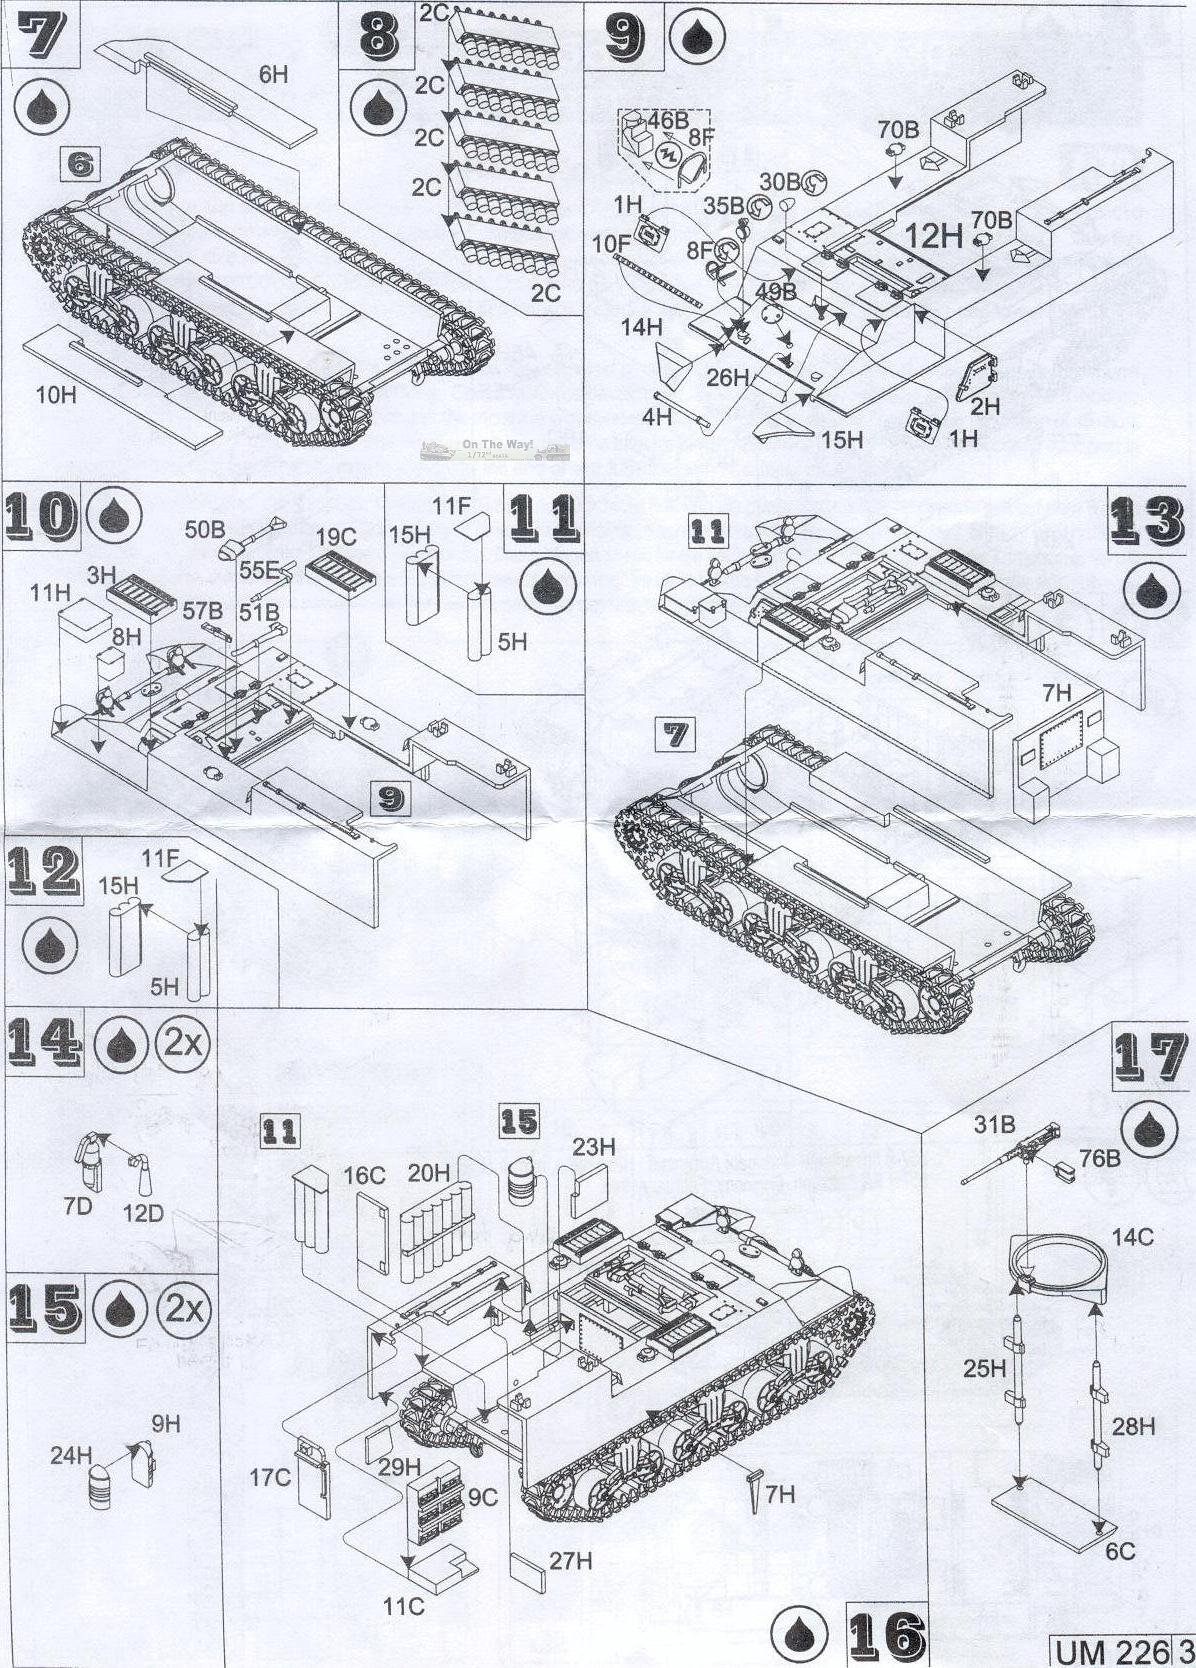
Sprue-H here is
for the M30 model and holds the superstructure and some ammunition parts. This
M30 superstructure (part H12) is a little different from UM's M12 hull in being
longer and with a high storage bin on the port side. A minor thing is that due
to this way of molding, the superstructure is missing a line of rivets on the
upper side. The driver's visors (parts H1) for the front of the superstructure
are well done and can be portrayed open if we cut an opening in the
superstructure. We can see some sinkholes on the back of the air cleaner
parts-H9 & H24 but worry not, when they are glued together they should look
fine.
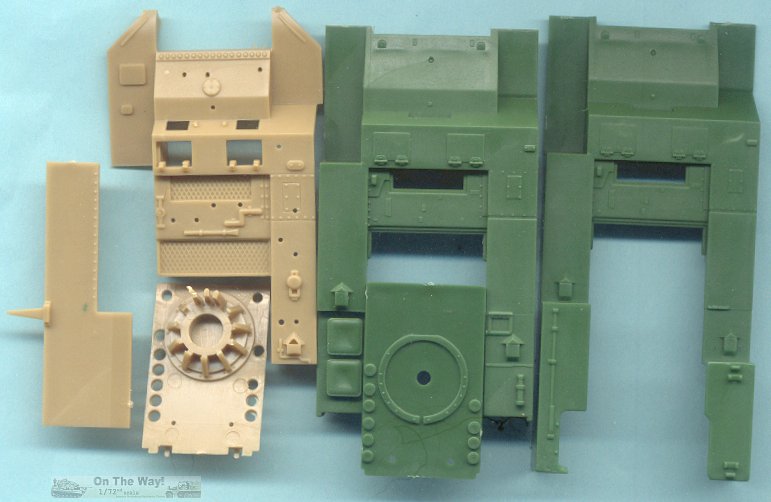
A compare and
contrast of the hulls shows that they are fairly similar in dimensions but
unassembled I will not comment on the details, since many of UM's details are
separate. ESCI's driver's hatches and front visors (parts 34, 35, 36, 37) are
separate and so can be modeled open which is a big plus). The line of holes
along the floor of the ESCI kit's deck (part-28) are for the ammunition (parts
3-10) stored up on end. On the glacis ESCI molded the vent dome into the upper
hull while UM has it as a separate part (part-49B).
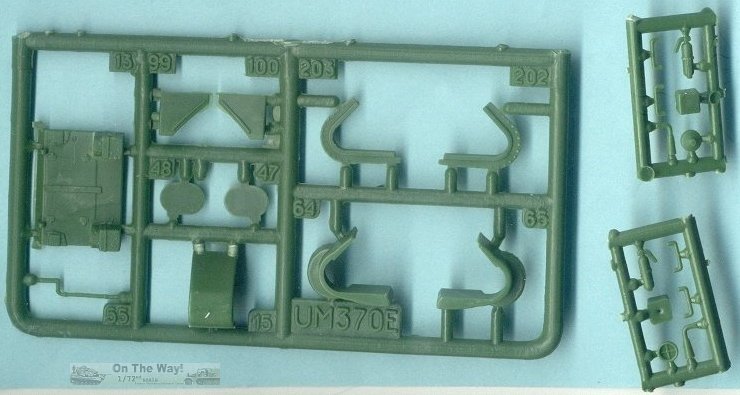
This sprues-E
and the two little sprues-D above are common with both the UM M12 and M30 kits
and other UM Sherman kits such as their M4A4 model. The two sprue-D at right
holds small parts for the M12 and M30 such as grab handles and a spiffy fire
extinguisher.
Besides the
rear lower hull plate (part-E13) this sprue holds the parts for UM's 3-piece
differential cover (parts E15, E64, E65, E202, and E203). Be aware that in the
assembly instructions the parts 202 and 203 on sprue-E are mislabeled as parts
104E and 105E. When I assembled the UM M4A4 kit (kit 385) last year I had a
devil of a time assembling this differential cover. The parts E64 and E65
appear much too thick to mate with the parts 203 and 202 and required
considerable shaving to thin it down so it would fit together.
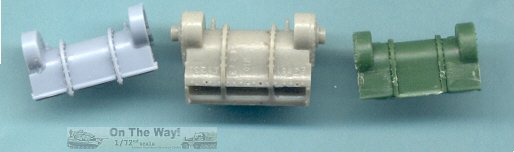
Above is a comparison
of how two other 1/72 Sherman makers do their their 3-piece dfferential cover.
Heller at left is in five parts of pale gray plastic and fits together
logically and with a tight fit. In center is a resin part from Wee Friends cut
off a hull bottom.
At far right is
the assembled 5-part UM differential housing after much shaving and sanding to
make the parts fit; a rotor tool would be handy here. When I build one of
these UM kits I will try and substitute the resin part in the middle. There is
no reason for UM to have done their differential housing this way when they
could have just as easily done it as like ESCI or Heller did their parts.
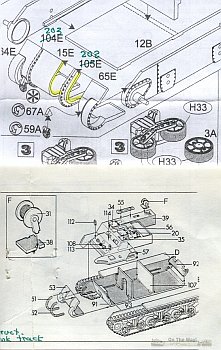
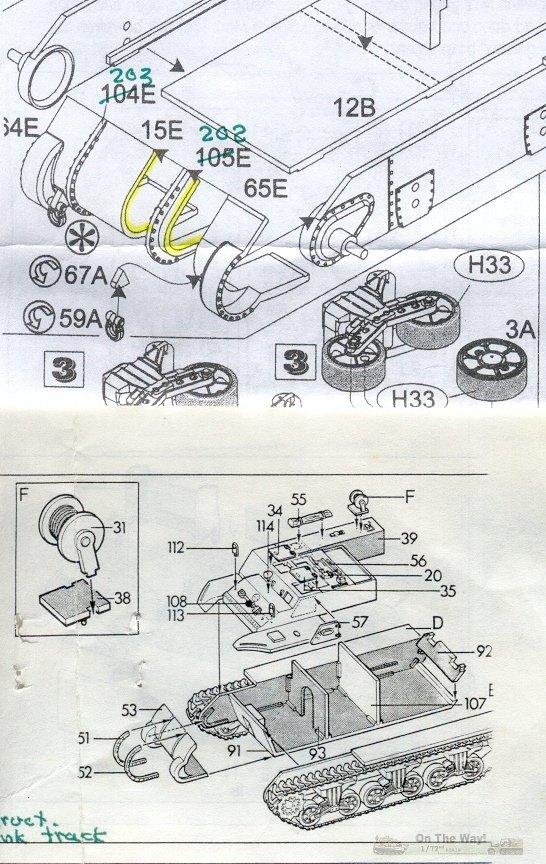
Here is a comparison of the assembly
instructions for the UM differential cover (at top) and the ESCI differential
cover (at bottom). I have highlighted in yellow areas on the UM parts that
will need thinning and repeated test fitting. The UM part numbers have also
been corrected in the UM instructions.
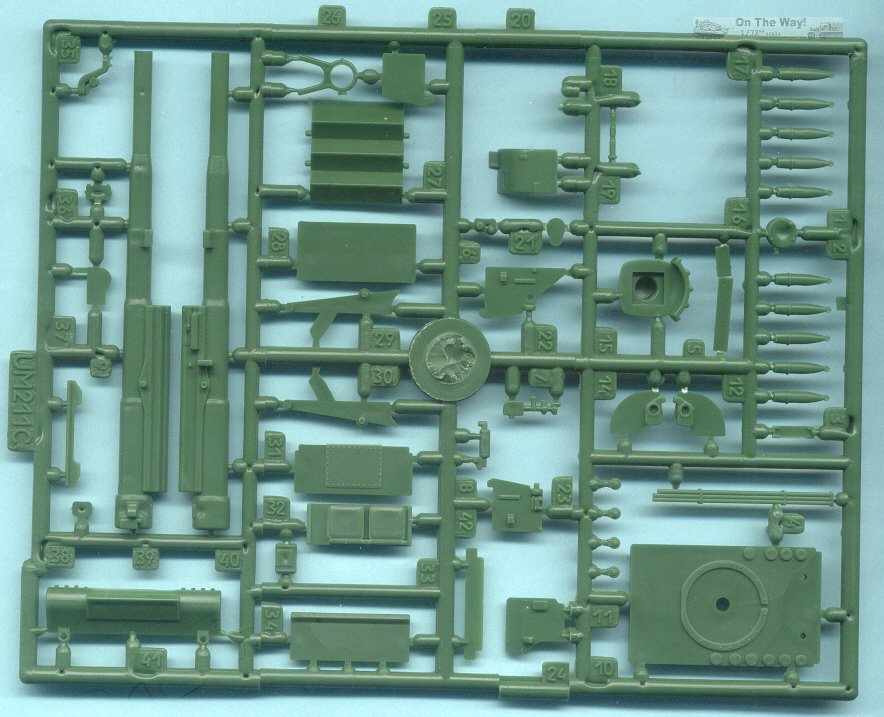
Sprue C is only
in the M12 model Kit 211, and holds the 155-mm M1917 gun parts. The gun is
broken down into more parts than the ESCI model. What is disappointing is the number
of sink holes that will need filling, sanding and shaping. I have found sink
holes on the gun pedestal parts C16 & C17, and the gun barrel parts C39
& C40. The 155-mm projectiles, parts C1, I think are very well done; I
like how the lifting rings atop the projectiles are portrayed. Part C7 in the
center appears to be the gun sight; I did not see a gun sight in the ESCI model
kit.
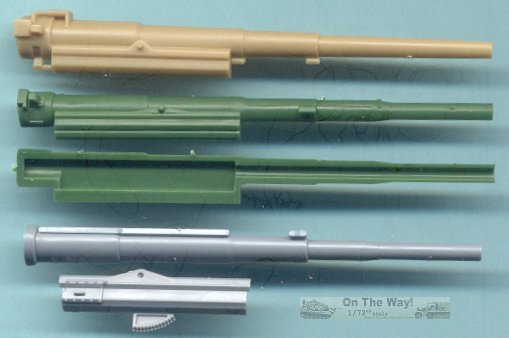
A comparison of
the 155-mm GPF (US M1917) guns shows that they appear all about the same size
though the UM has a greater muzzle diameter. My personal assessment is that
the UM M12 gun parts are better detailed and more accurate than the ESCI kit
gun, and the UM M12 gun has more parts which is good. To get the ESCI gun
accurate we'll need some scratchbuilding. The UM has multiple, annoying sink
holes to fill and sand.
At bottom are
several parts from the RPM 155-mm GPF gun kit which in my opinion appears to be
the best of the three. All gun barrels assemble in two halves and there is no
need to drill out the muzzle, just a glue seam to worry about. When put
together I found the ESCI and UM gun barrels to be satisfactorily round and not
oval which is good.
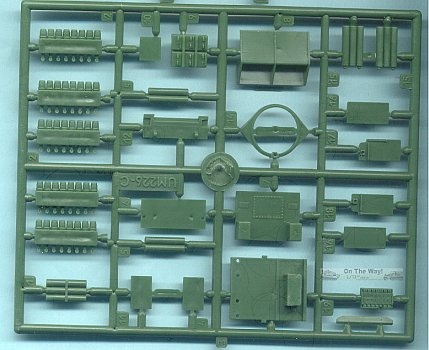
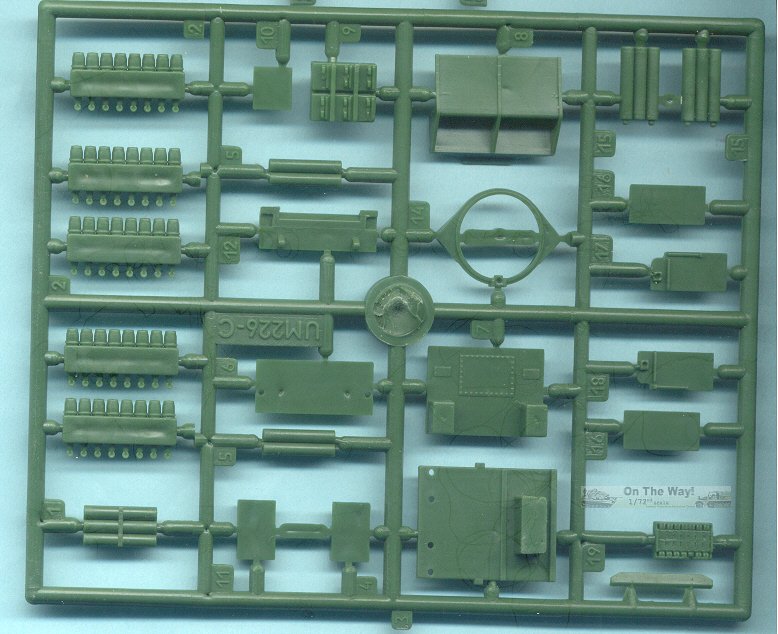
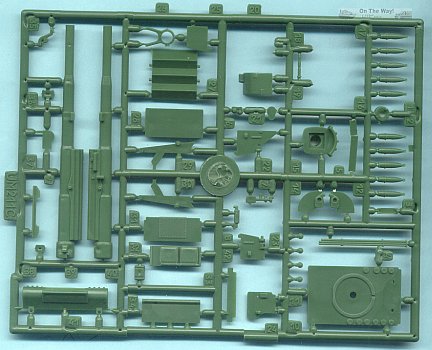
Above is
sprue-C for the UM M30 Cargo Carrier kit no. 226, different and not to
be confused with sprue-C for the M12 model kit above. This sprue is not
in the M12 kit. This sprue contains the superstructure parts, AA machine gun
ring mount, and ammunition for the 155-mm gun.
Assembly Instructions
Both UM and
ESCI give the exploded-view type of instructions standard to other ESCI and UM
model kits, and most other model manufacturers.

This version of
the ESCI kit shows assembly of the link & length track parts. Another kit
I have of the ESCI M12 comes with the stiff polyethylene band track resistant
to glue. The hard plastic track was great, top notch for its day but in 2015
is mediocre compared with other Sherman track now available. These assembly
instructions appear straightforward. The suspension assembles just like that
on the ESCI M4A1 kit.
The ESCI M12
kit painting guide shows markings for one M12 in Europe 1944-1945. On the
small decal sheet are markings for four vehicles. This decal sheet is over 10
years old, some of my old ESCI decals are stiff and cracked.

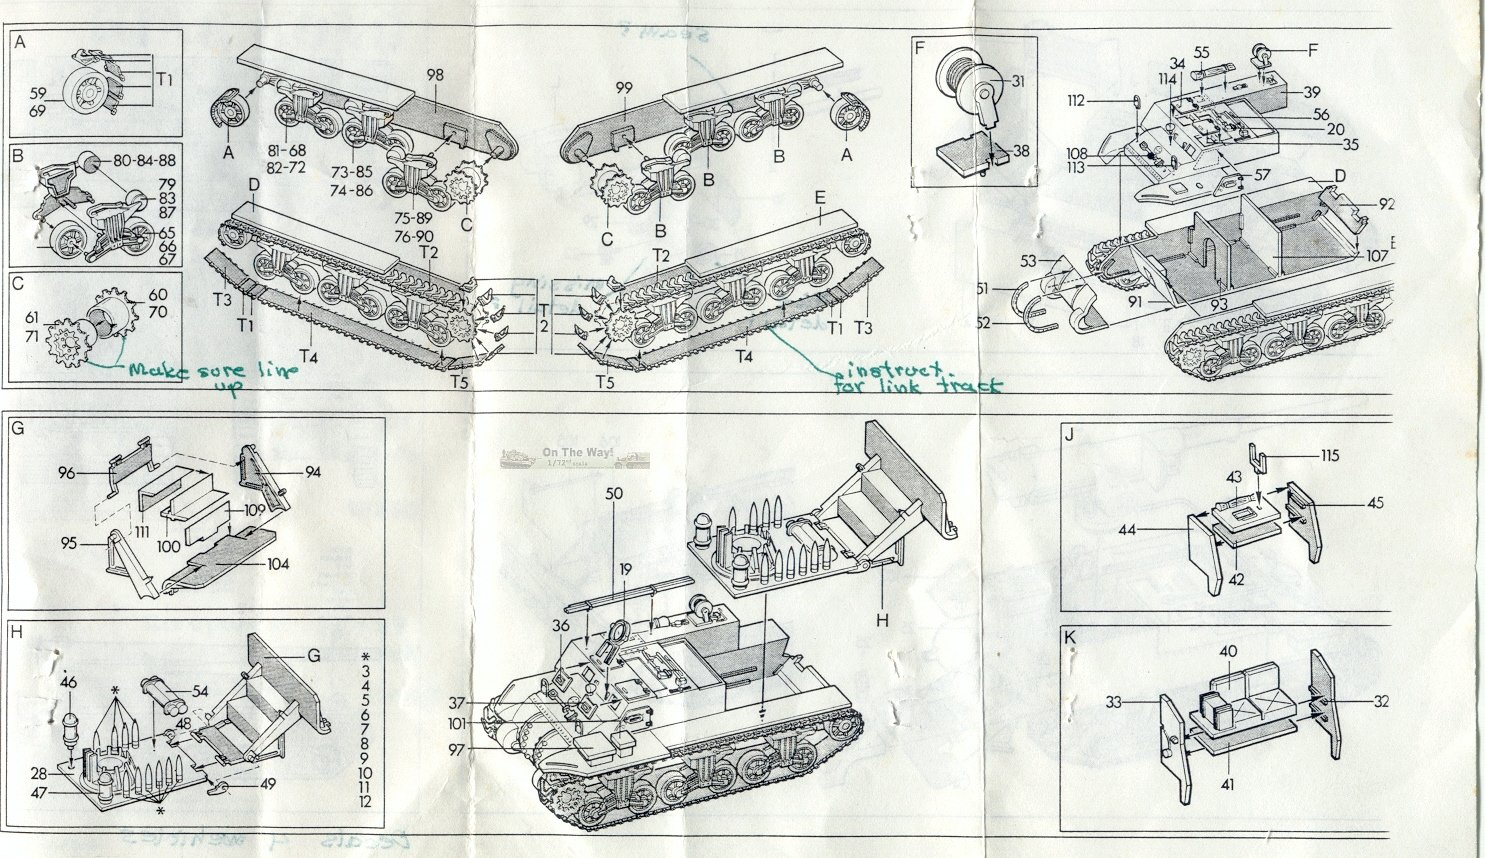
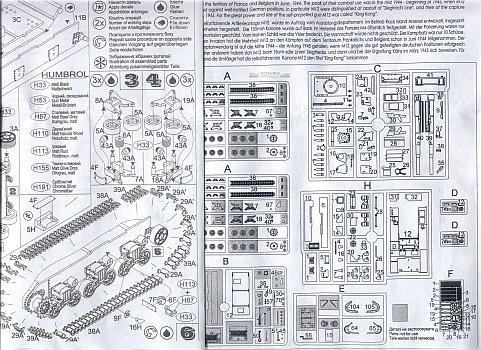
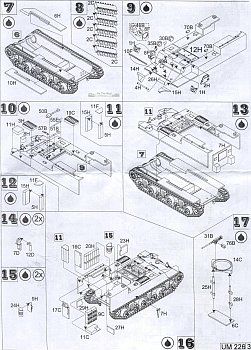
The
instructions from the UM M12 kit 211, below, start with a diagram of the sprues and kit
parts. The unused parts are shaded in gray. Based on this we have a lot of
unused Sherman parts like with other UM Sherman kits.
The last
drawings in the instructions below show deployment with the recoil spade down
for firing and up for travel.
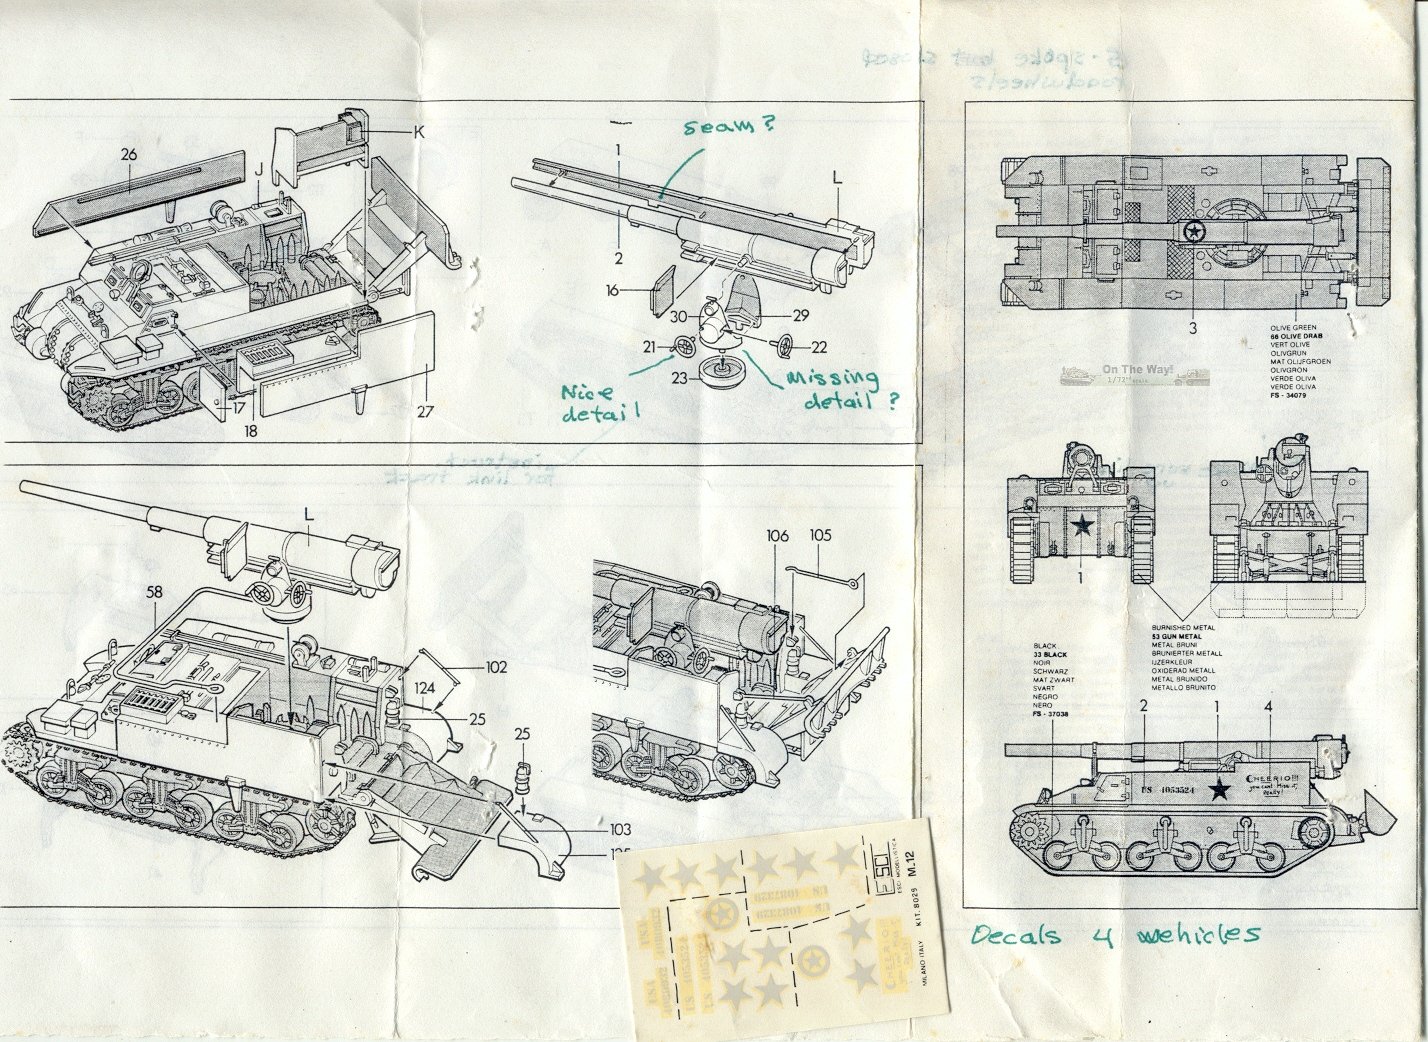
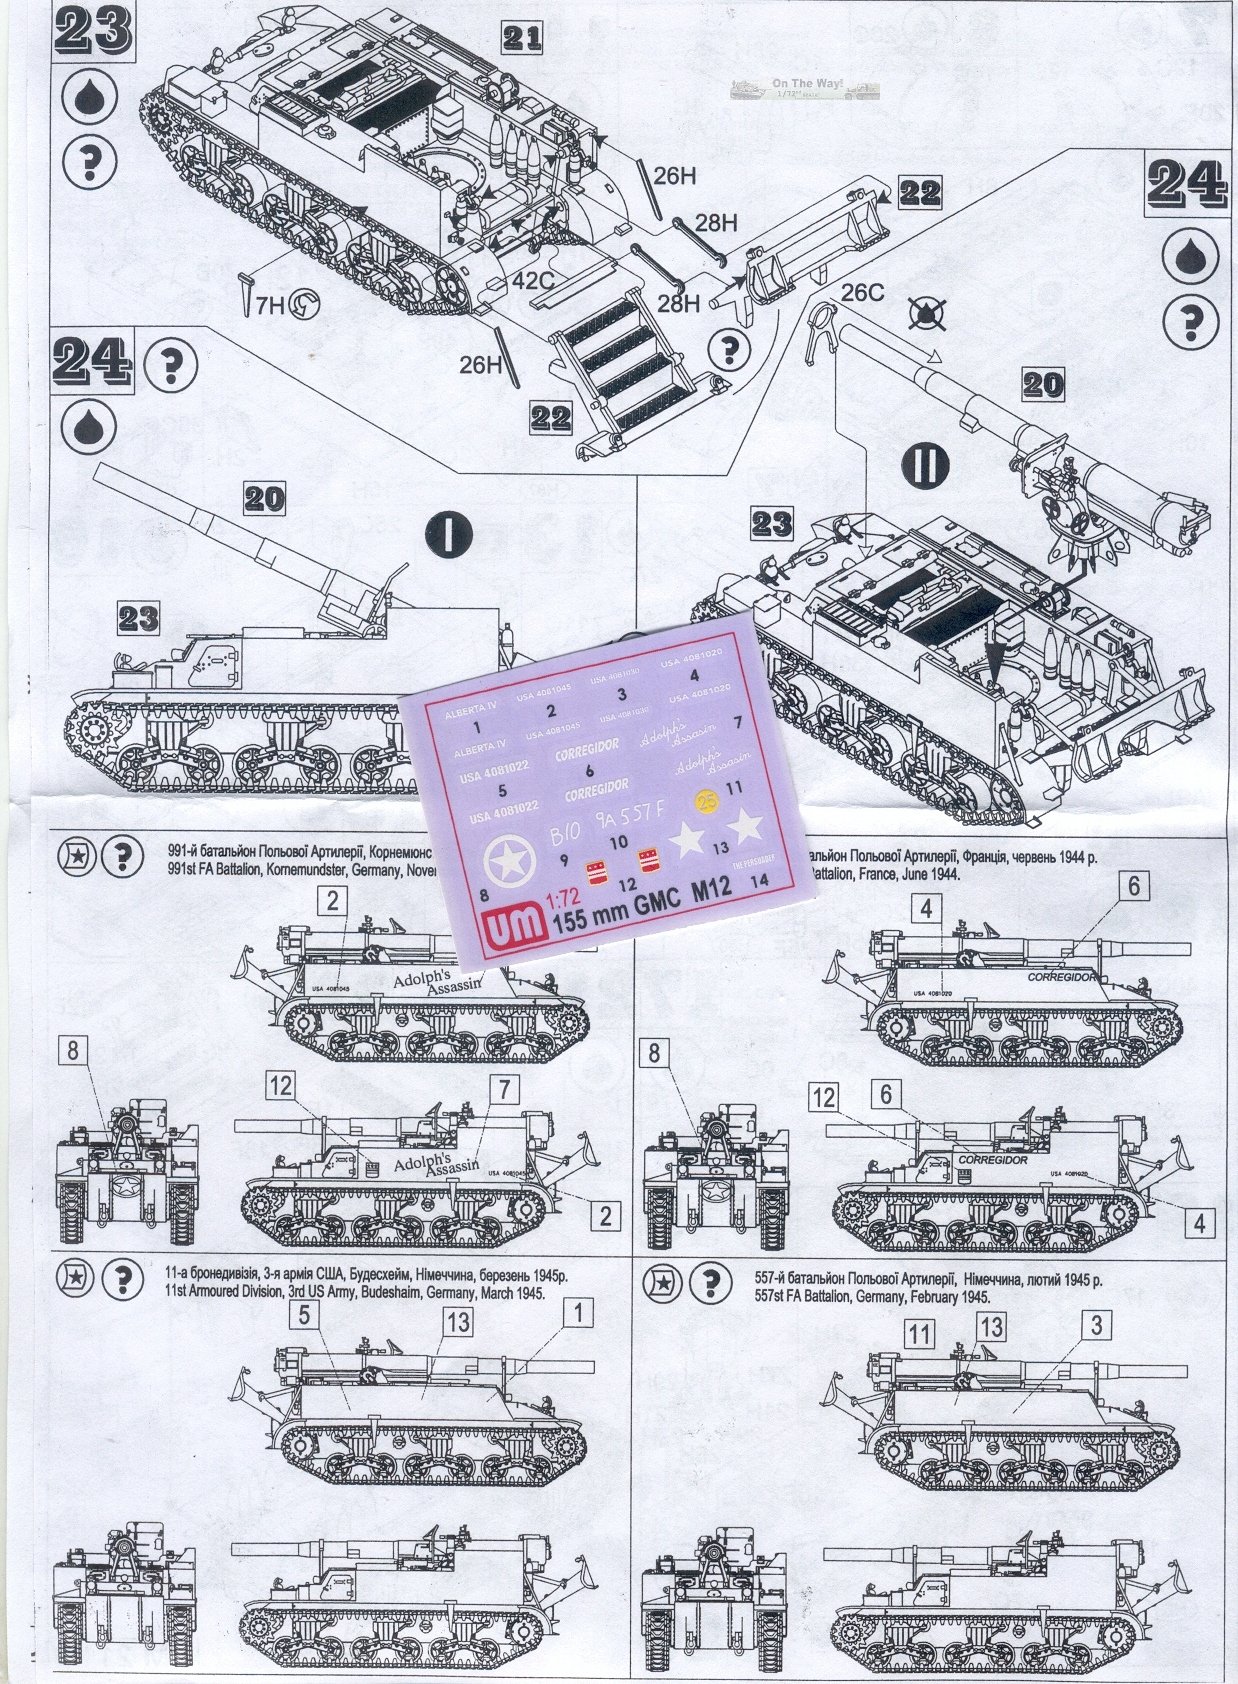
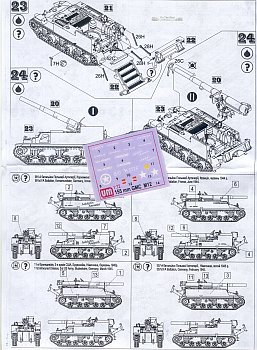
The last
page of UM's M12 instructions, below, shows final assembly of the gun either in
the firing position or in the travel mode with the gun secured in the travel
lock. At the bottom are painting and marking instructions for four M12
vehicles and the sheet of water slide decal markings for this vehicle.
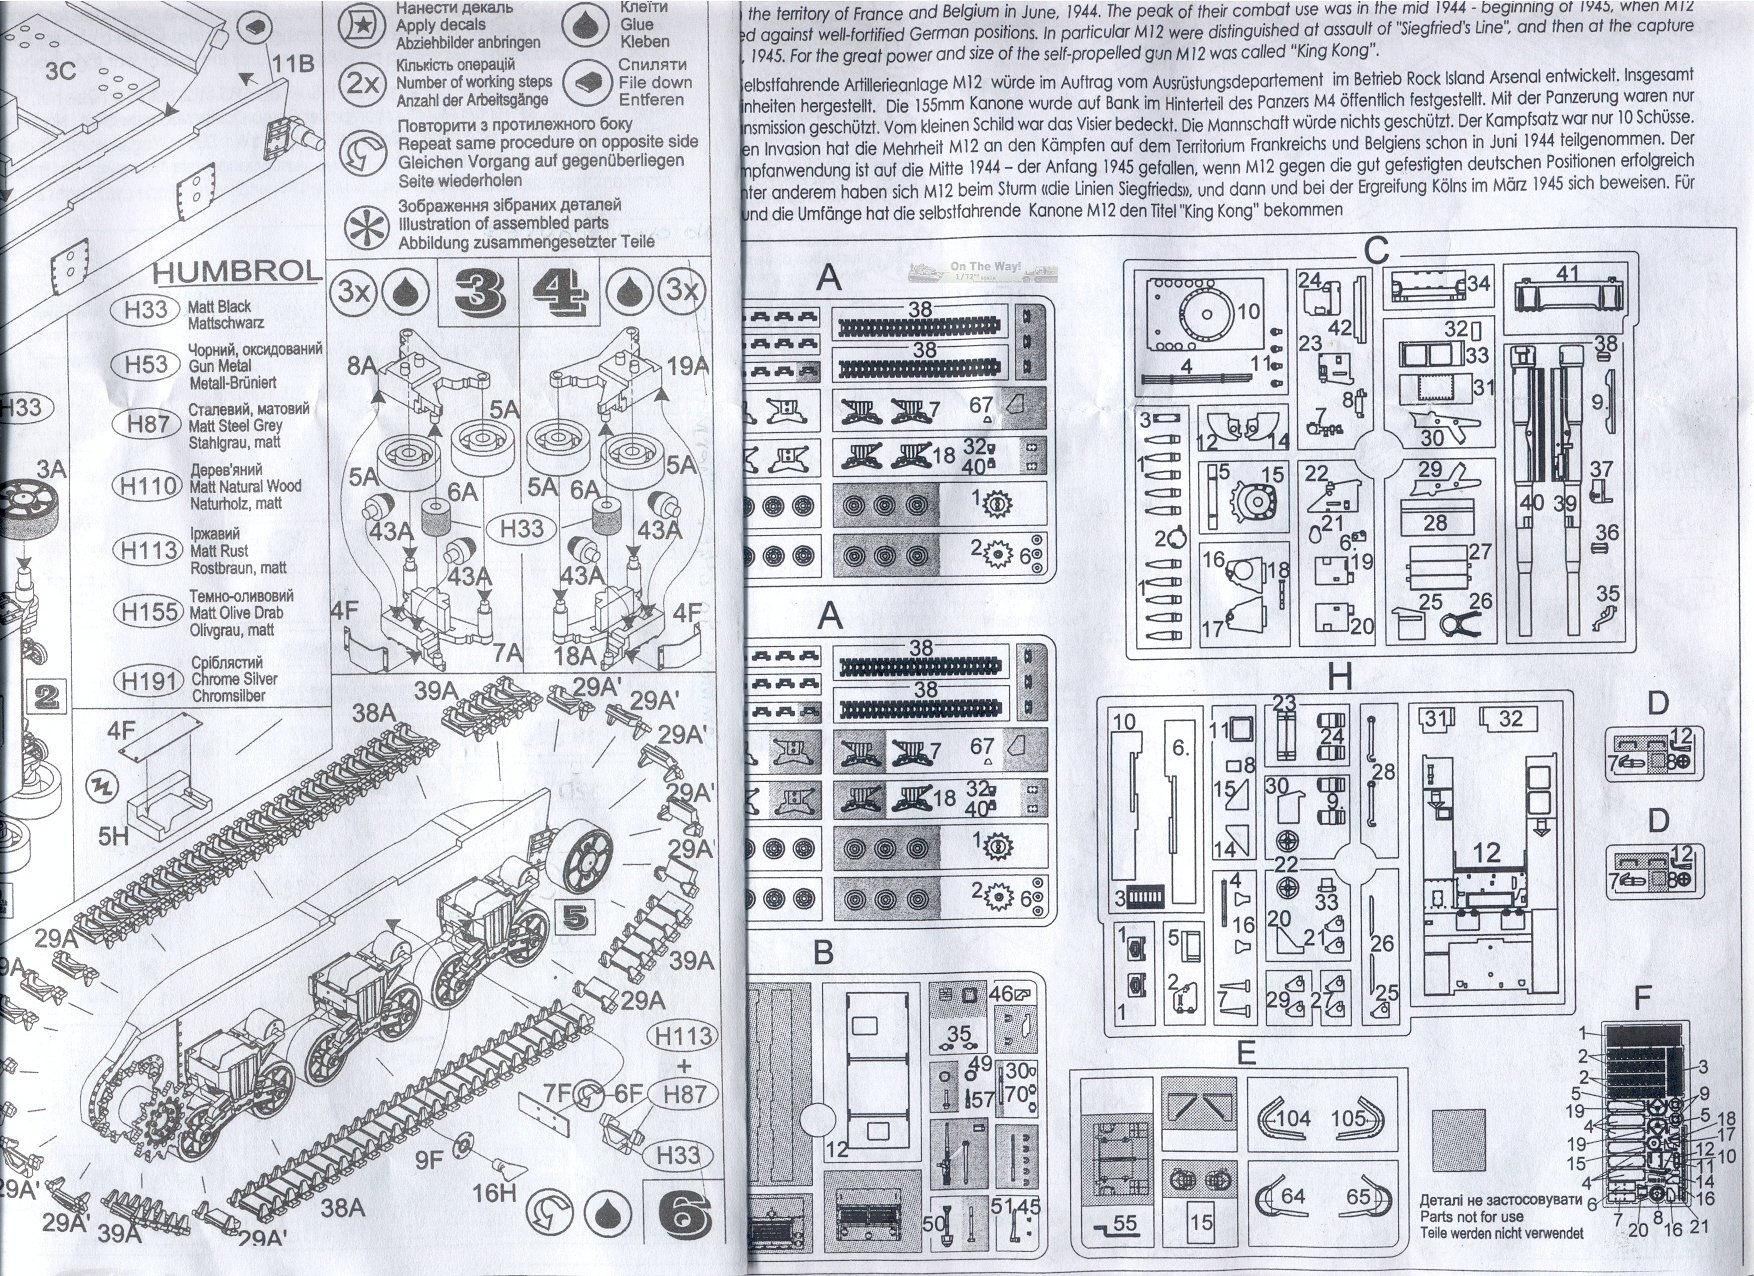
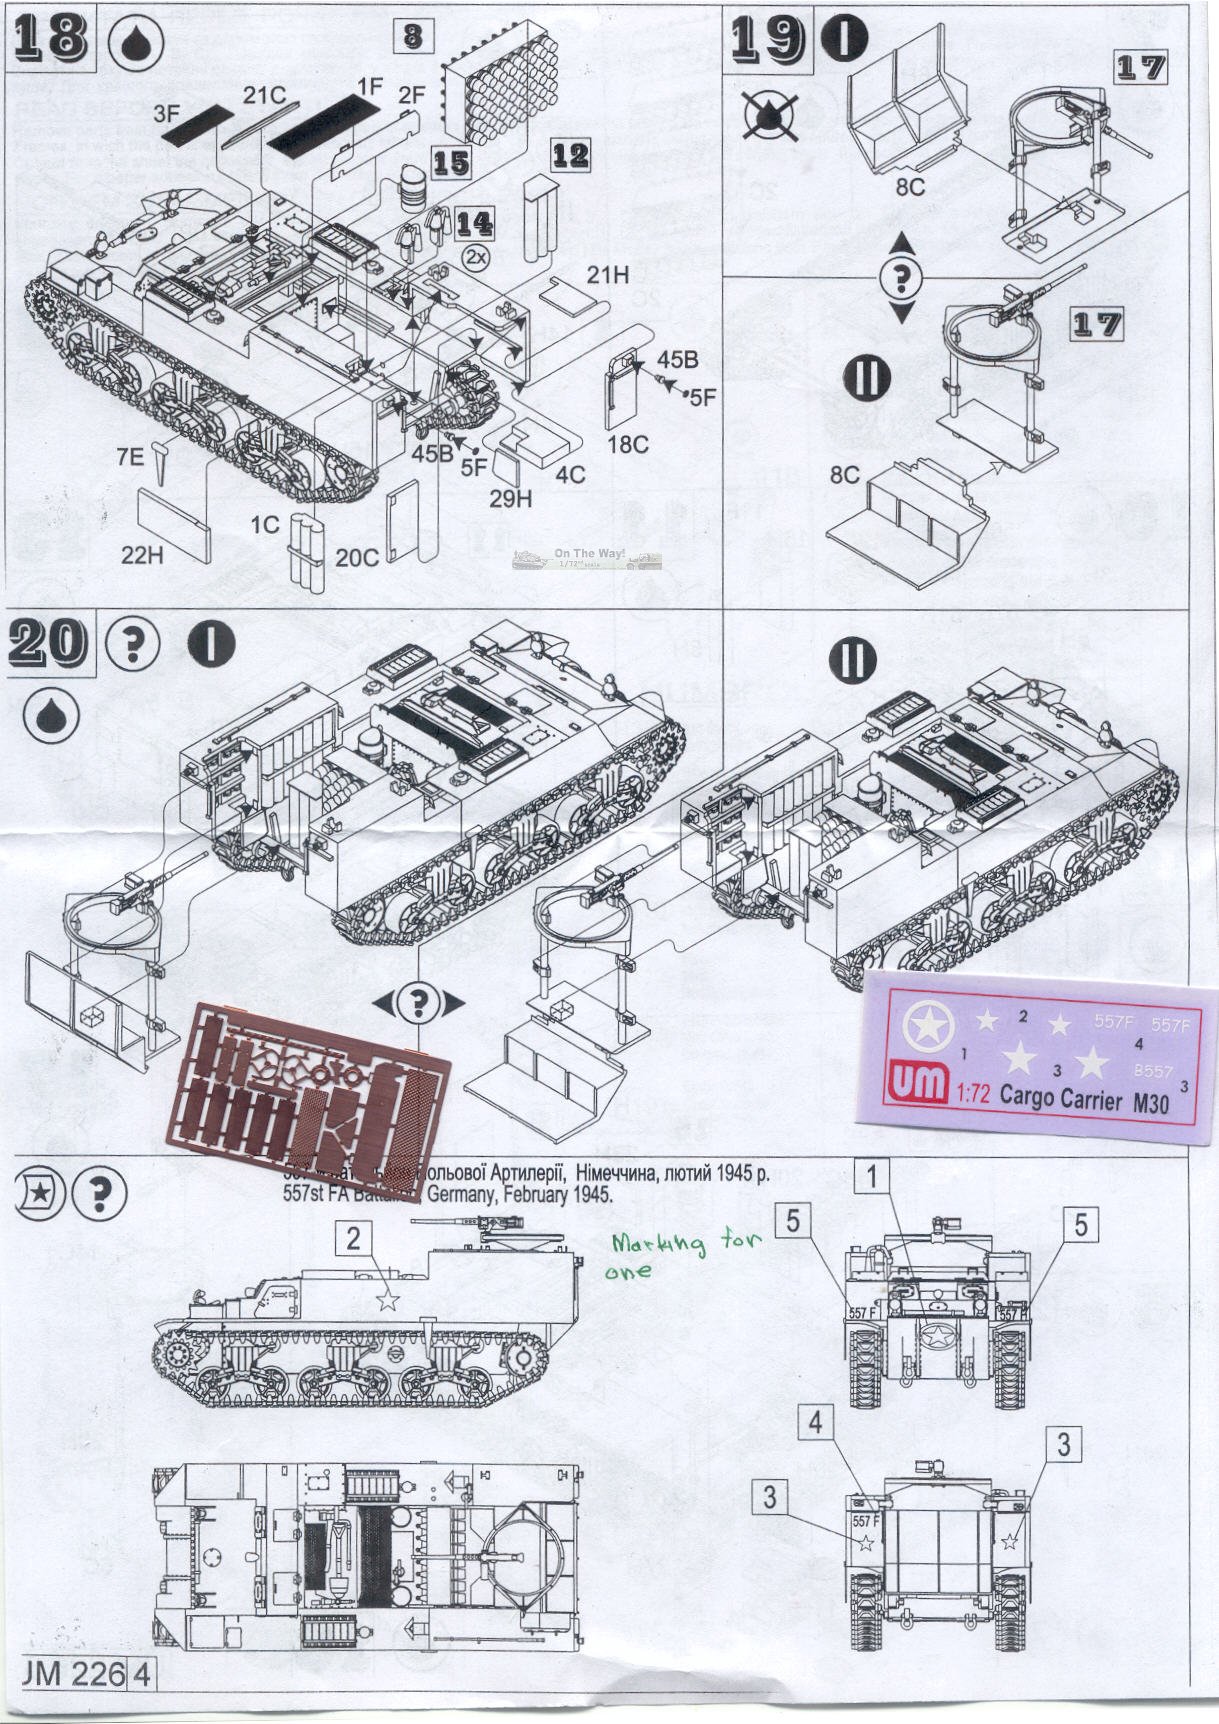
The 20-plus
step assembly instructions for the UM M30 Ammunition Carrier kit 226 are
the same as for the UM M12 kit until we get to the upper superstructure for
ammunition storage which is a different superstructure from the M12. I used to
think that the M30 could be easily modified to take the 155mm gun if necessary,
but after studying the vehicles I realize that was not so. The floor was
different and did not have the gun mount, the M30 had higher ammunition bins
for greater storage, and the M30 lacks the recoil spade on the rear.
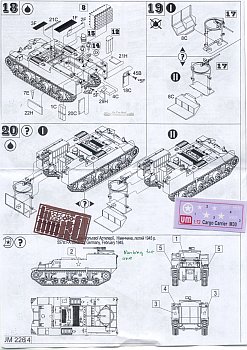
In the last
page of the M30 cargo carrier assembly instructions below we have a painting
and marking guide and a small water slide decal sheet for one M30 model. At
lower left is the etched metal fret-F that is included within the M30
kit. This fret differs from the etched metal in the UM Sherman kits in having
two engine ventilation screen parts. The UM M12 etched metal fret is similar
but has etched tread plate pieces (F1, F2, and F3) for the rear spade. (ESCI
molded their tread plate pattern into the plastic parts.)
Painting and Markings
ESCI's painting
and marking guide consists of the box art and black & white drawings on the
last page of the instructions above. The painting & markings instructions
are adequate but unfortunately only a guide for one M12 and no unit information,
though it looks like there are decal markings for four different M12s.

Above is the
back of the box for UM's M30 kit showing a full color painting guide which in
combination with the front box art and the instruction sheet show us their
recommendations for all four sets of decal markings. These painting &
markings instructions are typical of UM kits.
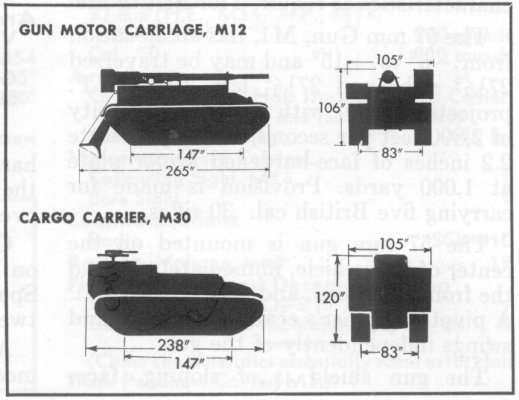
The silhouette
profiles below will help in determining the scale of the kit. Based on the
comparison of the gun and the hulls above, it appears to me that the ESCI and the
UM M12 models are comparable in size. Looking at the ESCI and UM Sherman kits
I understand that they are reasonably close to 1/72 in scale and I presume that
means the M12 and M30 models are a reasonable 1/72-scale as well?
Conclusions
Taking into
consideration that I have not yet built any of these models, if I were to wish
a contest and display quality model I would substitute an RPM model's GPF gun
and use the ESCI hull along with some selected UM parts. I would not use
either the ESCI or UM VVSS bogies, wheels or tracks, but substitute some
aftermarket, Heller or Dragon suspension parts. My biggest problem with the UM
kit is the way the company did the 3-piece bolded differential.
In my opinion
both manufacturers appear to make an accurate small scale representation of the
M12 self propelled gun. ESCI did not produce an M30 kit like UM does but with
some scratchbuilding the ESCI M12 can be converted to an M30 cargo carrier,
like what Steve Zaloga built years ago. The UM kits share a lot of parts
assembly with the UM Sherman kits. UM Shermans do not have the, what I call
finesse, delicate and crisp molding, of Revell and Trumpeter small scale kits,
but I am thankful of their M4 kit releases. UM offers a wide selection of
Sherman variants and other vehicles unavailable from others other than in more
expensive resin, They make a good wargame model and with some work make a fine
display model.
Models purchased by the reviewer.
|