|
Currently, to have a 1/72 scale Jeep in plastic, the choices look quite plentiful. No less than seven kits are available:
Academy, Airfix, Dragon, Hasegawa, Heller, Italeri and S-model. Unfortunately the Dragon kit, despite being well done, is in 1/76 scale (see table below).
Heller has a quite good Jeep with the tools and the bridge plate moulded on. This kit is also sold by Airfix as item #01322, and is already
reviewed on OTW (here). Airfix has its own separate kit #A02339. S-model has a very good
mould, which is also offered with other various items, or sold as separate kits. Italeri offers a correct simplified quick building model. As far as I have
seen, Academy and Hasegawa kits look to have some shape and detailing problems not solvable without replacements, so I didn't buy either.
Writing about the Jeep is almost embarrassing. A so well known vehicle, one that can still be seen driving on our streets, should be so familiar to all, that every
thing about them seems superfluous. However the kits I built revealed that there is room to clear some confusion.
Jeeps were manufactured by Willys as model MB and by Ford as model GPW. Ignoring the earlier Willys model MA and the version produced by Bantam, the type depicted
by the kits, with the typical radiator grill, was produced in 628,245 units. Its catalogue number was G503 and the official name was ¼-Ton, 4x4, Truck.
Differences can be found along production time lines as well as between the two companies.
Regarding the S-model kit, the restoration community would point out that
the flat tool box top is correct for an MB, while the rear chassis (missing an additional cross member) is correct for a GPW. Production details are correct for
a Jeep made by March 1943 to September 1943 (see 4UWPDatingJeep for the batch
registration numbers).
As for the Airfix kit A02339, it has the swaged tool box top for a GPW and the rear chassis with the additional cross member for a MB. The windshield has a hint
of a rifle rack, while the footrest of the spare wheel is missing, all valid for a Jeep produced by September 1943 to December 1943.
Italeri's kit has the correct features for a MB made by March 1943 to September 1943, having the flat tool box top and the rear chassis with the additional cross member.
Most of the production differences are very small and microscopic in 1/72. Not considering the very early production run, which had different windshield and
grill, some details that may be of interest in 1/72 are:
- The early muffler was cylindrical. It was changed to oval in 1942: May for Willys, July for Ford.
- The rear mounted Jerrycan and the blackout light on left fender were added in July 1942. Jeeps produced earlier could receive the blackout light as a retrofit,
called "Kit No. 1".
- In March 1943, the rear reflector was placed at the same level as the light to make room for the newly introduced trailer plug.
- A horizontal rifle rack was added to the inside of the windshield in September 1943.
- A footrest for the spare wheel was introduced in December 1943.
- In June 1945 the exhaust pipe routing was changed, placing the muffler under the rear seat
(see g503.com here.)
Regarding vehicle dimensions, I included the Dragon kit to show it's not 1/72 scale. The widths are shown with and without the grab handles for better comparison
because of the
S-model problem (see below). The dimensions are quite true to 1/72 scale and the only real surprise came from the Italeri wheel track, which is 2 millimetres narrower.
The total vehicle height is not reported because I didn't use the tilt.
| | 1/72 | S-model | Airfix | Italeri | Dragon |
| Length | 132 1/4" | 46.7 | 46.3 | 45.6 | 46 | 43.9 |
| Width | 62" | 21.9 | 20.2/-- | 20.0/21.4 | 20.5/22.0 | 19.2/20.8 |
Height
. w/top | 69 3/4" | 24.6 | | | | |
| Wheels | 6.00x16 | 10.1x2.4 | 10.0x2.3 | 10.0x2.0 | 9.6x2.2 | 9.4x2.3 |
| Track | 49" | 17.3 | 17.2 | 17.5 | 15.5 | 16.4 |
| Wheel Base | 80" | 28.2 | 28.3 | 28 | 28.4 | 27.1 |
To build my models I used some printed sources: the technical manuals TM-9-803, TM-9-224 (for the gun mount), TM-10-1281 (for the trailer) and the
Osprey New Vanguard 117 book "Jeeps 1941-1945", where the full registration numbers can be found.
On the net, a very nice site is classicJeeps.co.uk,
while photos can be found here: olive-drab.com
Thanks to the restorer community, a lot of info is available in the G503 forum. One of the most important things to keep in mind is that when they were made,
each Jeep was 100% Willys or 100% Ford, whereas restored Jeeps could be a mix of both, so using a restored Jeep as reference could generate a hybrid. If one
is interested about the production and maker differences, or timeline variation (even the smallest), these web pages are very useful:
Jeepdraw.com,
'Jessie' the Jeep and
sosJeependetress.forumactif.org
Jeeps were sent also to the other Allied countries and one can find photos of Jeeps on every front and for every country that fought in WW2, Germany included.
US registration numbers are well documented whereas British registrations are not. I couldn't find a Jeep WD number list, but what I eventually found, scattered about
the restorer community forum, are the following batches, which cover 64,830 out of the approximate 66,000 total. Those WD numbers I found in photos and outside of
the batches below are marked by an *.
M1166416 - M1166419 (4-slat grills)
M4611718 - M4611775 (58 Bantam)
M4768471 - M4771586 (3,116)
M4771587 - M4778143 (6,557)
M4921997 - M4923996 (2,000)
M4938020 - M4939019 (1,000)
M4957976 - M4958017 (42)
M5155534 - M5158535 (3,002)
M5220001 - M5221364 (1,364)
M5475632*
M5534138 - M5539697 (5,560)
M5557518 - M5558171 (654)
M5558376 - M5559875 (1,500)
M5571048 - M5572845 (1,798)
M5584033*, CM5584352*, M5637432*
M5814127 - M5845740 (31,624 reconditioned Fords)
M5833457 - M5834956 (1,500)
M6128340 - M6133339 (5,000)
M6270724*
If someone can provide me with the missing batches I'll gladly update the list.
Also the Canadians received Jeeps. Their generic registration numbers were comprised from 4200000 to 4299999. Some Jeeps retained the British
number with the C suffix added (for example CM5584352).
Before proceeding on to the different kits, a few words are needed regarding the grab handles. Each Jeep had four of these handles, one in the middle of each side and
one on each rear corner. To be really accurate these should be replaced on whatever kit one chooses. They are moulded on with differing results on every kit
but the S-model kit, who provides them as etched parts, and are even worse in my opinion, as they are flat and thin where they should be round in cross section. Some
experiments to make the middle side handles with metal wire failed and after some nerve wracking crises I made them by plastic in the moulded on way.
My Jeeps are specific to the European campaign. Other fronts saw wide use of local modifications which I intentionally ignored, otherwise I'd have to model
Jeeps for years! With that said, here we go.
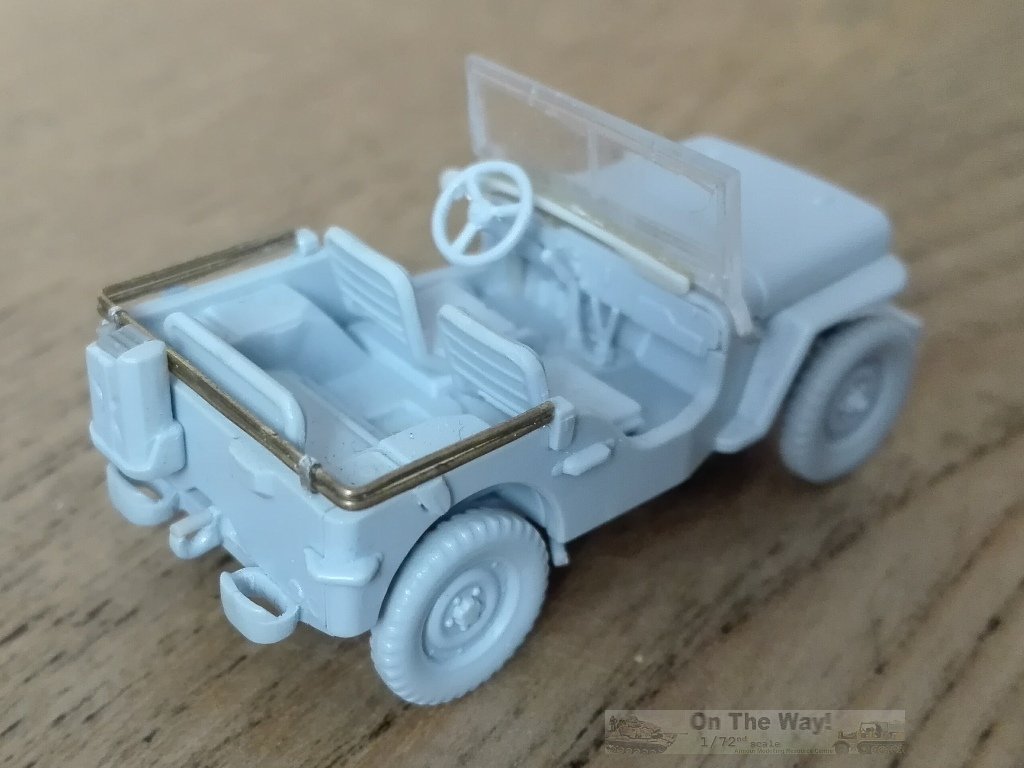
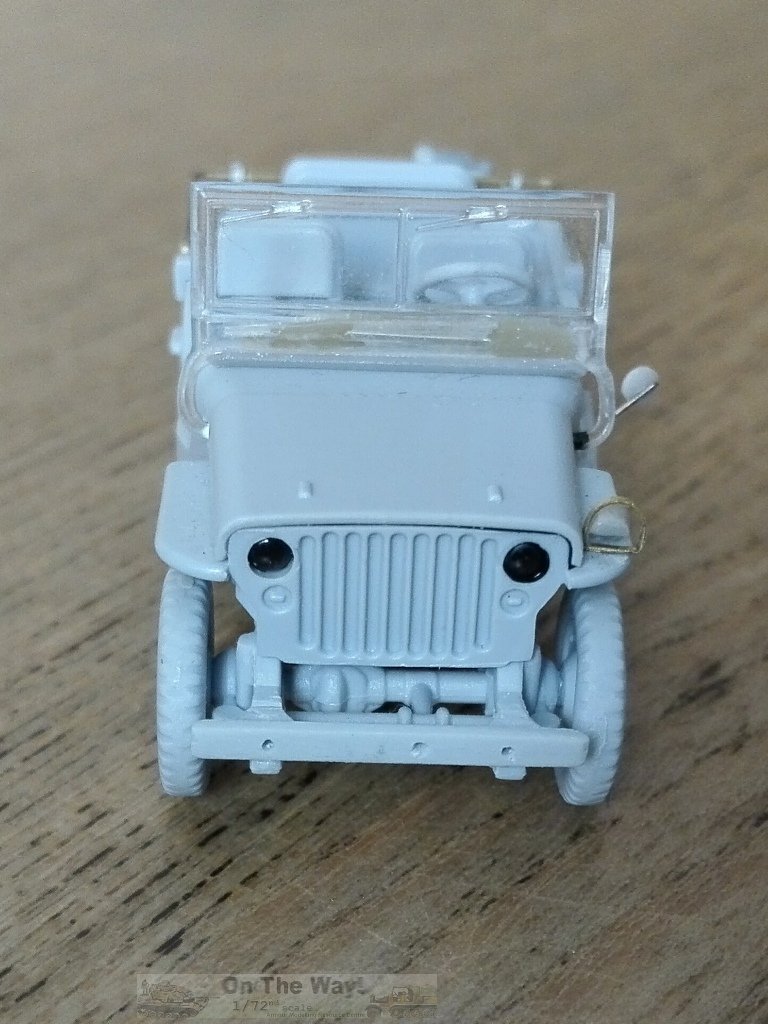
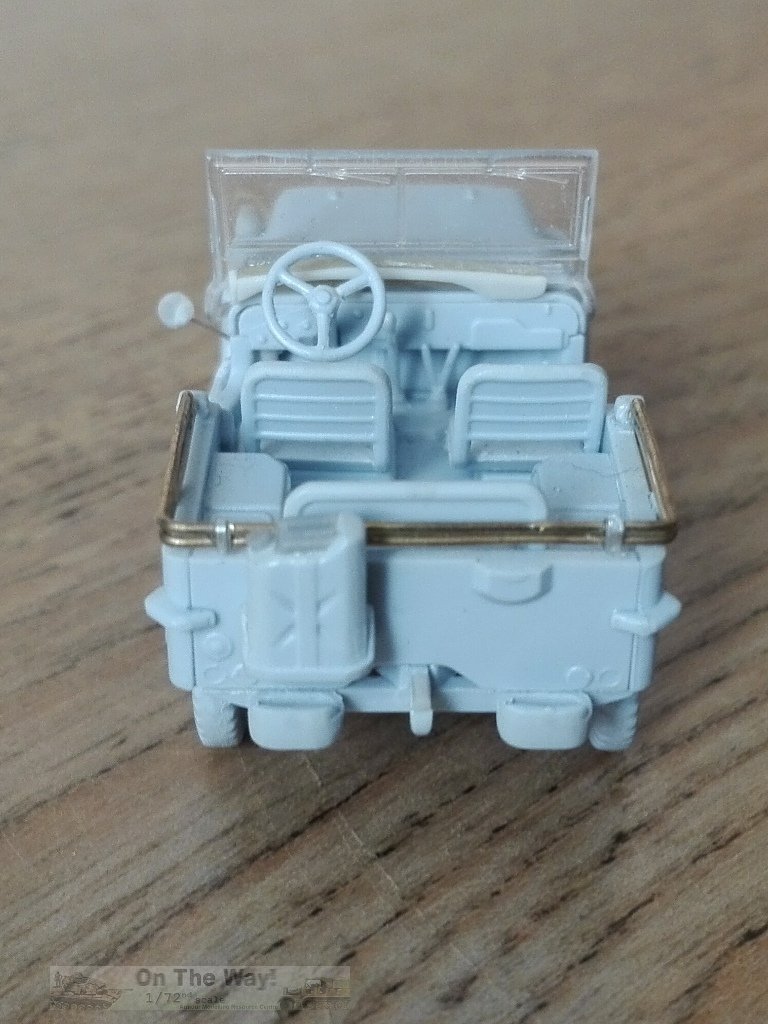
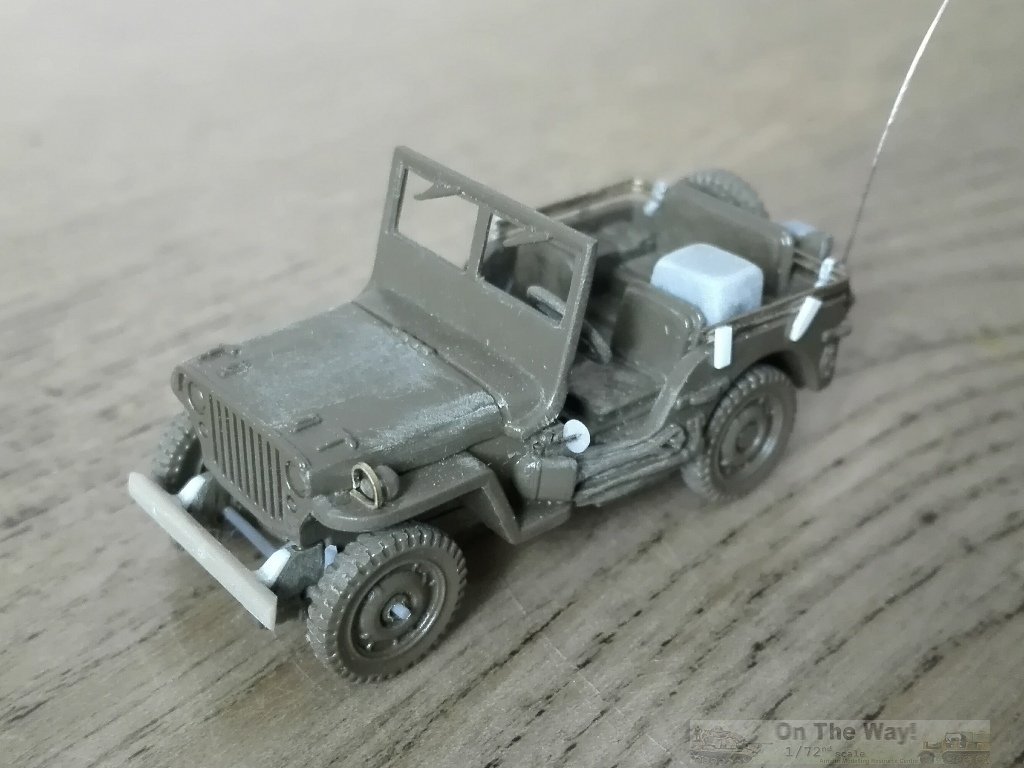
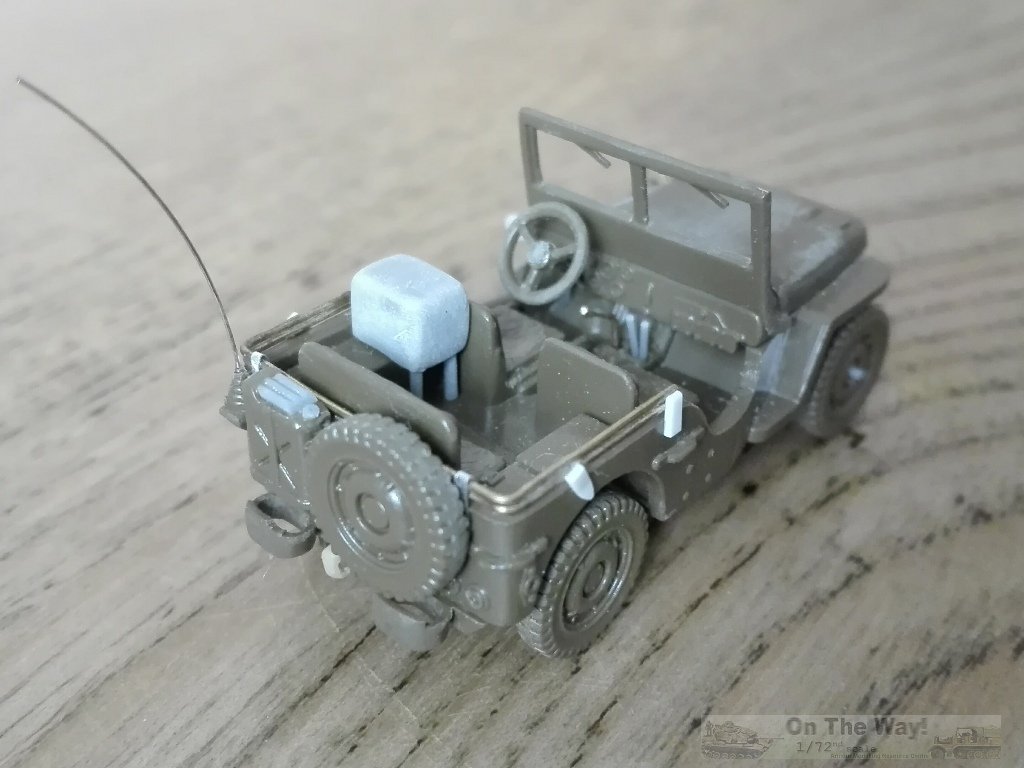
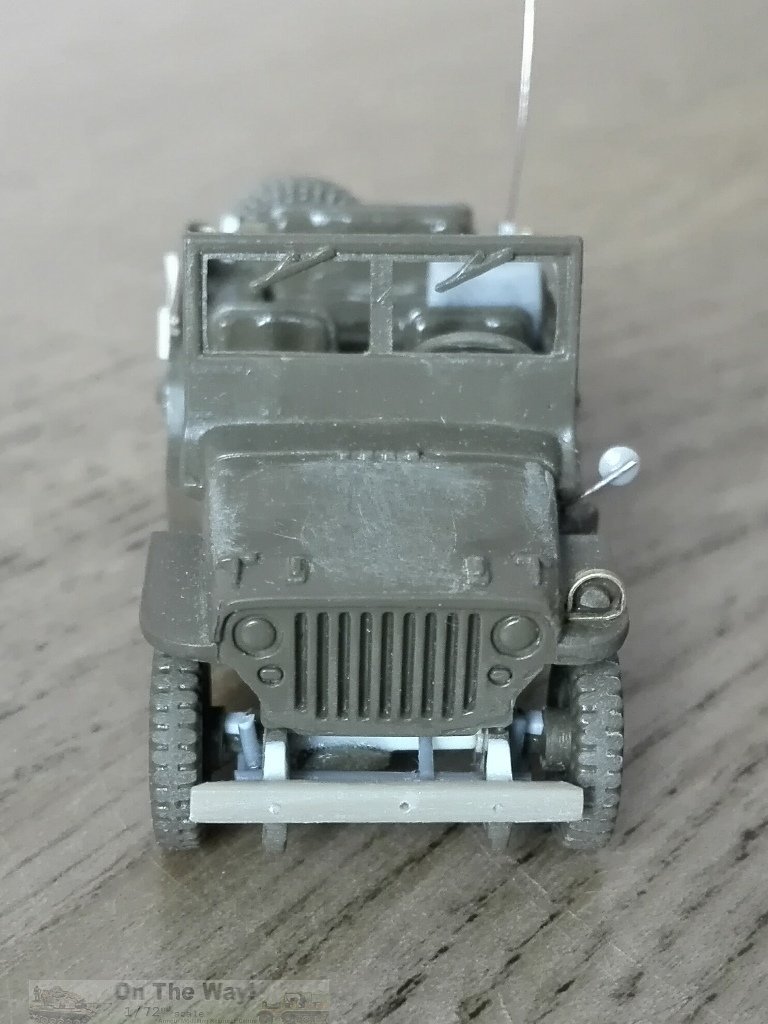
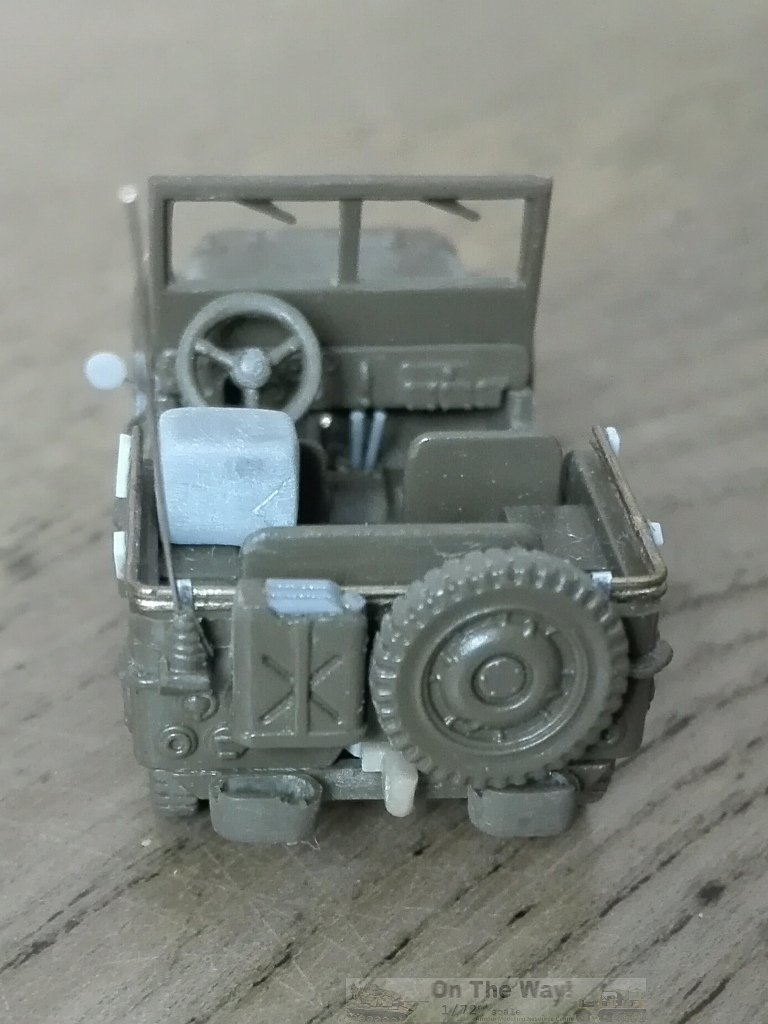
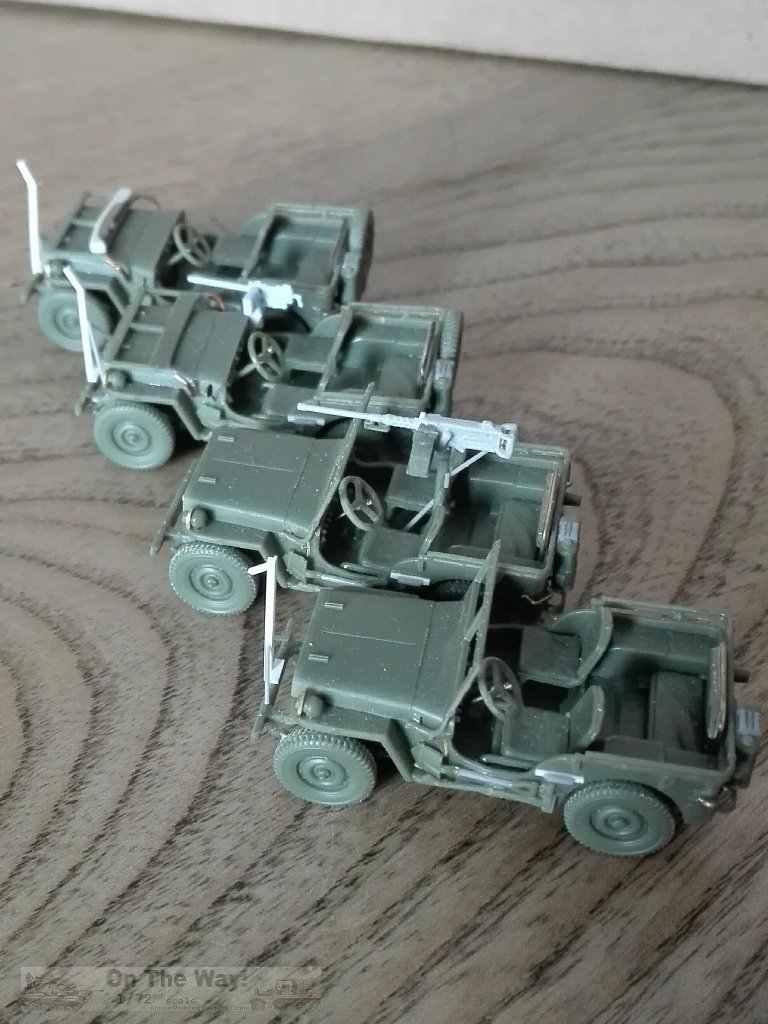
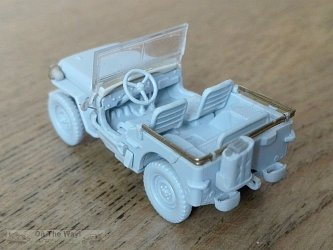
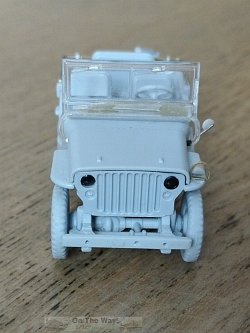
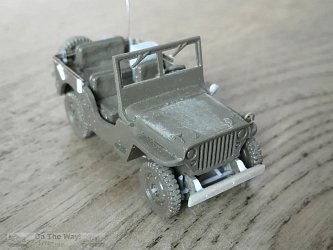
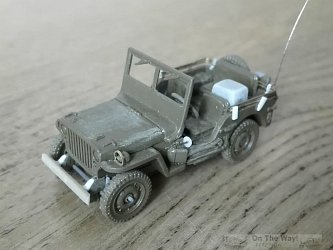
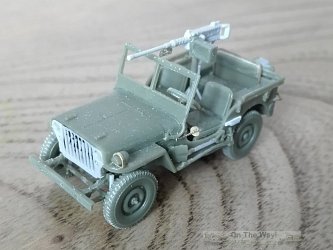
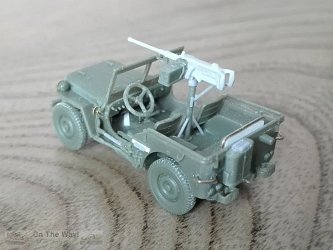
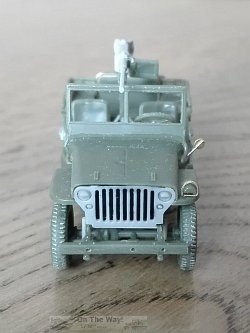
S-model (Kits 720046 & PS720047)
Two identical moulds are given for a pair of Jeeps. Details are well depicted. Each mould includes a helmet, a Garand M1, a Thompson M1 and a US Jerrycan as
bonus parts. PE parts are given for thin details. Transparencies are not supplied. The green plastic is quite fragile and care must be
observed in removing the thinnest parts from the sprue because they're easy to break. I made four S-model Jeeps and on each one something broke.
Depending which kit is chosen, there is a further couple of frames. Kit (PS720047) has two towed 37 mm anti-tank guns, while kit (PS720046) has two
trailers. I bought both. A special (and rare) armoured variant is proposed by another kit (PS720044). S-model has some special Jeep releases,
one with a pedestal mounted 37 mm anti tank gun and water cooled M1917 MG (SP72004), while the other has just a pedestal mounted M1917 MG (SP72005).
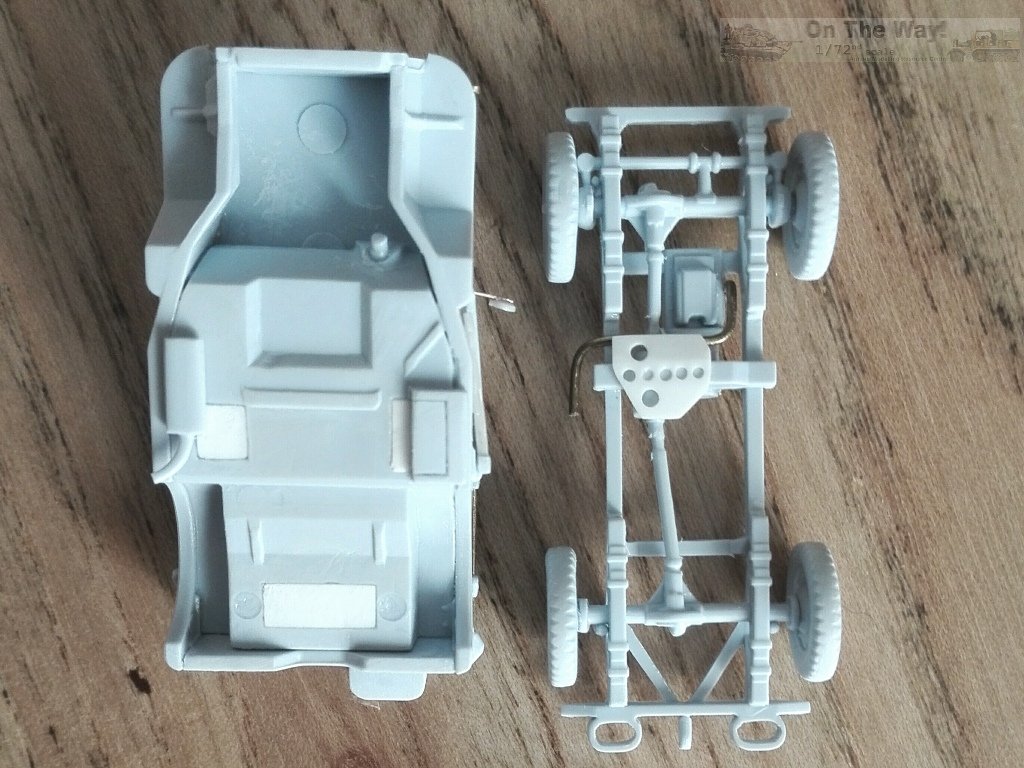
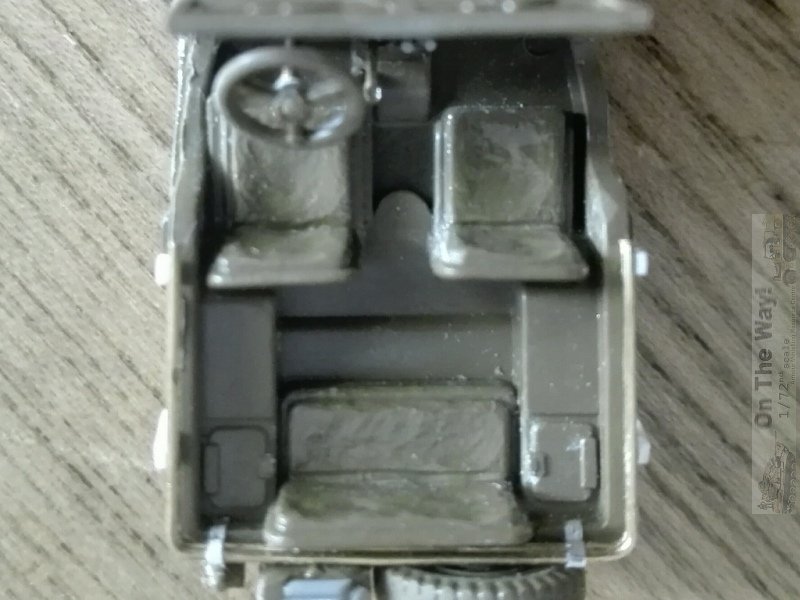
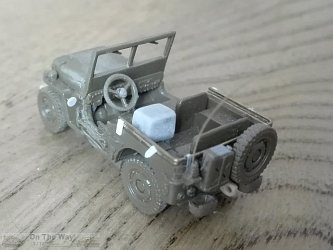
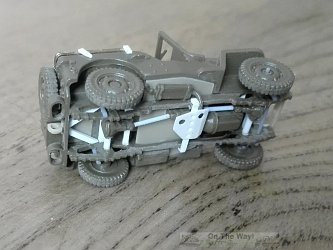
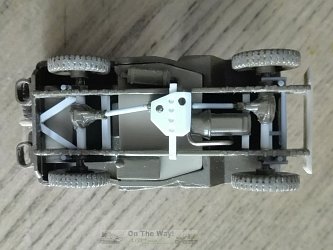
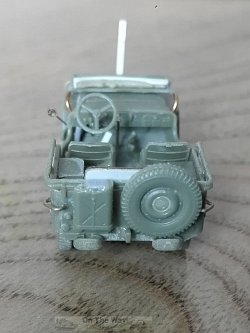
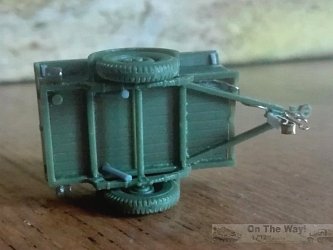
Chassis
- The chassis is very nice. To join the two halves A1 and A2, I glued the centre first and when dry, I glued the leaf springs. I had to
replace the first member just because it interfered to the new grill (see below).
- The shock absorbers are missing. I made them from stretched sprue. This also helped to strengthen the suspension whose spring shackles are tiny.
- On two Jeeps I added a member to close the "V" frame of the pintle hook, just to have a couple of MB. The other two remained as they are for a couple of GPW.
- The transmission skid (part A17) changed shape during production, and differed as well between Willys and Ford. The kit one is correct for the period GPW and does
not need correcting. Other types can be found here.
- The wheel pairs correctly have different hubs. The wheels with the more protruding hubs (part A14) are for the front axle. The pair which has the
normal hub (part A31) go on the rear axle.
- In the bumper Counting left on the grille, I drilled a hole at the 6th slot in the bumper for the starting crank handle. Only for my GPW, I drilled two
further holes where
the bumper meets the frame. From the restorer community, another detail was discovered: the bumper was filled by a wooden insert which slightly overlapped the
edge, "to provide both added strength, and to prevent the tow rope from being cut on the bumper's sharp edges". This detail is depicted on the kit!
- On the rear member there was the pintle hook. The type molded is correct. The 1945 production had a slightly bigger top, which is not noticeable in
1/72 scale anyway. At its sides, on the lower bolt heads of its flange, there were little trailer safety rings. I tried to replicate them by wrapping thin
metal wire around a pin, but they looked huge, so I decided to omit this microscopic detail.
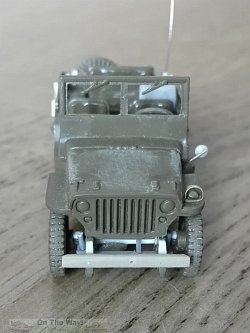
Body
- The pressed grille, introduced by Ford in January 1942 and by Willys in March 1942, despite its being well shaped, does not look very good because its slots are
too shallow. Being a poor painter, I opted for an after market item, the Rescue grille, part no. 72006. It is
very well done and really makes a difference. Getting it to fit needed a little
adjustment of the engine bay and replacing the chassis member. In my opinion the grille is the kit's only real let down, something S-model could
easily rectify by using a PE grill.
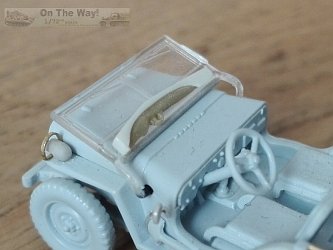
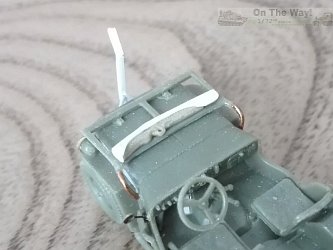
- No clear parts are provided for the windshield. But this is not the worst problem. Its arms are very fragile and easily broken and lost. This happened
to me for three of the four Jeeps built.
- On one of mine I added a scratch build rifle rack, found on Jeeps produced from September 1943 to December 1943, and later, if the spare wheel footstep is added.
This link illustrates what the rack looks like and where it mounts: g503.com
- The gear shift is very fragile. I replaced it with metal wire with a knob was made from glue.
- Metal wire also replaced the steering wheel shaft.
- I added an accelerator pedal using thin plastic chips.
- There was a fire extinguisher on the MB passenger side. With the introduction of the glove box in February 1942, it was moved to the driver's side. An alternative
position visible on some photos was just under the dashboard between the two seats, but in this position it would block the newly introduced emergency kit introduced
in December 1943. On the left fender there was the decontamination pump. It did not use the same bracket having different length, however apparently troops begun to swap the items
to have the fire extinguisher more accessible. The decontamination pump was placed under the passenger seat, a practice that was made official for Jeeps produced by
June 1944.
- On the left fender there was also the blackout light (part A19) introduced by July 1942. It's missing the horseshoe shaped brush guard, which I fashioned from
left over PE parts.
- The rear-view mirror has a large and flat shaft. I replaced it with thin metal wire.
- The grab handles are supplied as PE parts, but I did not like them because handles were made by a round rod, not by flat plate. I replaced them with metal
wire and stretched sprue (see intro).
- The backrest (part A5) has thin supports are very fragile. I replaced the whole structure by a shaped metal wire.
- The Jerrycan (part A13) has the usual large single handle; I replaced it with stretched sprue.
- I didn't use the opened soft top tarpaulin even though it is well depicted, and much better than Airfix or the others I've seen. If were to use it, I'd replace
the two "V" supports (parts PB1 and PB3) with stretched sprue because, being PE parts, they are too much flat.
Special features
Besides the rifle rack, and to have something different for the other Jeeps, I added some extra features.
On one Jeep I placed a M48 mount, using the Airfix .30 cal MG with a new cradle. On another I used a M31 pedestal mount. I added the braces and the travel
lock, and replaced the .50 with a Trumpeter part taken from the spares box, and added the S-model handle.
On three out four I added a wire cutter. These were hand made items and had various patterns made by the unit's workshops. I chose the more common version,
but by observing the period photos, everyone can find their preferred style. One can be seen how they were made at
criticalpast.com.
Decal
This is another sad part of the story. Just some anonymous Allied stars and four Chinese markings are given. Better than nothing, but....
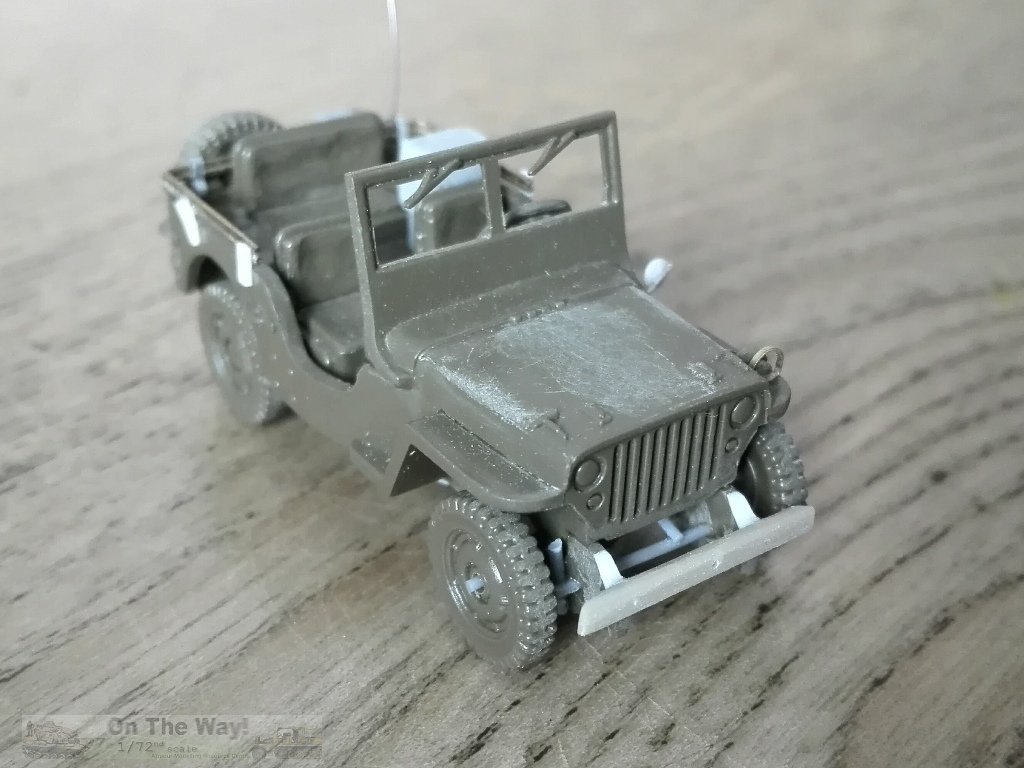
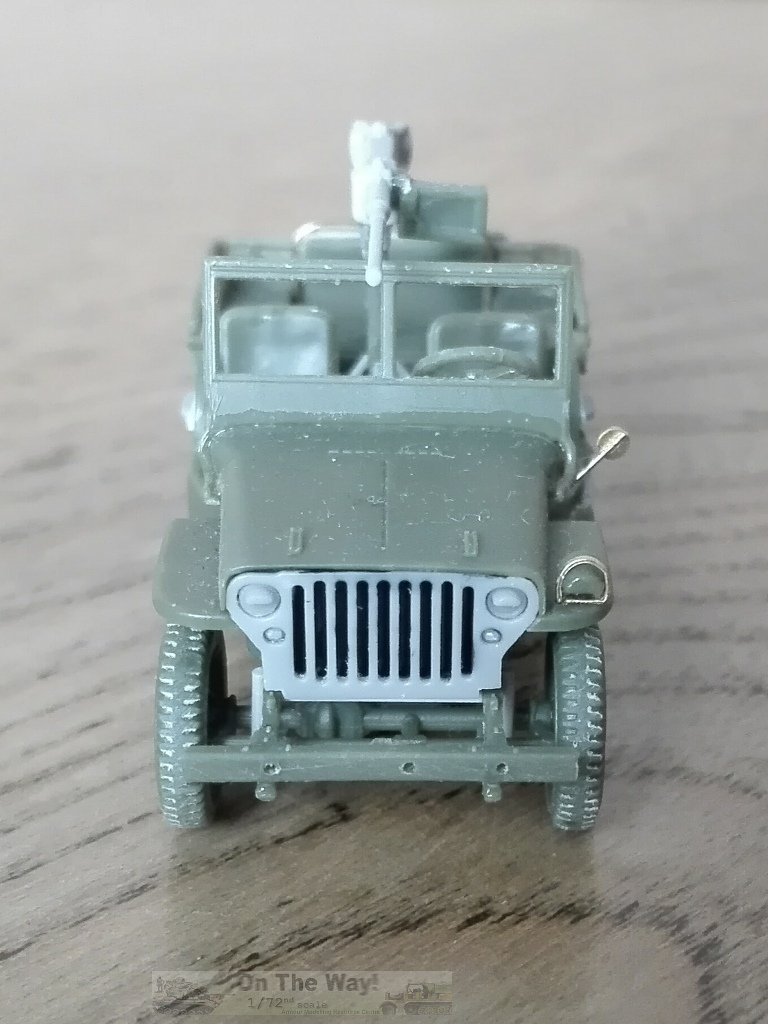
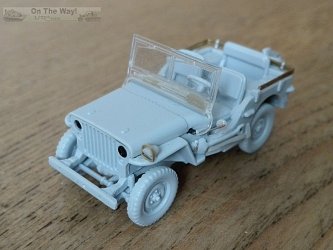
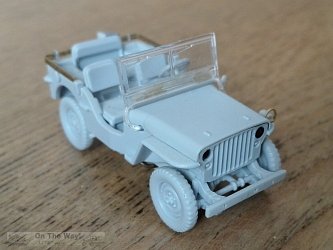
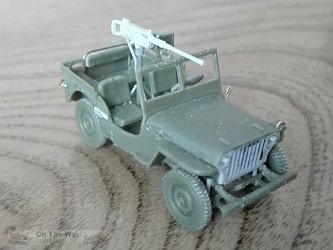
Airfix (Kit #A02339)
Two light grey plastic and a transparent mould could make this the more complete kit. Colour instructions and a decal set are included.
Some bonus items are provided: four US jerrycans, a wooden box, two Lewis MGs with their mount and bonnet top. Bonus models are a trailer and 75 mm Pack Howitzer.
An opened tilt, a .50 MG on a M31 mount and a .30 MG on a T47 mount gives some options.
Despite this, some problem arose during assembly, and unfortunately there are a lot of ejector pins which need to be dealth with.
Chassis
- I resized the wheel pins to correct the wheel track.
- The front bumper had the squared towing point removed and I sanded down its top to have a squared section, and then I drilled the hole for the
starter crank and the two at the frame intersections.
- The protective skid is missing. I fashioned one using thin plastic sheet based on the GPW pattern.
- The exhaust piping route to the muffler is incorrect. I made a new piping by metal wire.
- According to the GPW swaged box top I removed the member present on the MB chassis.
- I thinned the rear bumpers.
- The pintle was shaped and closed with its top.
- All the wheels have the same hub, which is correct only for the front axle. I sanded down the hub of the wheels going on the rear axle.
Body
- I cut off the small lights present on both fenders.
- The black out lamp is moulded on and very small, so it was replaced. It received the brush guard thanks to the PB1 and PB2 S-Model arms.
- The shovel and axe are moulded together. The look is not convincing and I preferred removing the axe and improving the shovel by reshaping it.
A new axe was scratch built using stretched sprue and a sprue tab.
- I added the fire extinguisher in the same spot as found on the S-model kit, in its almost hidden position.
- The steering wheel is a tad long. I drilled open a hole in its interlock on the floor and glued it in a more comfortable and natural position for the driver.
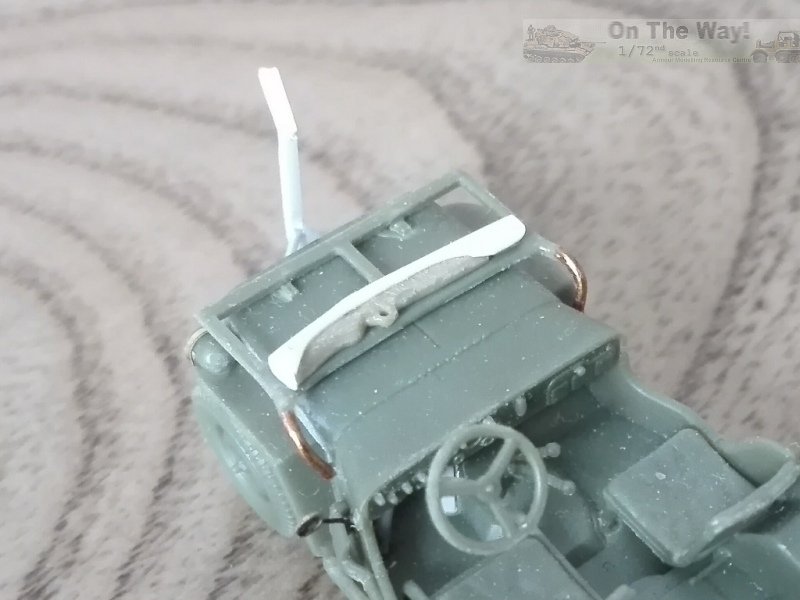
- The windshield comes as a single transparent plastic piece. It has three problems:
- When placed raised it falls much too close to the steering wheel. Placing it using the tilt as a template, puts it in the correct position, but the lower edge
doesn't touch the hood. I glued a stretched sprue segment to the bottom to correct it.
- The support arms don't have the proper curve and, if the windshield is placed lowered, it doesn't rest on its stoppers on the hood.
- It has a hint of the rifle rack, but it's shallow and barely visible. Following the variant suggested by the kit, I added a scratch built one.
- The rear-view mirror arm was replaced by thin metal wire.
- On the hull belly I closed the squared depression under to the seats and filled the box by plastic sheet.
- The folded structure of the tilt is badly done. I replaced it with metal wire and also added the missing interlock with a plastic chip.
- I detailed the jerry can, replacing its handle and cap. I placed it a bit higher according to the period photos.
Decal
Two Jeeps are depicted. A not so convincing US Army one, and a British airborne one.
- 2023238, AB10. HQ-3, 4 Division HQ, Belgium 1944 (?). The bumper codes don't look correct to me. As far as I know, for a 4th AD HQ vehicle
the code should be "4△ - X" and for a 4th Inf.Div. it should be "4-X". AB code was for the airborne units and was sported by the
101st and 82nd vehicles. The registration number is out of the official list. I didn't find a period photo, however there's a restored Jeep
marked in this way, and I think the kit depicts this Jeep.
- M4771410, 6 Airborne Div., 1st Airborne Reconnaissance Sqdn. The WD number is part of a 3.117 Jeeps batch, but I didn't find its photo.
For this last marking option the modeller has to modify the Jeep. A good description of the airborne variant can be found at
paradata.org.
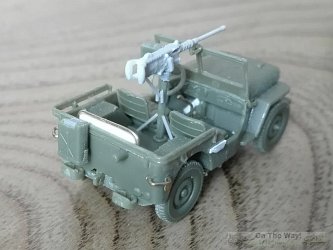
Italeri (Kit #7506)
The Italian brand has a double kit in the fast assembly range. Almost incredibly, the Jeep body is made up of just three (3!!) pieces of olive drab
plastic. The five wheels, the steering wheel and the rear view mirror complete the car. An open tilt is given as optional part. No transparent
parts are given, nor is a template provided on the instruction sheet.
Despite this, the Jeep is quite well done and has items not provided by other kits, such as wipers and an antenna bracket (but no radio).
As for the radio, different apparatus were used by Army and by USN/USMC on their Jeeps, so if one wish adds a radio, they have to use a photo as guide.
For the Navy and Marine types there is an interesting article at cj3a.info and at
g503.com there are some interesting photos.
Good references about the radios used on the Jeeps can be found at
radionerd.com.
The moulding looks good although there are sink marks at the base of each seat backrest. The sides are thicker than S-model's Jeep but not as much as on the
Airfix or Italeri kits, which both have the same side thickness. All wheels have the same hub, correct only for the rear axle. The grille is well depicted and the slots are deep, but the lower edge extends to
interlock with the chassis. The solid chassis looks a bit too high, especially on the front, where the bumper is placed a bit too low, altering
the original look. The chassis is solid and has a floor. This makes the frame inside shallow. To give a bit of perspective the mould maker placed
the inner part of the axles lower than the outer parts which connect to the wheels. It is strange thing to see, if one turns the model up side down,
but if it is placed on a diorama oddness doesn't make much difference I suppose. About the dimensions they are quite well respected, wheel track apart.
The soft parts (the seat pads and the tilt) look rigid and for a better result need to be reworked.
Being more interested in building vehicles and not much for dioramas, I tried to improve my model. Someone told me building this kit was a futile exercise,
and it might well be,
but I find these challenges enjoyable.
Chassis
- I cut off the whole solid floor, saving the transmission cases and the engine. The external parts were filed off, saving the box and the exhaust. I
shaped the rear frame profile which was curved, not squared, and the solid suspension springs were drilled to have a more realistic look.
- The longitudinal members are a bit too high. I filed off the excess using the little gap as reference for the level.
- I added the new members by plastic rod.
- I fashioned new axles from plastic rod, aligned with the pins for the wheels, and adding the saved transmission cases. If placed as suggested the wheel tracks
are 2 mm too narrow. I glued a 1 mm shim on both axles to widen the track.
- Thin plastic sheet was used to make the missing skid.
- A new front bumper was made from plastic and added after having shimmed the chassis to raise its position.
- The steering gear was made by stretched sprue.
- The rear bumperettes were thinned from inside.
- Using a plastic chip I shaped a pintle.
- The forward axle wheels had a different hub. I added the protruding part by stretched sprue.
Body
- On the bottom I closed the holes under the rear couch and the floor.
- In the engine area, I added two chassis members using plastic rod. This because the straight edge doesn't follow the original curve and the chassis
itself is straight.
- On this last and the floor bottom I added the engine belly. The drive shafts were added after having glued the chassis in its place.
- The windshield has the lower frame a bit too high. I filed off the small ridge to restore a more likely look.
- The seat pads look stiff like boxes. To make them softer looking, I used a motor tool and liquid glue.
- The gear levers were replaced by stretched sprue and metal wire.
- I added the fire extinguisher near the driver left leg.
- The steering wheel is quite correct, but the column is short. I made a new one to reach the floor.
- The blackout light is missing. Since the rear-view mirror is huge, I shaped it to make the lamp. Also this kit benefited from leftover PB1 and PB2
S-Model arms to receive its brush guard.
- The tools on the left side are moulded on. The handles follow the side profile, but they should lie in two recesses. I engraved the recess and sanded
straight the handles. I opened the shovel blade handle by drilling.
- Because it has an antenna bracket, I added an Army style radio. Without something available to make it, I used resin sprue to simulate one, which was
protected by its fabric cover.
- The bracket is placed on the rear which was an uncommon feature in WW2. Text book application was on the left side, above the rear wheel, even though
this placement was dangerous due to its overhanging. To avoid injury a brush guard was used. Better results were achieved placing it on the
rear, a solution used on airborne Jeeps, and on some ground unit Jeeps. Currently most of the restored Jeeps have the antenna bracket mount
on the rear. The restorer forums report cases of vehicle crash caused by its original placement. I left the bracket in the place chosen by Italeri,
but I cut off the lower part because its sides were triangular, and then added a whip antenna.
- The Jerrycan is solid but quite good. I replaced the handle and added its cap using stretched sprue.
- The tilt structure is missing. If the tarpaulin is used, it will need the two "V" supports added. I depicted my Jeep with the tilt folded using
metal wire and plastic chip.
- The spare wheel inner side ring needed to be cut down to place the wheel correctly.
- The last detail to be added was a scratch built rear view mirror, seeing as the original piece is huge and was sacrificed to make the black out light.
Decal
Three versions are supplied.
- US 1 AD, 81st Cav. Rec. Sqdn., Italy 1944/1945: 20443854, F-24, "Danny Boy", Napoli, September 1943. On the windshield there was the name "Lt. Temple".
I located a photo of this vehicle and the bumper is covered by dust and has a rope wrapped around it, so it is impossible to see the codes.
The registration number given is correct for a Willys MB built by November 1943 to March 1944 and clearly is not congruent.
20435482, F-25, "BUTTS". I couldn't find its photo. Registration number is correct for a Ford GPW built by February 1943 to January 1944.
- 6 South African AD, 12 Inf. Bde., Wits Rifles/De La Rey Regiment, Italy, 1944/1945: M4778692 and M4784598, both WD numbers are outside of the list I've found
and I couldn't locate their photos.
- Brazilian Expeditionary Force (FEB), Italy, 1944/1945: No registration number and no individual number are given. 103 is the unit code and it belongs to the
artillery unit of the 1st Infantry Division (Divisao de Infantaria Expedicionaria). I didn't find any info regarding which unit had 104 code.
The M31 pedestal mount
S-model and Airfix give pedestal mounts as an optional part. Authorized mounts for the Jeep were the M31 and the M48, as indicated by the technical manual TM-9-224.
The first one is the mount placed behind the driver. Introduced by early 1942 with the D38579 cradle, and when in late 1944/early 1945 it received
the E10014 cradle, the pedestal became the M31C. The new cradle didn't need the travel lock, which was discontinued.
The other gun mount authorized for the Jeep was the M48, which was placed on the right end of the dashboard, requiring the glove compartment
door to be cut. It had a cradle inserted in a very short mount welded to a plate. Judging on the photos I've seen, it was not common.
The M31 could carry the following weapons:
- .30 MG M1917A1 or M1919A4
- .50 Machine Gun M2 HB
- Browning Automatic Rifle (BAR)
The M31C normally only used the .50 cal Machine Gun M2 HB.
The type supplied by the S-model kit should be an M31, but it misses the three braces and the travel lock, looking more similar to its prototype,
the T47. The three braces were added for its stability and help prevent floor cracking. The S-model .50 looks very well done on the sprue, but
when removed, it shows how narrow it is. The barrel section is oval in the wider part and flat in the narrower (which has the handle),
and in my opinion is not usable.
Airfix's kit has two M31 mounts. One has a .50 and the other a .30. The .50 is quite well done and has separate handles, but the way
the barrel joins to the sprue makes it easy to bend or break. Unfortunately the travel lock is not reproduced well and the cradle is incorrectly
depicted and located. The braces at the base are made as triangles. The 100-round box is well made but misses its shelf and and should not be installed.
The second mount has a better moulded .30 mounted on a poorly moulded M1917A1 cradle. I didn't find evidence regarding this combination and I'm not sure
it works without adjustment. The .30 was also used on the M48 mount which had the same cradle type used by the M31. This gun too has the round
box. I used the .30 with a new cradle, so I could use the M48 mount on an S-model Jeep.
Conclusion
In the end, a comparison between these kit is not so easy. It depends at which target the modeller is aiming. The S-model is surely the best. It is a
good display model, its negative aspects lie in the PE parts, and the plastic formulation which makes the smallest or thinnest pieces very fragile. A
transparent sheet printed with the windshield shape would be a welcome upgrade. The decal set is very disappointing and its updating is to be
desired. To solve the poor grill, S-model could add a PE piece to the fret already present in the kit.
Airfix share the same place on the podium for different reasons. Tiny pieces are stronger and just some details need to be replaced such as the
blackout light and the axe. This kit doesn't need intervention to correct the body or the chassis, but some details are not well depicted, needing
their replacement.
The Italeri is an honest sturdy war game kit. Not as good and detailed as the previous kits, being generally correct, it can be improved reaching
a good level for a display models. Surely better than using the Academy or the Hasegawa kits which need deeper intervention to be good display models.
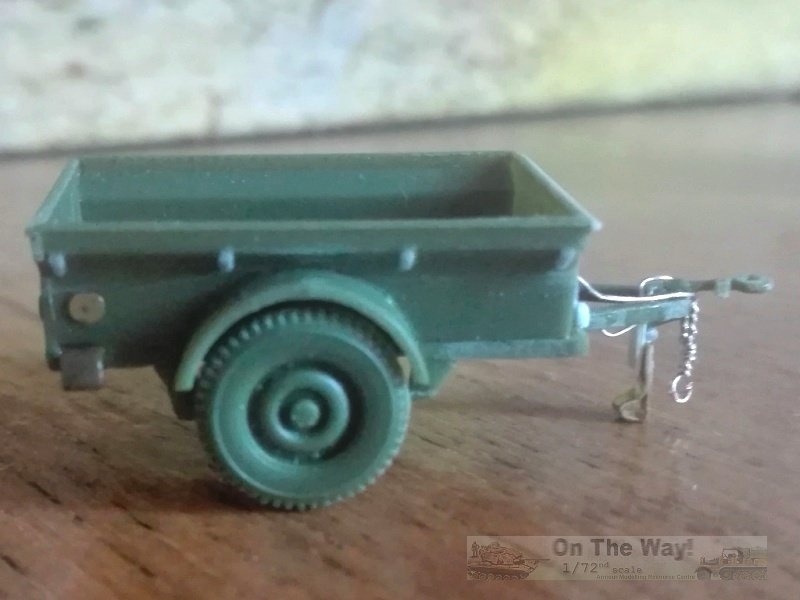
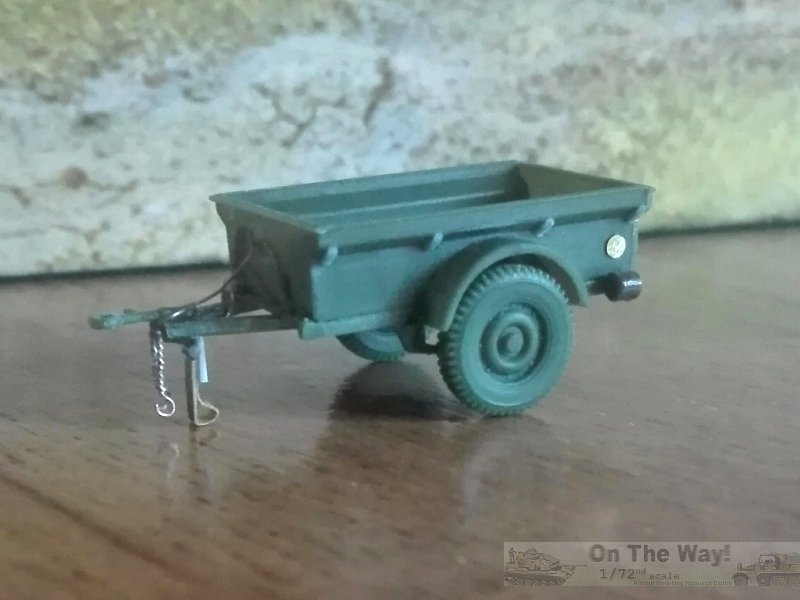
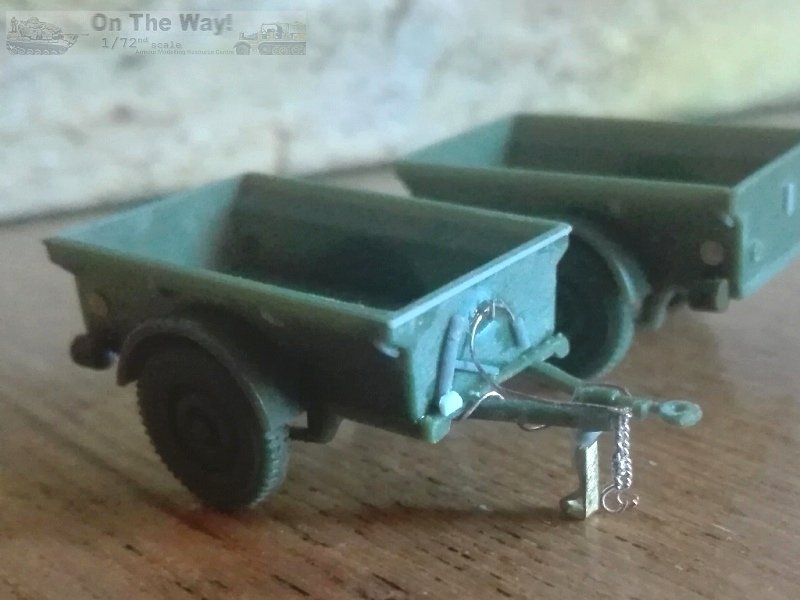
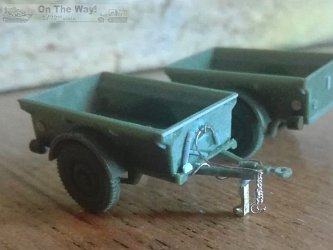
The ¼ ton Trailer
The standard trailer for the WW2 Jeeps was the "trailer, 2 wheel, ¼ ton" built by Willys as MB-T and by Bantam as T3. Its catalogue number was
G529. Respective technical manuals were the TM-10-1230 and the TM-10-1281. They are the only printed sources I found for it. Interesting info can be found
at jeepdraw.com. Useful photos can be seen at
olive-drab.com.
Approximately 60,000 Willys MB-T and about 74,000 Bantam T3 were produced. Below is a list of the registration numbers batches I found on the restorer
community, whose members seem to really like the trailer and provided most of the info.
0158918 - 0168917, Willys
0168918 - 0173917, Bantam
0212994 - 0244966, Willys
0253934 - 0277083, Bantam
0277084 - 0280830, Bantam
0463283 - 0476700, Bantam
0476701 - 0485076, Willys
0623670 - 0633061, Willys
0639615 - 0639820, Willys
0697387 - 0702837, Bantam
0820221 - 0830578, Bantam
0839070 - 0847530, Bantam
0947356 - 0955086, Bantam
Other manufacturers built another 16,000 trailers post-WW2, for a grand total of about 150,000. Most were T3 models and were
nearly identical, but others had some small differences. Converto produced the US Navy T6 which had a different hand brake and the T7
which had a tailgate (not to be confused to the Converto Airborne Dump Trailer which was a different type altogether). Springfield Auto Works also produced the T6.
The trailers were water tight and could float with up to 500lbs of load, or could be filled and used as a tub. To avoid water stagnation, there was a cap in the
floor rear right corner for drainage.
Post-WW2 it was also used to carry the two big boxes containing the tools and spare parts common to the K-38 trailer. In such cases
it took the name of Signal Corp K-38-A trailer. Apparently it was a conversion without relevant modification of the cargo box. Both tool
boxes measured 72" long x 16½" wide x 19" (25.4 x 5.8 x 6.7 mm in 1/72) high. I didn't find any photos which showed its use during
WW2, and the 1945 ORD 7-8-9 SNL G-529 ordnance supply catalogue didn't mention it, while the 1951 catalogue does.
The tandem trailer is only real WW2 variant that can be considered post war. It had a rear "V" member and a pintle to tow a second trailer.
A socket for a second trailer plug was present too.
The Jeep trailer also saw a wide civilian use after the WW2 with a lot of home made modification.
The quarter ton trailer is present in the Airfix and S-model kits, and both are just a few pieces each. Only Airfix gives the tilt. The plastic quality is the
same as for the Jeep kits from these came from. The Italeri kit lacks a trailer.
Regarding the real dimensions listed below. Some of the cargo box dimensions are given as inside measurements (marked with * in the table) by the manuals.
Due to the plastic thickness, using the dimensions in the same way would be absurd, so the kits' dimension are always referred to the outside, which
is enough to have a general impression.
| | 1/72 | S-model | Airfix |
| Length | 108.5" | 38.3 | 37.6 | 34.5 |
| Width | 56" | 19.8 | 19.6 | 19.2 |
| Height | 40" | 14.1 | 14 | 15.4 |
| Cargo box | | | | |
| Length * | 72" | 25.4 | 25.5 | 22.6 |
Width
(upper) | 46" | 16.2 | 16.6 | 16.7 |
Width*
(lower) | 38" | 13.4 | 13.3 | 13.1 |
| Depth* | 18" | 6.4 | 6.3 | 6.8 |
Airfix's trailer is shorter and taller, while S-model one is more accurate. Airfix's wheels are wrong because they should be the same as found on the
Jeep. The side's thickness is huge, as well as is the ribbing, and this recommends the use of the tilt. These features left me unsatisfied,
so I choose to assign it to the spare part box. Sometime in the future I'll find another use for it. However if some plan to use this trailer, some
notes are given.
The rear cross member is missing as for the first Willys batch. The chassis has the rear "V" section of the tandem trailer variant, but no pintle
nor socket for the second trailer plug are given. The assembly procedure for the body causes some alignment problems because the floor is a bit wider than
the closed sides. The support leg is solid and needs to be replaced.
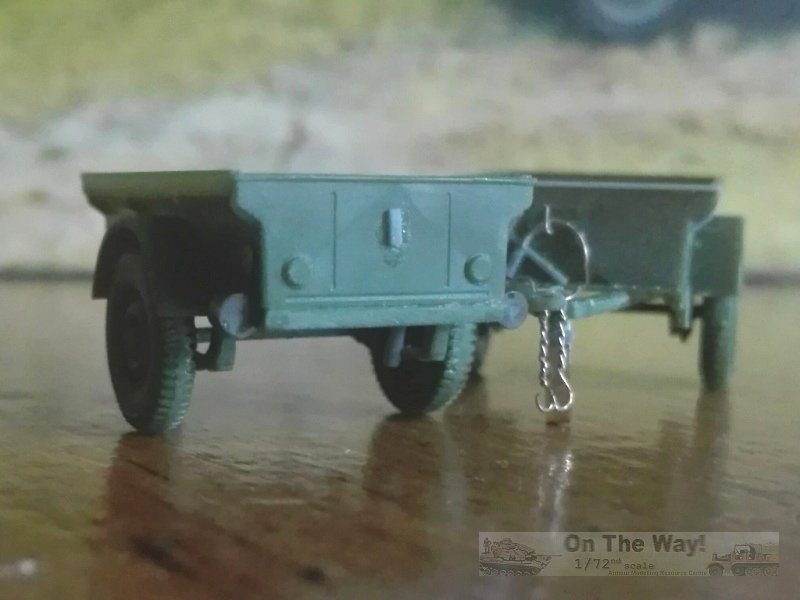
S-model's trailer has flat sides and lack the stamped ribbing used to stiffen them. The plastic thickness is quite adequate. Some details are missing
but they can be easily added:
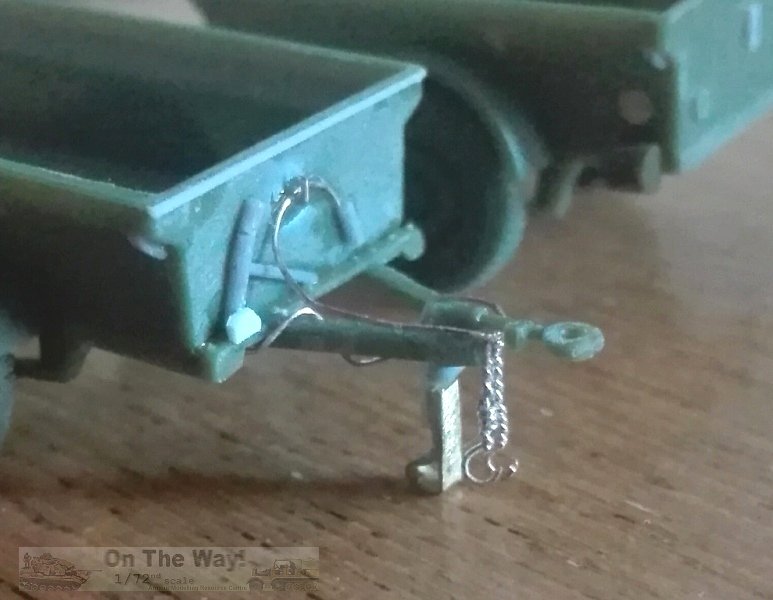
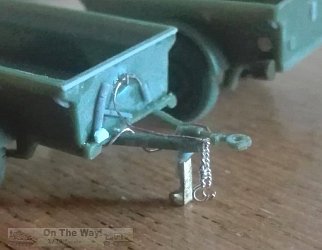
- The lunette eye is open to be snapped to the Jeep pintle. I closed it with cyanoacrylate glue drops, sanded when dry.
- The support leg is missing. I used plastic strip for the solid part, stretched sprue for the hinge while the PE fret gave the material for the folding part.
- The trailer had two little chains with a hook which went in two little rings placed at the pintle's sides. In 1/72 they'd be very tiny. After
some tentative attempts, I couldn't find any better solution than two short segments of thin, wrapped metal wire. Not really correct, but better than nothing...
- I added the hand brake lever using stretched sprue.
- The wiring and its plug was added from metal wire and stretched sprue. The wire was hung to its hook.
- The missing shock absorbers were made from stretched sprue.
- On the bottom of the rear right corner, a short segment of stretched sprue was used to add the drain plug.
- In almost every kit there are some small injection relief cylinders attached to the pieces to aid moulding. I usually keep them and used four to make
the missing lights.
- Stretched sprue supplied the segments to make the hooks for the tilt, shaped in place.
Conclusion
The S-model trailer, despite the lack of ribbing, is sized and shaped well, and I preferred it. With little effort, the lights could have been easily
added by S-model, as well as some PE chains. Despite the fact that it would look better with some detailing, I find Airfix's trailer useless with it's incorrect
dimensions and improper wheels that should be replaced. But this could be just because I'm a bit too finicky and others could find it perfectly usable.
I searched for another trailer type which could be depicted using it, without results.
The K-38 telephone trailer has a different wheel type, as do the British type trailers.
Airfix Jeep


Italeri Jeep


S-Model Jeep

S-Model Trailer


|