| Type :
resin
Scale : 1/72
Paint : Lifecolor, Vallejo/Model Colour, MIG
Accessories : scratch, Evergreen
History:
Not much history to tell here as there is not much available, even
not on the Internet except for a couple of pictures.
According to the above mentioned book, the Renault ADR 1 truck was
classified in the 3,5 ton range and build in limited numbers by Renault
as a civil and as a military truck. It was built in 1936 mainly with
a general service body with tarpaulin and used for transport of cargo
and troops. In all 335 ex. should have been build for the French Army,
126 ex. for the French Gendarmerie Nationale, 20 ex. for Algeria,
1 with a gas burner (gazogène) and 3 tippers. I have no numbers
regarding the civil production.
When war broke out in 1939, many civil trucks would be requisitioned
and at the end of the fighting, military and civil versions would
find their way in service with the German Army.
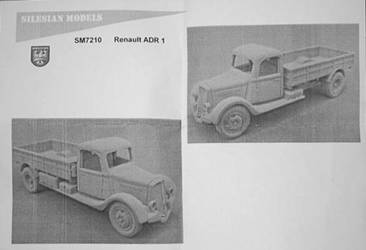

The kit:
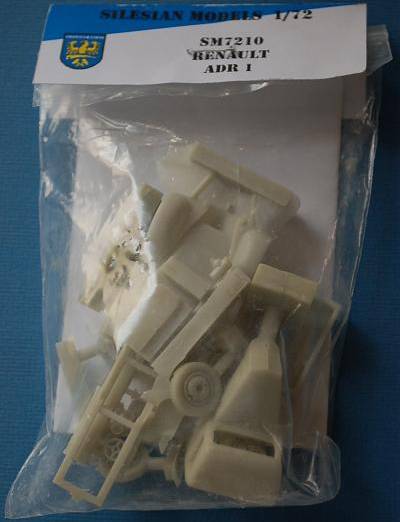
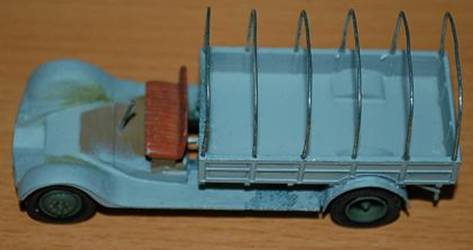
The kit is all resin packed in a clip opening clear plastic bag and
a small paper label on top with a picture of the truck as it can be
built. That same picture can be found in the book, page 70, and it
represents a 1936 military version of the truck. The light grey resin
looks good, almost without flash but, as usual, care must be taken
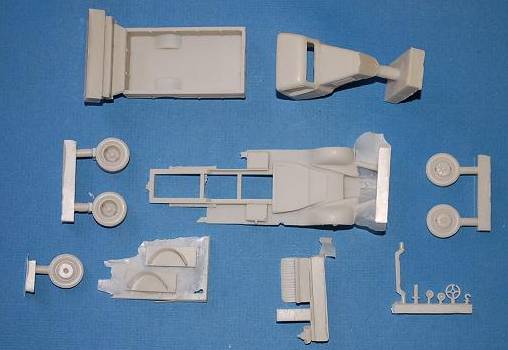
when removing the resin parts from their carriers. Parts consist of
a chassis, cabin with engine hood, cargo bay, 2 rear mud guards, 2
double rear wheels, 2 front wheels, a spare wheel, driver’s
bench, a rear axle and a sprue with smaller parts. There is no interior
detail except for a steering wheel and a bench, there are no windows
provided and no tarpaulin or canvas tilt leaving the attention of
detailing the truck open to the modeller.
The instruction sheet consists of a couple of pictures of the finished
model.
As I mentioned before, information
is rather scarce and I therefore spent a lot of time in search for
pictures of the real thing. This ended up with some pictures of pre
war military trucks in French service and some civil and military
trucks in use by the Wehrmacht.
This search taught me the following
differences between a military truck and a civil one:
- Steel wheel rims instead of cast
iron rims on the civil version.
- Other type of cargo bay with tarpaulins
and canvas
- 2 towing eyes front and rear, the
front ones mostly as pig’s tails, the so called “queue
de cochon”
- Towing hook for trailer at the rear
- Steering wheel on the right hand
drive (like on British trucks)
- Steel bar in front of the radiator.
This would also serve to carry the licence plate.
- Front direction indicating lights
in the middle of the cab just above the windscreen.
- Collapsible square plate painted
blue with a yellow triangle on top of the cab. This plate was erected
when a trailer was towed and folded down when not. The same type
of plate can be found on German trucks.
- Large metal anti-slip steps both
sides running from the front to the rear mudguard.
- Tool boxes both sides on the steps.
- Round 50L extra fuel drum on the
left side step.
- Exterior placed fire extinguisher
on the right hand side of the cargo bay.
- Speed regulator, red painted grease
can, pick, shovel, tyre inflator and driver’s rifle holder.
The correct place where these last items should be found is still
unknown to me but probably somewhere in the cab and/or engine compartment
for some of them.

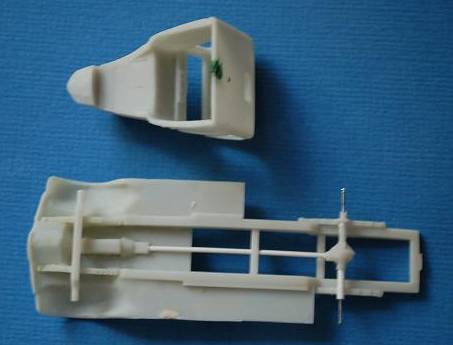
Construction
The first item that got my attention was the chassis where the rear
wheel axle had to be positioned. Unfortunately, one of the legs was
broken off in my review sample and I decided to replace the missing
part by Evergreen rod. Dry fitting the rear wheels taught me that
I could never obtain a strong fix unless I could drill the axles out
and insert a piece of steel wire. Once done, I could turn my attention
to the non existing drive shaft running from the transmission to the
rear axle. This was also made of Evergreen rod cut to length and inserted.
Meanwhile I had read some remarks on
this kit stating that the cargo bay provided in the kit was not correct
in shape and dimensions. Comparing the kit part with the available
pictures, I could find no major differences and decided to change
nothing to it. I did however lengthen the left step and this showed
me that the 2 rear mudguards provided in the kit were not large enough.
According to the pictures, I scratch built new ones using the aluminium
from a tea light candle. When the cargo bay was glued to the chassis,
these 2 mudguards could be fitted making sure they connected with
the lengthened steps. Once dry, it was time to check out the correct
positioning of the rear axle and it showed that it was necessary to
fix it a bit more to the rear. That way, the rear wheels fitted better
in the centre of the wheel arches.
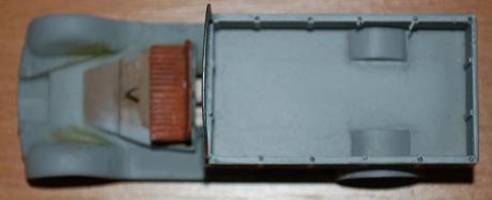
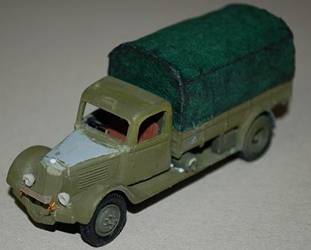
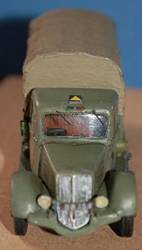
I now turned my attention to the driver’s
compartment. As I had no idea about the interior colours of this type
of truck I opted for a brown floor supposing it would be build up
of wood planking. The driver’s bench was painted Model Colour
70818 red leather with a light MIG dark wash to accentuate the stitch
lines. Cabin interior was painted Model Colour 70893 US Dark green.
The centre placed dashboard received 3 black dots representing the
instruments.
The steering wheel received a steering axle (Evergreen rod) and was
painted black before being fitted to the right hand side of the cab.
No pedals are fitted as they can’t be seen.
A gear shift lever was made from steel wire and fitted in the middle
of the cab.
Door and window handles are added on the inner side of both doors.
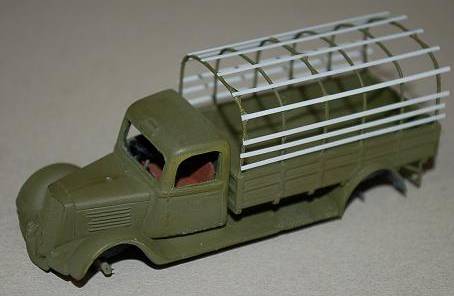
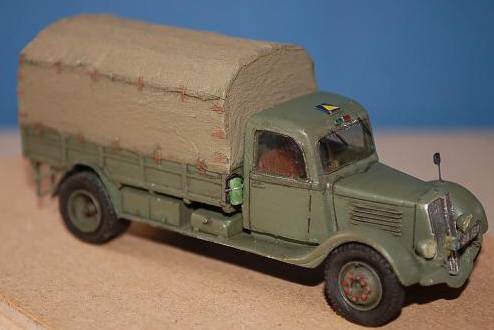
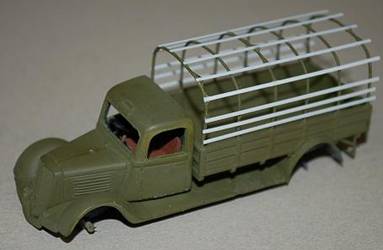
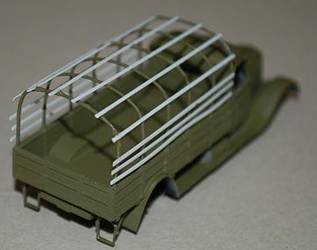
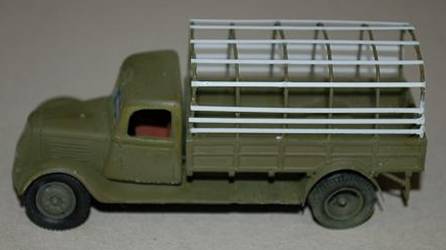
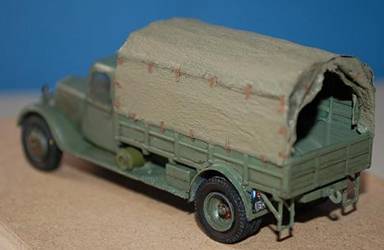
I found no pictures of the truck being
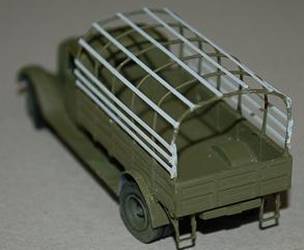
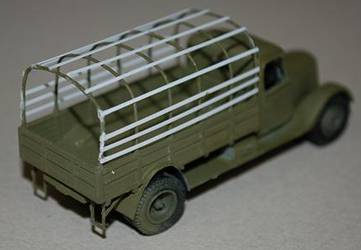
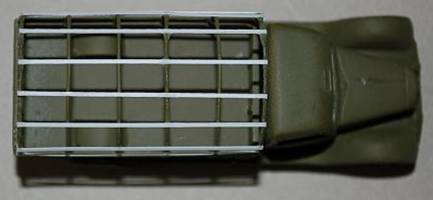
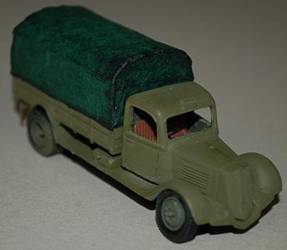
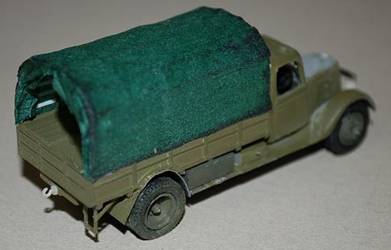
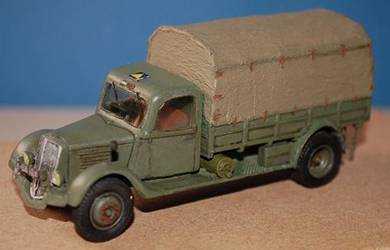
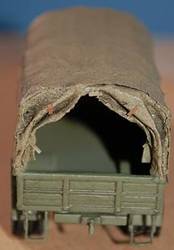
used without tarpaulin and canvas over the cargo body. As the kit
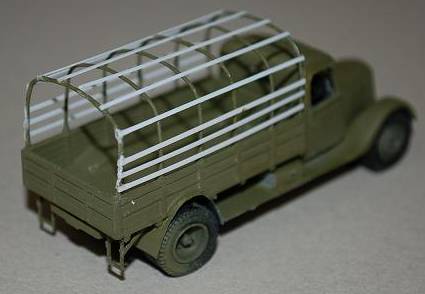
does not provide any parts for constructing them, five arches were
scratch build using metal wire. Holes were drilled in the upstanding
cargo bay sides and the arches fitted. Pictures also learned that
the canvas covering these trucks was build up of five parts, each
connected to underlying planking and to each other. The planking was
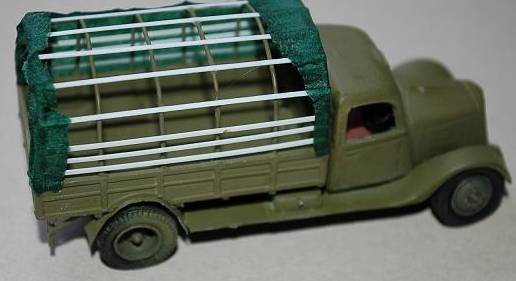
made of Evergreen strips, five on top and three on each side.
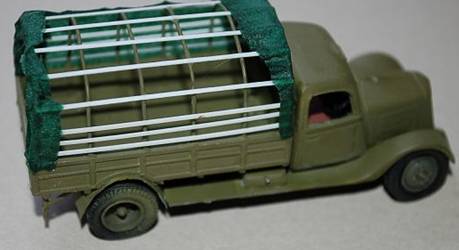
The canvas consisted of a front and a rear part, two side parts and
a top cover. Unlike seen on US trucks, all had to be stretched and
connected by small leather bands; 16 on each side.
The canvas was cut out of a green coloured, two layered paper napkin.
Each part was glued using Klir (Future) and stretched carefully except
for the rear part that was partly cut in the middle with the sides
folded aside as a curtain. This complete job took a couple of hours
as wet paper is very fragile and you must wait till the front and
rear parts have dried before fixing the side parts. The same goes
for the top part taking care that it does not overshoot the side parts.
The small leather bands were made of small film, cut to size.
Once done, this construction is rather strong and allows the truck
to be positioned upside down without damage.

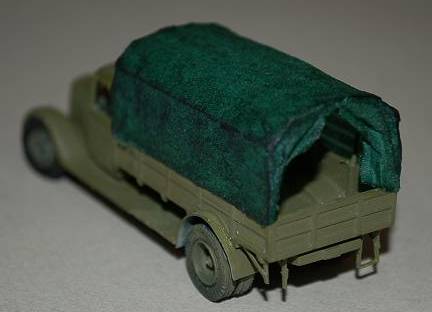
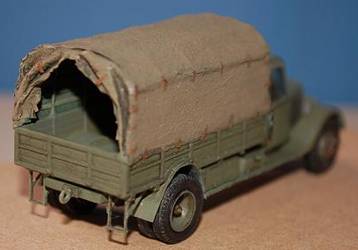
Time can now be spent on the rear of
the truck. Pictures of other types of French pre-war trucks showed
that they had a small metal frame at the end on both sides, probably
to allow troops easier access to the truck once the rear berth is
up. These frames are of rectangular construction with two supports
and were made using Evergreen strips.
My references showed there was a rear licence plate but I could not
find any data regarding the position of rear lights on the truck.
I therefore added one rear light to the top of the licence plate supposing
it had a triple function of rear and brake light as well as licence
plate light (if ever that was in use in those days)
As I could not find any references as to the correct position of the
spare wheel, it was omitted. I guess it hung underneath the truck
chassis at the rear but got no proof on that.
An extra box and a 50 litre French
gas can, both found in the spares box, are added to the left step
underneath the cargo bay.
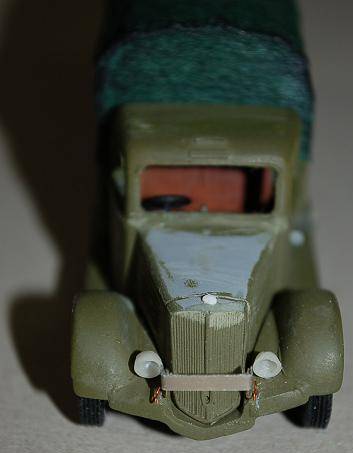
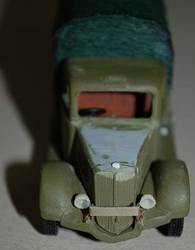
The front also needs a little bit of
attention. Two tow hooks, the so-called “pig’s tails”
are made from fine copper wire and fixed each side of the radiator
grille. The radiator protection is made from some left over PE, cut
to size and bent. Next, both front lights are fixed in place.
The cab’s windows will be added after painting.
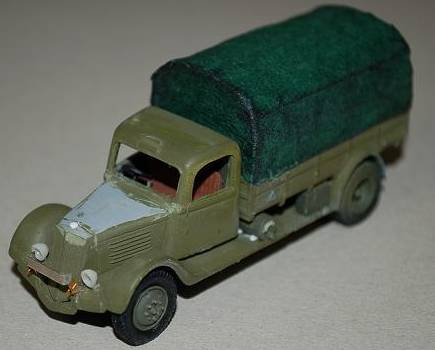
Painting and decals:
My reference book states that the overall colour on French trucks
was “vert olive” i.e. olive green but, when comparing
my colours with the ones shown in the book, I couldn’t find
any matching olive green as the French “vert olive” looks
like a greyish kind of olive green. A search on the Internet taught
me that Lifecolor has several paints referring to French colours and
one of them, UA142 French Kaki (FS34096), looked the one needed. Despite
the name kaki it is indeed a greyish olive green and this looked very
convincing on the truck.
My reference pictures also show that
the canvas on my 1936 pre WWII truck was of lighter colour than the
body. When war broke out the canvas on all trucks was sprayed in the
same colours of the body and camouflaged but here a lighter colour
was needed. I fell back on Vallejo khaki that is a brown colour and
looks to do the job.
Tyres are painted matt black and highlighted
with Vallejo Dark Rubber; the bolts on the wheel rims are painted
red as in use on French trucks.
Headlights receive a silver background with, once dry, a touch of
yellow as all French trucks and cars sported yellow coloured lights;
an heritage of WWI. The head lights next receive Humbrol Kristal Klear
to represent the glass.
Also in use on that type of truck in
that period is a partly chromed radiator grille and head light contour.
This is applied using Vallejo Silver.
The direction lights on top of the
cab are painted green and red using Vallejo Panzer Aces 308 Green
Tail Light and 307 Red Tail Light respectively.
Finally, a MIG dark wash is applied taking care not to overdue, as
my truck will be brand new.

Finishing:
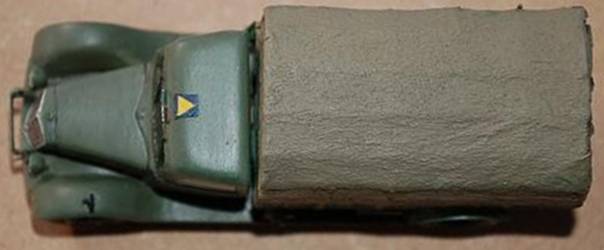
Cab windows are installed and window wipers added. The top of the
roof receives the blue and yellow trailer indication panel and the
direction lights are painted green and red. The kit doesn’t
mention exterior rear view mirrors but some pictures indicate there
was one mounted on the left front mudguard and so one rear view mirror
was scratch built using fine metal wire and a small round disk.
Finally, the exterior fire extinguisher is mounted on the right front
side of the cargo bay. As I have no indication about its colour, it
was painted a darker kind of green.
Conclusion:
What a nice truck this is. I enjoyed building this kit, and the necessary
research around it, very much and hope this truck will attract the
attention of other modellers when on show.
You can build this resin kit almost out of the box (or must we say
out of the bag?) but adding a canvas tilt really does change its appearance
a lot.
My special thanks go to Silesian Models
and to Onthewaymodels for providing this kit and giving me the opportunity
to build it.
References :
- Internet
- L’Automobile sous l’Uniforme,
Massin Editeur
|