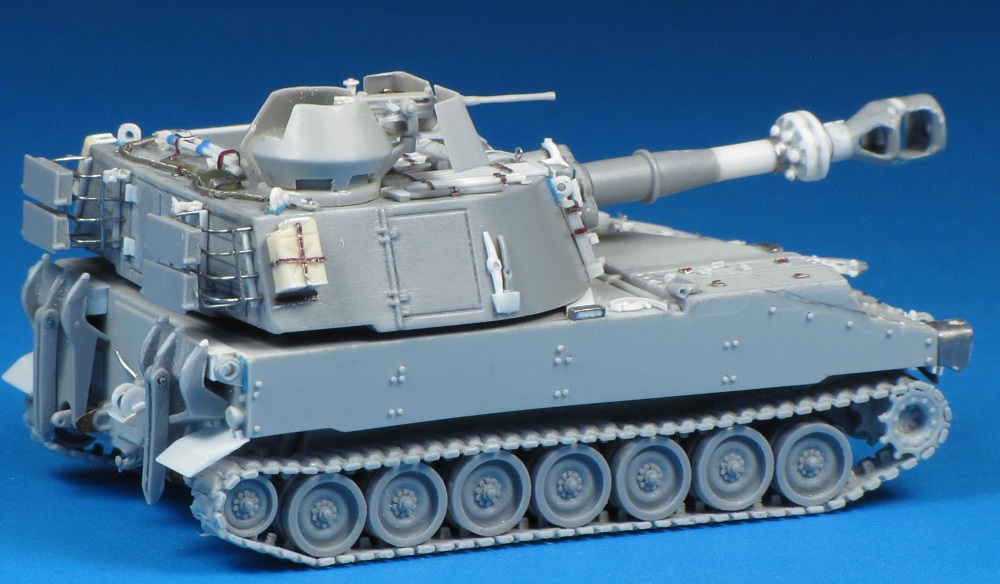
| Based
on the measurements in Hunnicutt, the hull scales out to within 0.2
mm of 72 scale in width. The road wheels and idler are about 0.3 mm
too small in diameter. The track links are about 0.5 mm too wide,
and track pitch is dead on. I can only estimate the assembled hull
length, but it looks to be within 1-2 mm. Overall, I would say scale
accuracy is excellent.
Construction
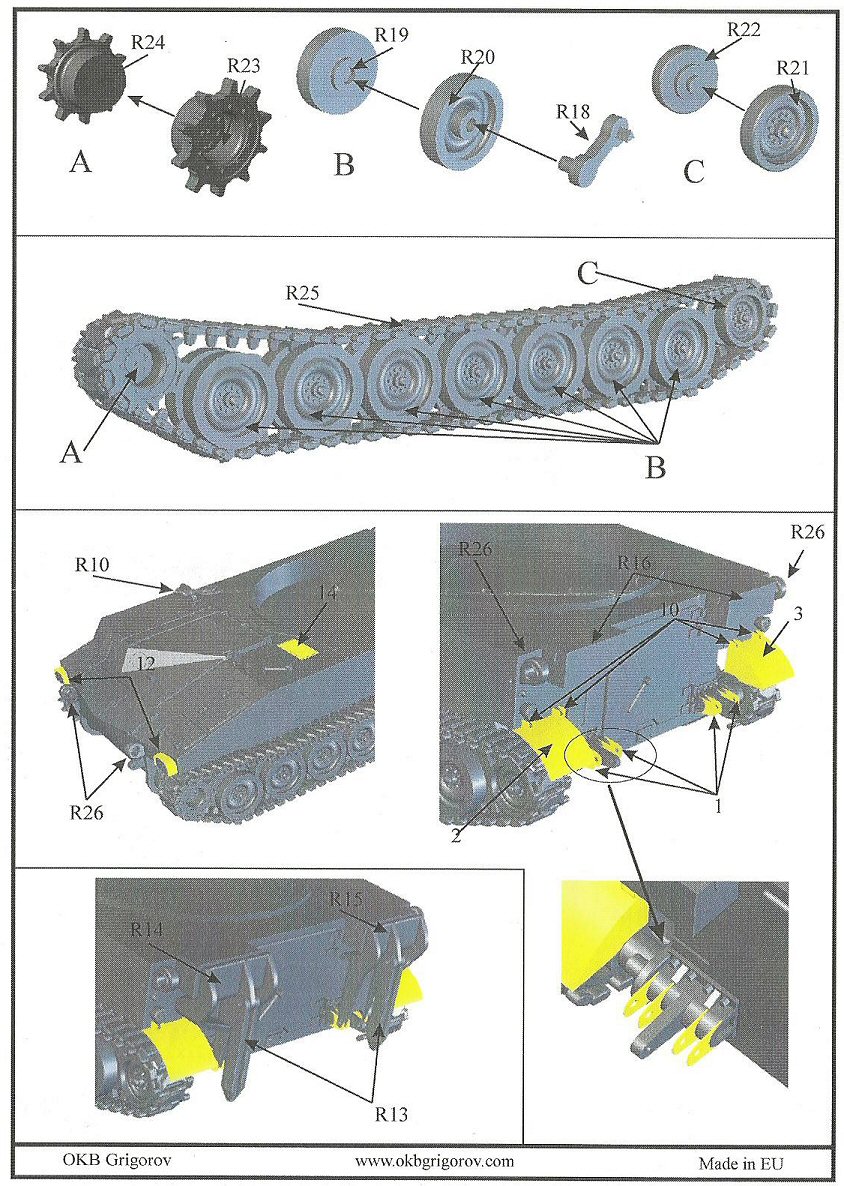
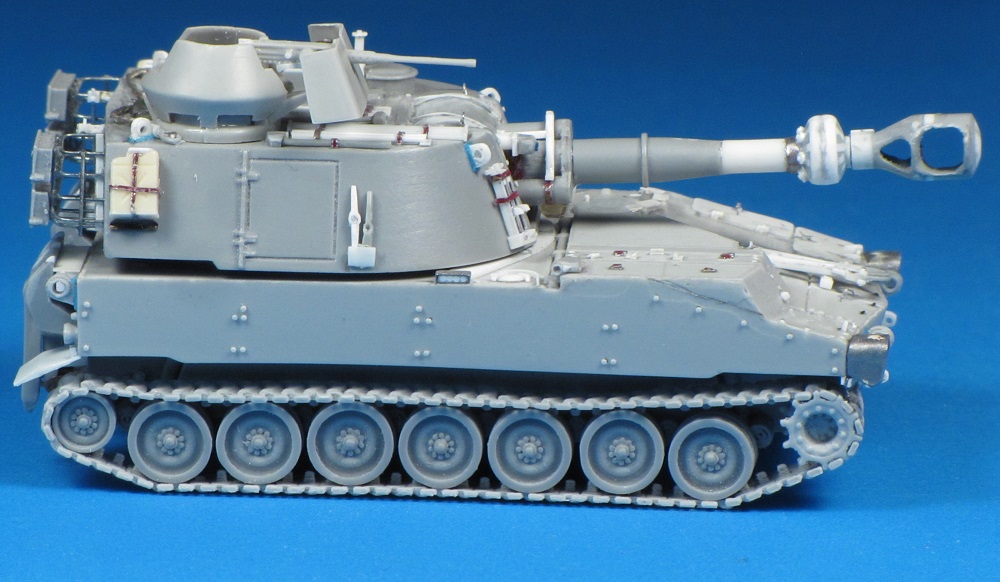
1. Suspension
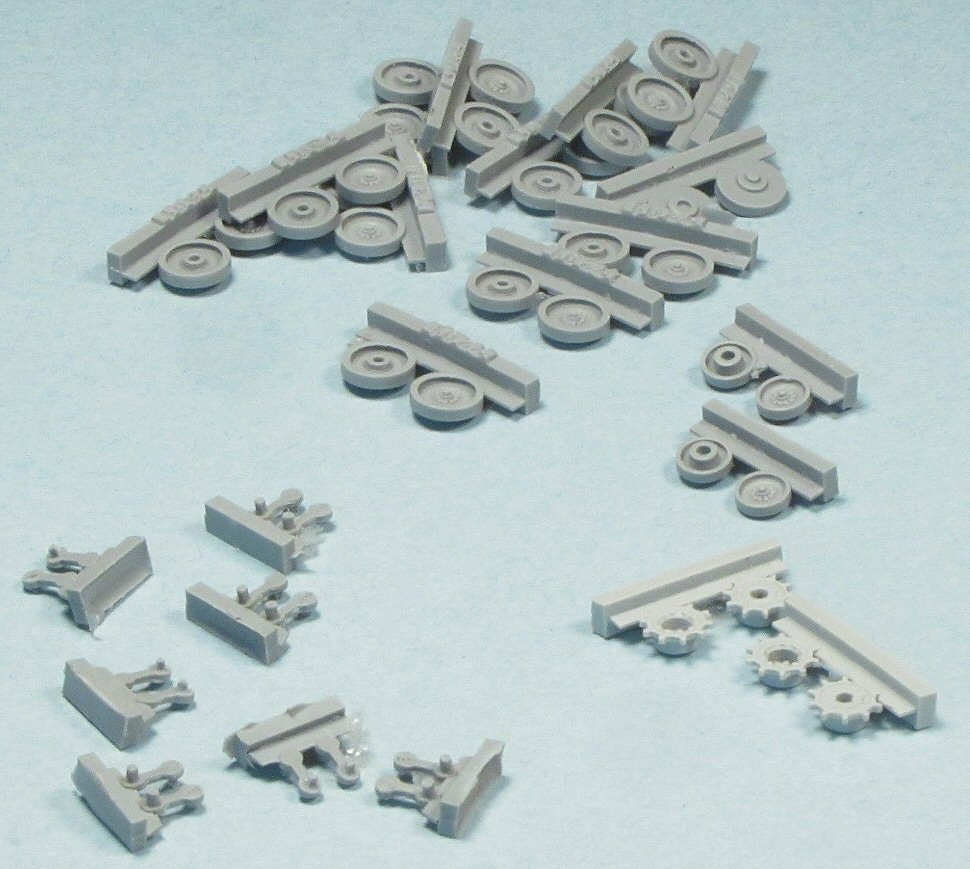
The M109 had 14 paired road wheels, and my kit only provided 12 pairs. I was able to obtain replacement parts after contacting Georgi at OKB Grigorov.
The road wheels are cleanly moulded, and correctly depict the undercut wheel rims. There is no clearly defined transition between the rubber on the road wheels and the
wheels themselves - this is also correct. A couple of the wheels suffered from pinholes where they were attached to the moulding blocks, but these were easily fixed
with scrap plastic and gap-filling superglue. The resin was easy to work with - almost rubbery, and a lot less brittle than what I've encountered in the past.
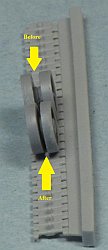
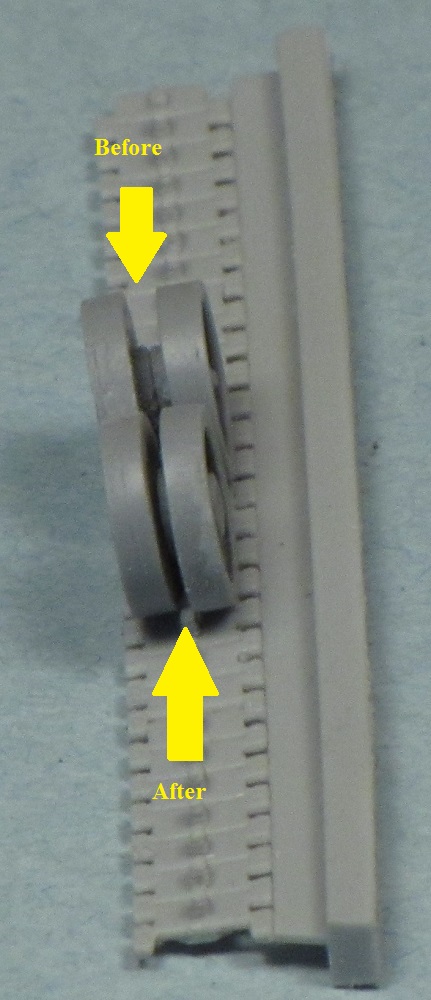
When I tried assembling an inner and outer road wheel, the gap between the wheels looked excessive. When I put the assembled road wheel against the track, the rubber
sections were overlapping the end connectors, so I reduced the gap between the wheels. This was easy enough to accomplish by removing the raised boss from the outer
wheel, and drilling the hole in the outer wheel a little deeper. Be careful when drilling - it's easy to pop the hub cap right off the wheel!
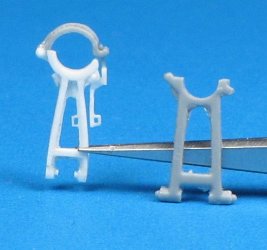
Here's a comparison of the road wheels before (rear) and after (front) the fix:
I used the same process on the idlers to reduce the gap. I had to drill out the holes in the back of the idlers to fit the axles moulded to the hull. Similarly, I
had to drill out the holes in the inner sprockets. I was impressed with the quality of the resin when removing the sprockets from their moulding blocks - it was
easy to clean up the parts, with no lost teeth! The kit does not provide any tool to help align the inner and outer sprocket halves.
The kit provides separate road wheel arms, which are a nice detail, but they may be a little flimsy to bear the weight of the model. Each arm has a triangular pin
to fit into a keyed hole in the hull and ensure the correct alignment. Unfortunately the holes in the hull are too small to accept the pins! I drilled out the holes
in the hull, and rested the hull bottom on a spacer to ensure the correct alignment of all the arms. When I installed the road wheels I found a couple were slightly
off in position, but the weight of the solid resin hull helped get them close to the right alignment.
The tracks are provided as several lengths of straight track, to be bent to shape. The detail of the track links is a bit soft, and the track teeth show obvious
striations as an artifact of the 3-D printing process used to create the masters. The instruction sheet includes templates of the suspension to help bend the
resin tracks to shape, but I ended up just cutting up some of the lengths into individual links and assembling the track as a link and length assembly. There
are plenty of spares provided.
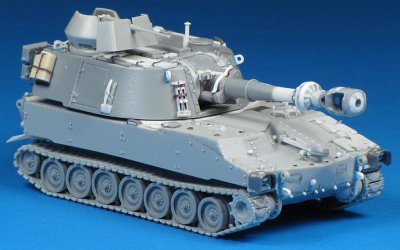
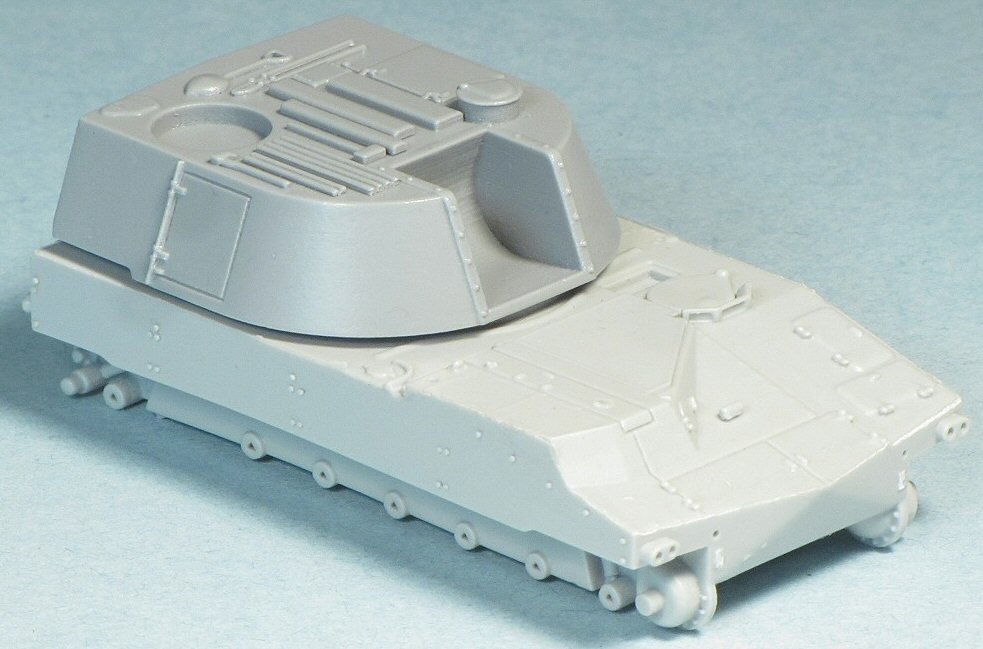
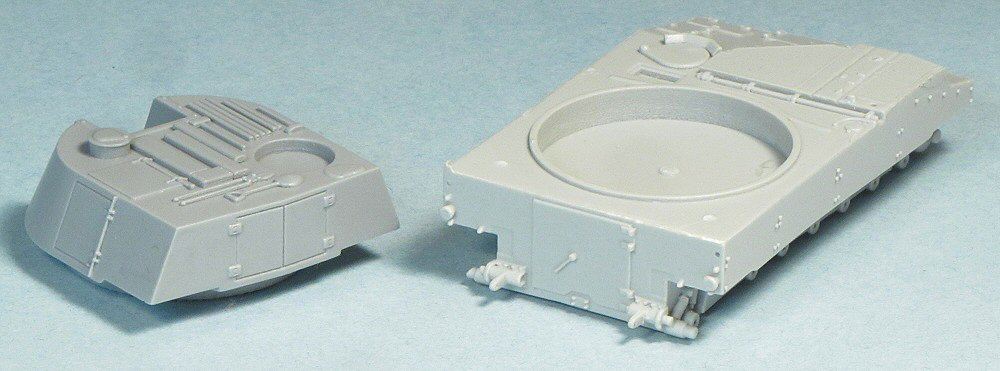
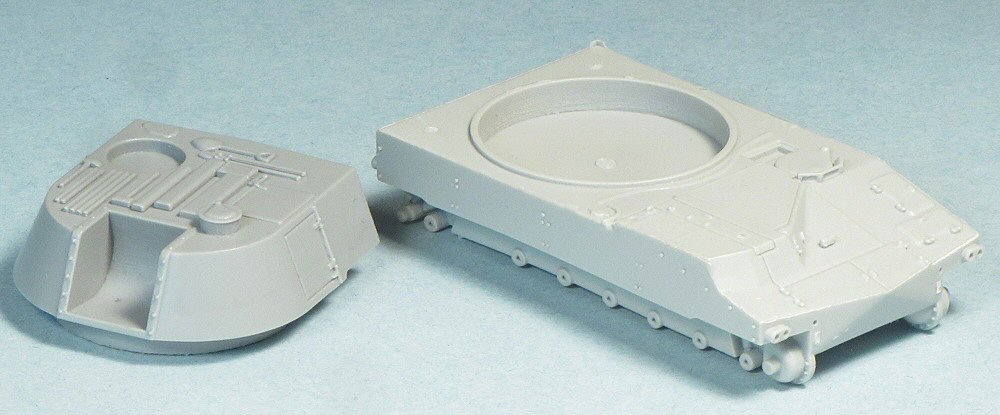
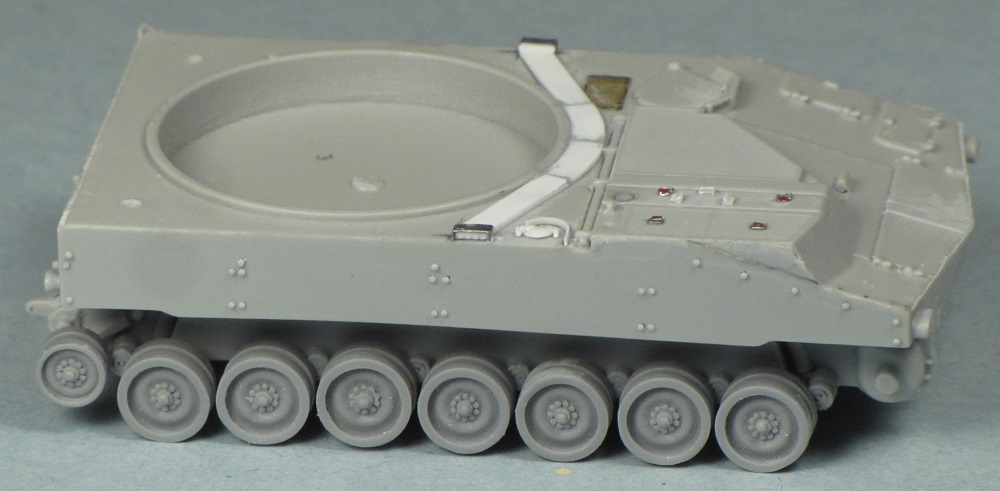
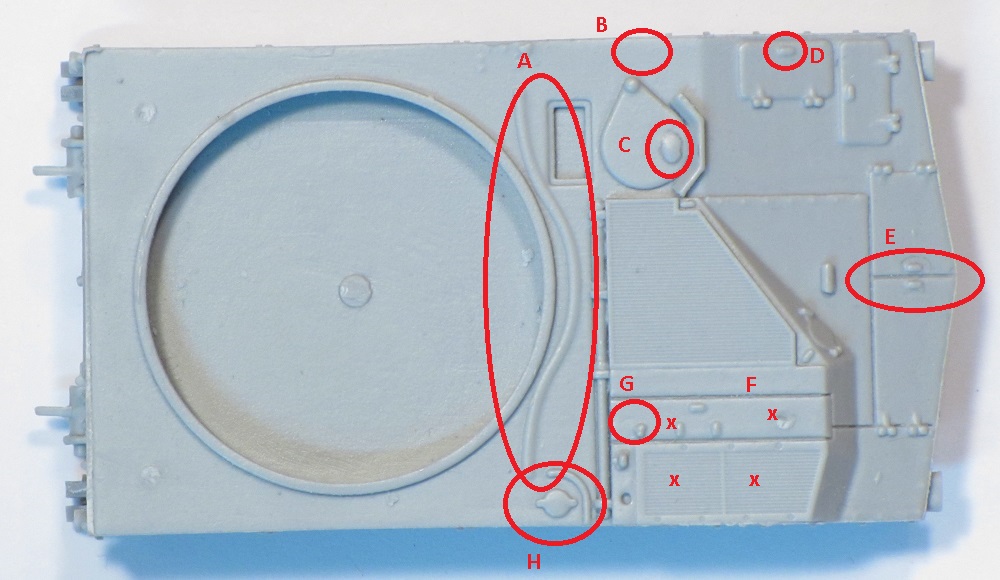
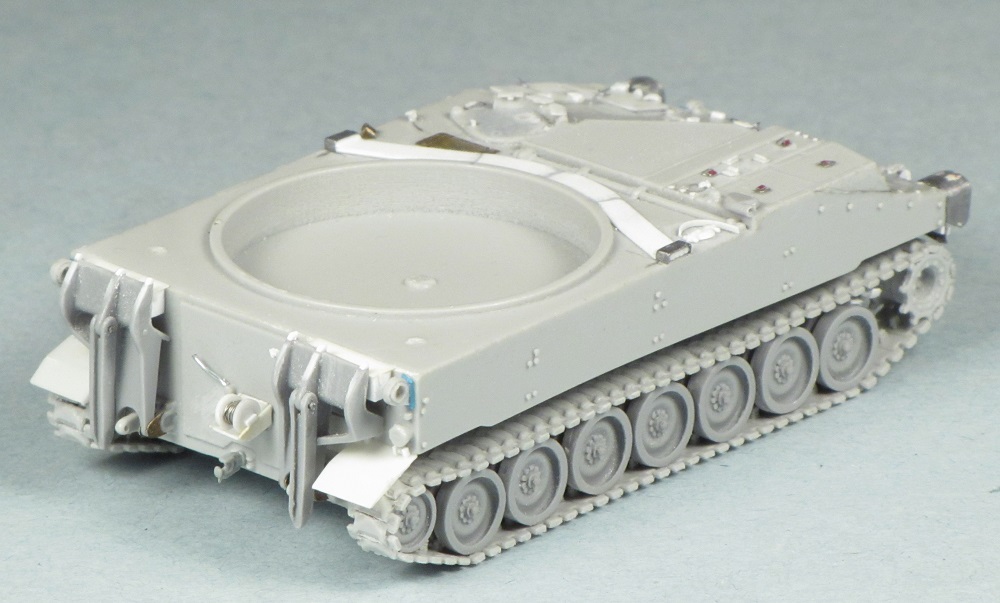
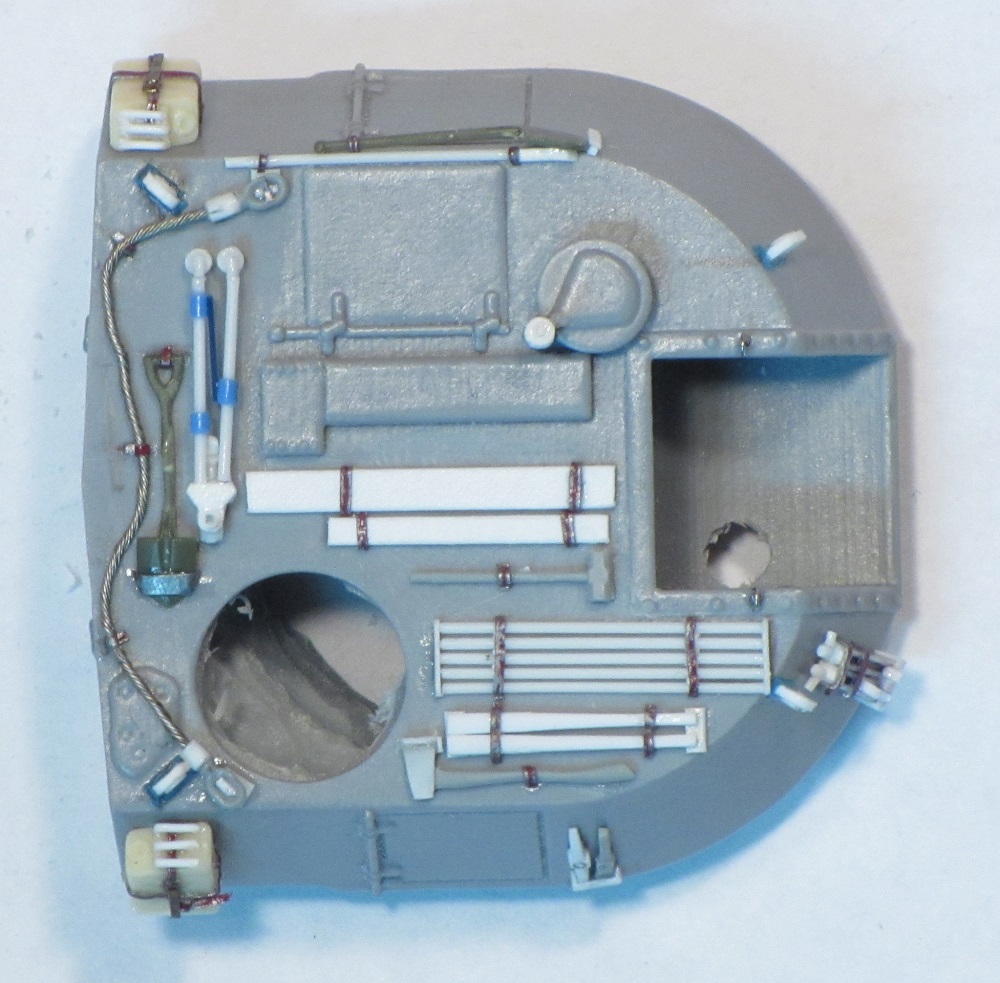
2. Hull
The detail on the top of the hull is a little softer than the turret, and again there are several missing or inaccurate details, so here's my corrections list
for the hull:
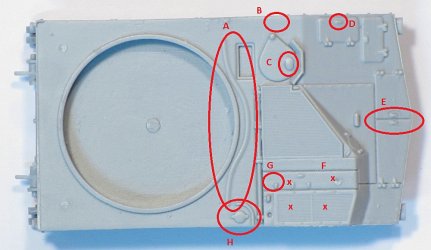
A. This raised detail represents the boomerang shaped cover that is part of the flotation system fitted to the M108, M109 and M109A1 and deleted in subsequent
versions. It should be substantially larger, with a housing at each end (I believe for inflation fittings)
B. Missing fire extinguisher pull handle and cover.
C. A strange bulge in the driver's hatch - this was caused by a large air bubble just below the surface of the part.
D. The handles on the various access hatches are very crudely represented, and probably should all be replaced.
E. The two hatches at the front of the hull should be approximately equal width. The lower red line shows where the circled panel line should be.
F. Four lifting handles missing at the approximate locations marked with Xs.
G. Missing filler cap.
H. Soft detail on the armoured fuel cap, and the guard is incorrectly shaped.
This list is not comprehensive - other issues include poorly represented bolt detail (strangely the bolt detail on the sides of the hull is nice and crisp)
and missing periscope covers. Some of the angles and shapes of the engine deck and front hull are not correct, but I chose not to try rebuilding the hull.
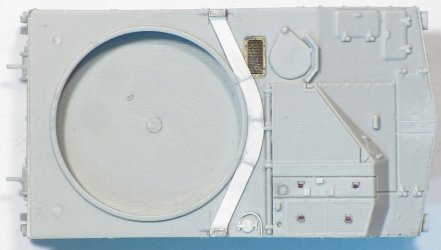
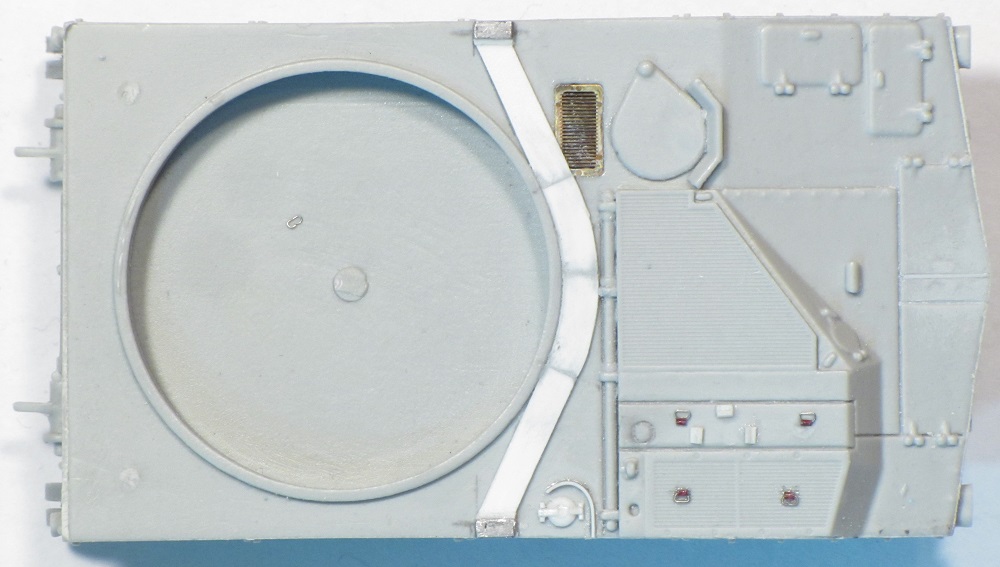
I added the flotation cover and the end fittings (4 tiny punched discs under a lead foil cover), replaced the fuel filler and guard, rescribed the split
between the front hull hatches, and added the missing lifting handles on the grills and the missing filler cap cover between the grills. I scraped off the
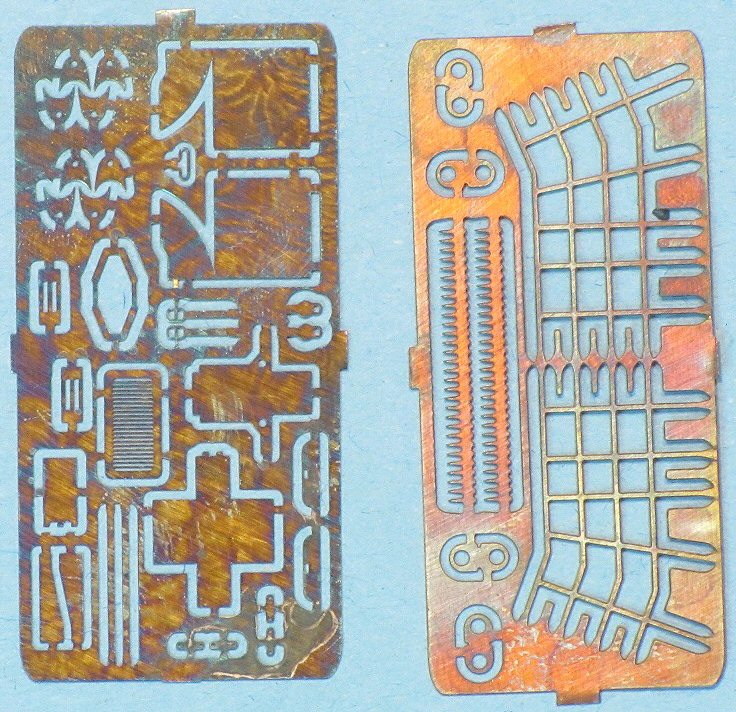
bulge on the drivers hatch, but later had to drill out the air bubble and fill it properly. The photo-etched grill under the flotation cover is provided in the kit.
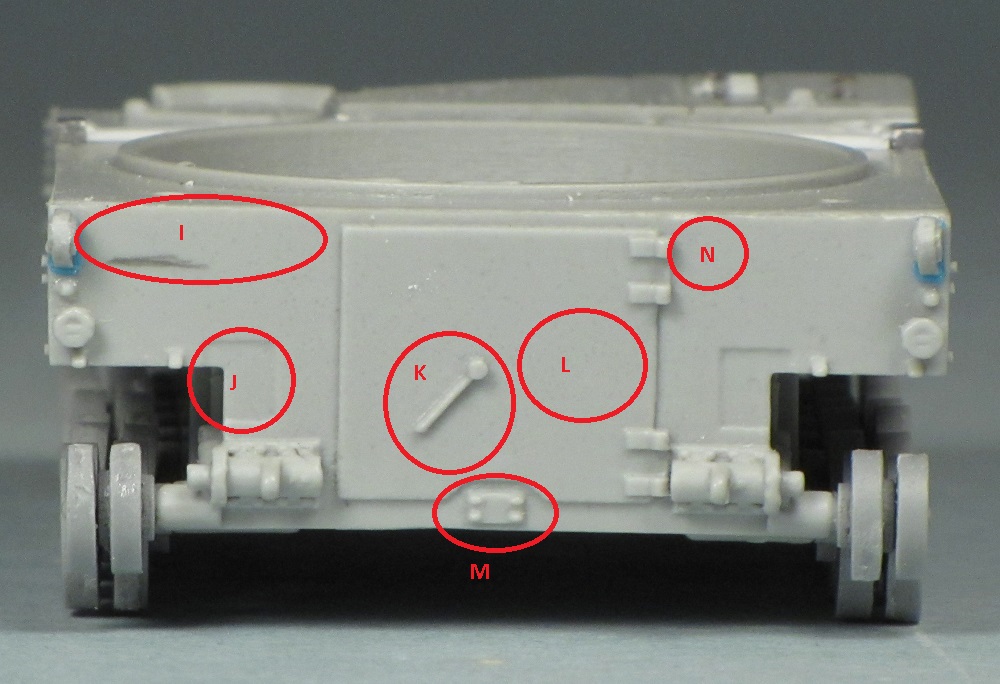
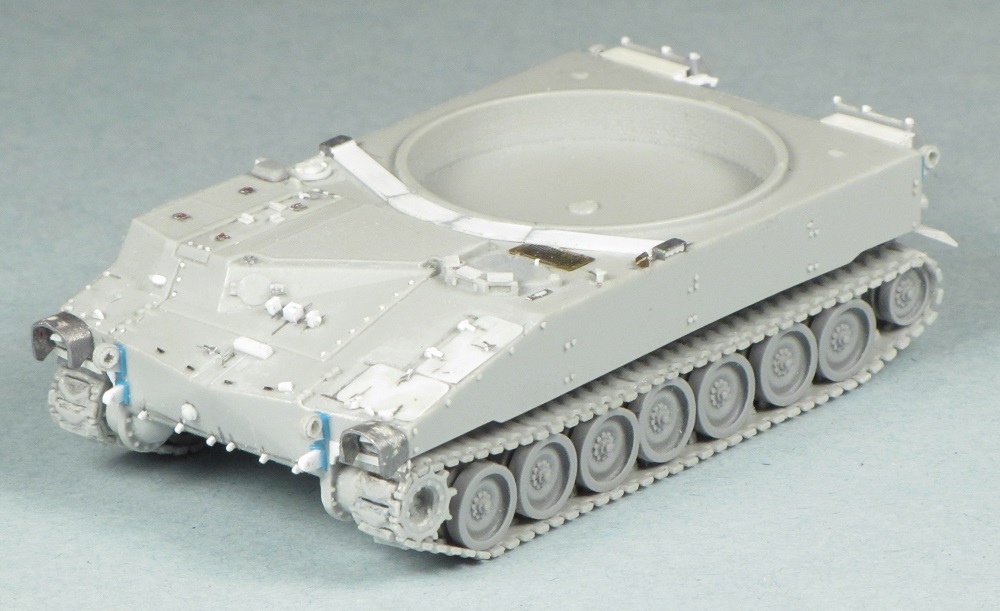
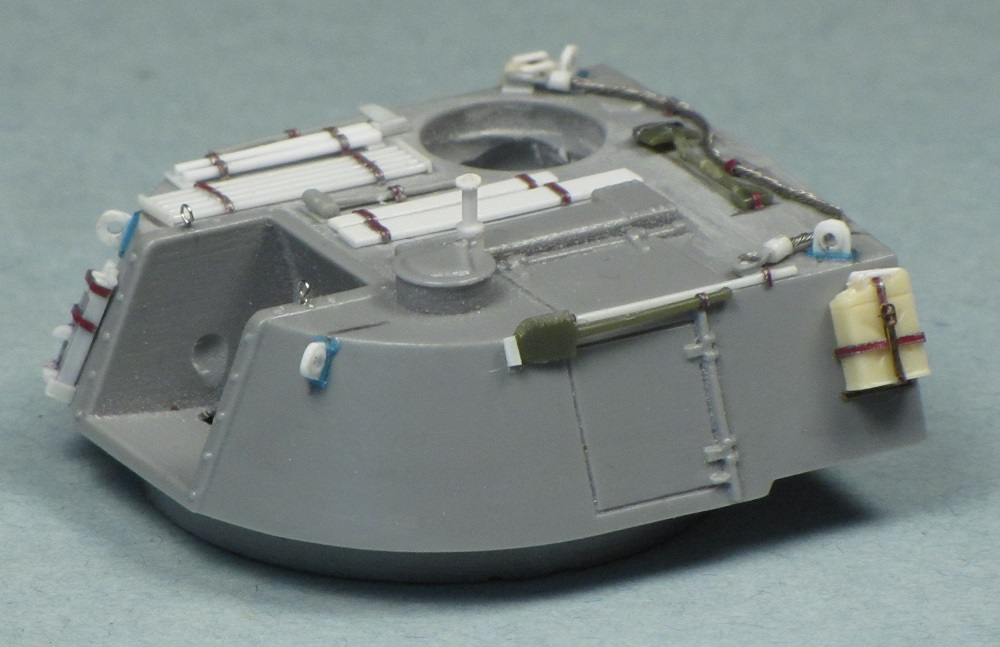
The rear of the hull is another area that calls out for additional detail. Here are some missing/inaccurate items:
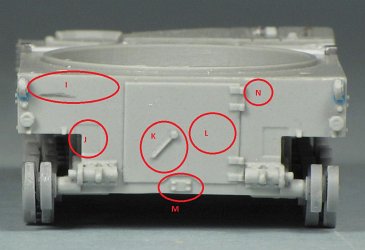
I. The stowage bins provided are too deep and too tall - they should not protrude further than the lifting lugs.
J. These recessed rectangles should actually be slightly raised. This area will be hidden if the spades are in the raised position.
K. The door handle is moulded in the incorrect position for a locked and shut door. Also the handle has the wrong contours.
L. There should be a small cable reel in this location.
M. The mounting plate for the towing pintle is provided, but not the pintle itself, which could be mounted here or stowed on the rear door when not in use.
N. There should be a latch here to hold the door in the open position.
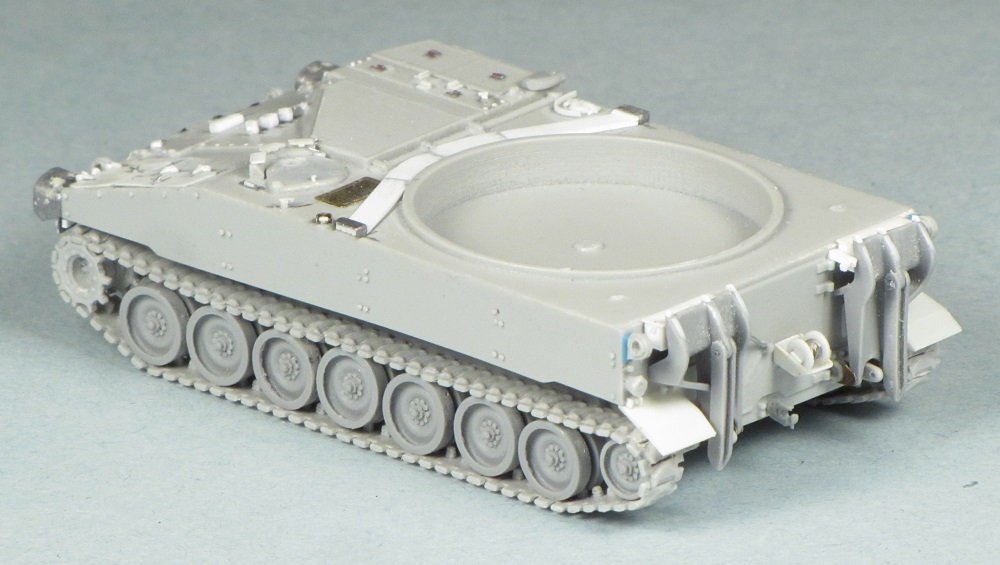
I replaced the stowage bins and the hull door handle, added the cable reel, the latch the holds the door open (subsequently replacing this again to match the
corresponding parts on the turret), and added a towing pintle modified from a Dragon Sherman part. I slightly lengthened the tips of the ribs on the spades as
they should extend beyond the blade itself.
I'd planned to use the photo-etched rear fenders provided in the kit, but they are curved. As far as I can tell, curved fenders only appeared on very early
production M108/M109s, and most had angled rear fenders. I made these from thin plastic sheet. I tried to use the microscopic photo-etched fender brackets,
but they were too hard to work with, and probably actually too thin, so I just added scraps of plastic to represent the brackets.

At the front end I did lots of little upgrades - the six small lugs on the bow for the flotation system, the fire extinguisher pull handle, the periscope covers,
handles for the engine deck covers, and front mudguards. In replacing and enhancing the detail it became apparent that the incorrect proportions of the kit engine
deck would make it difficult to get everything right without a total rebuild of the engine deck, so I did what I could to improve the detail, knowing that there
are inaccuracies.
I though the bolt detail on the engine deck was too soft. The real bolts are actually countersunk, so I drilled tiny holes and inserted even tinier bits of plastic
rod into them, and sanded them down until they were just slightly proud of the deck. In hindsight, maybe using hypodermic tubing to scribe tiny circles might have
been a better solution.
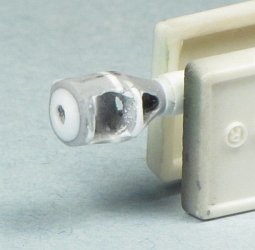
Thin kit provides very thin photo-etched headlight guards, which I thought didn't capture the hefty appearance of the real things. I had a go a thermoforming some
without much luck, and ended up making them from two laminated layers of wine bottle foil, formed over a basswood shape. Making two as mirror images of each other
was a challenge.

 The barrel travel lock is provided in two parts in the OKB kit, but the parts lack detail of the locking mechanism and the main support is the wrong shape. I
scratchbuilt the lower section, and slightly modified the kit part for the top section of the clamp. The travel lock this was one of the few parts in the kit
that suffered from air bubbles - there were two on the inside of the clamp, both easily filled with some plastic rod and super glue.
The barrel travel lock is provided in two parts in the OKB kit, but the parts lack detail of the locking mechanism and the main support is the wrong shape. I
scratchbuilt the lower section, and slightly modified the kit part for the top section of the clamp. The travel lock this was one of the few parts in the kit
that suffered from air bubbles - there were two on the inside of the clamp, both easily filled with some plastic rod and super glue.
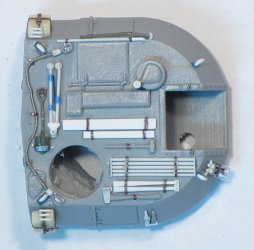
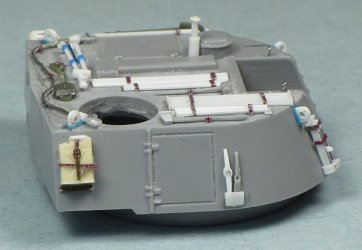
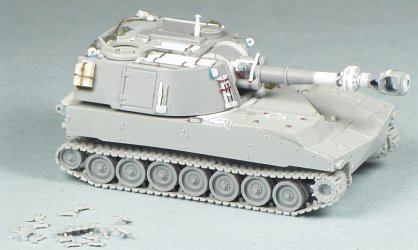
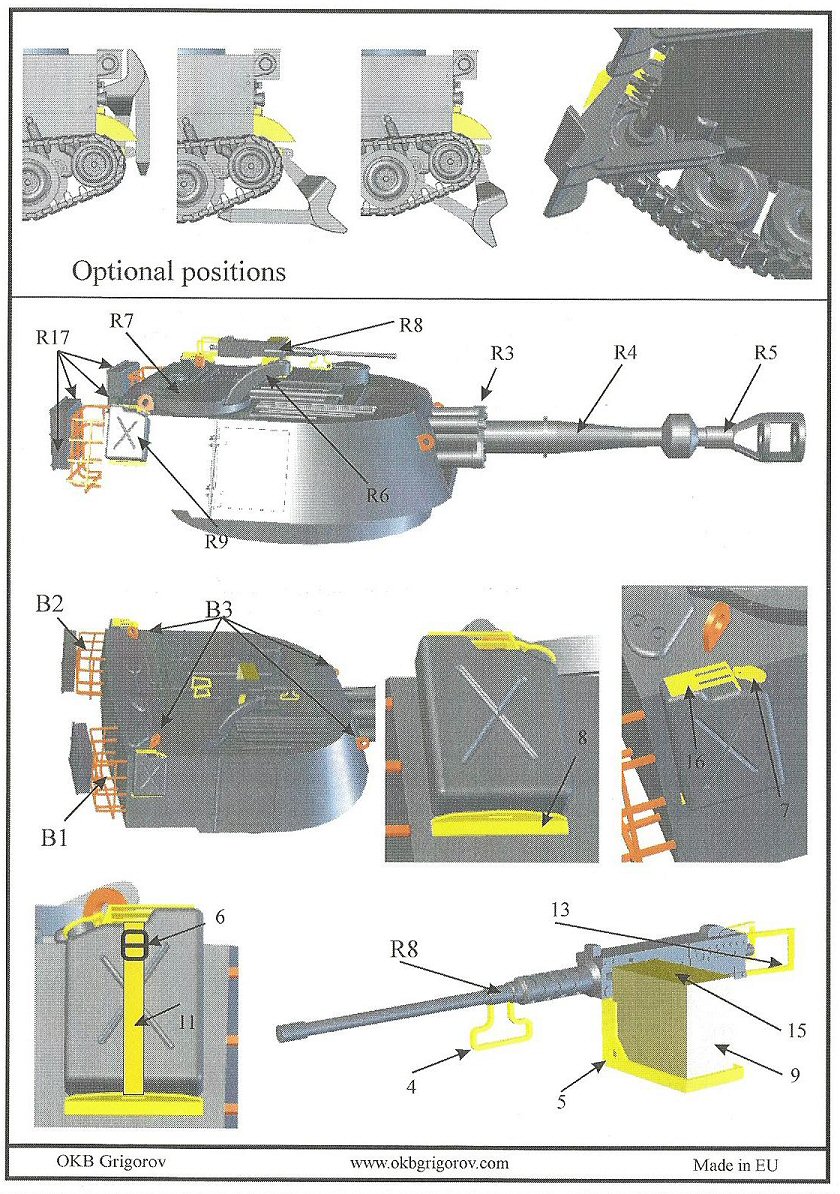
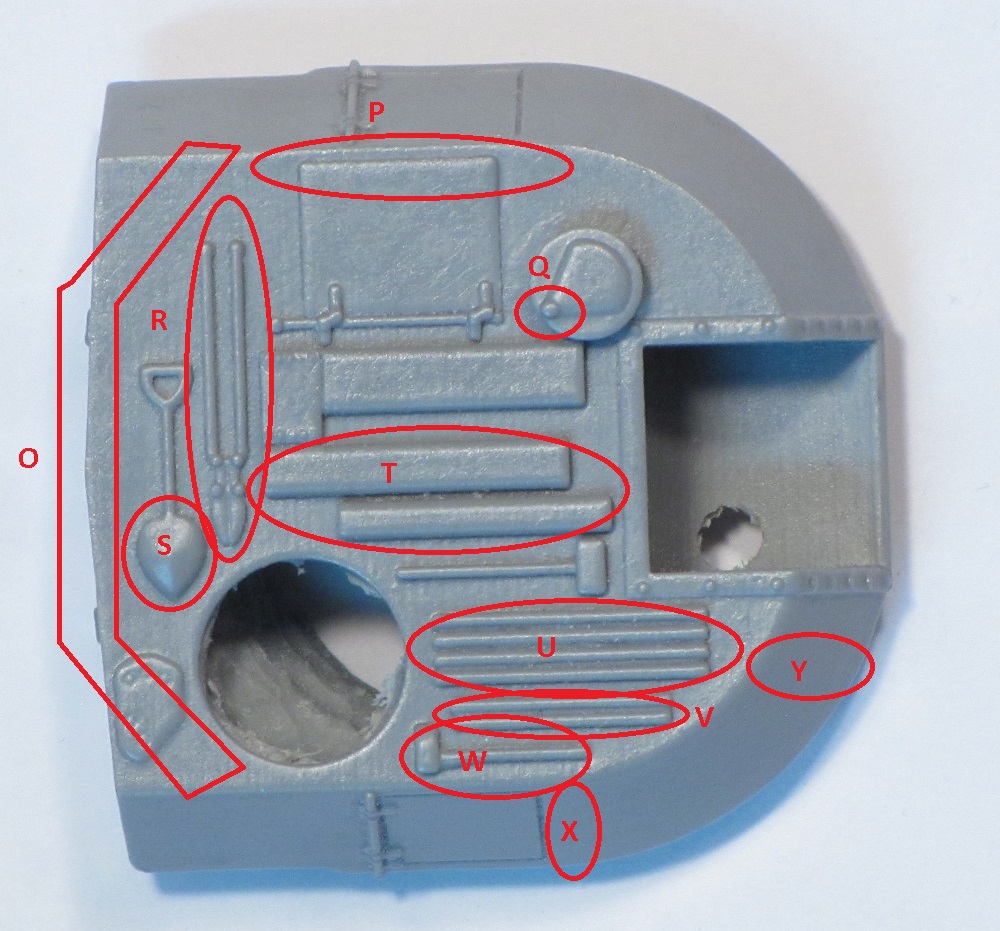
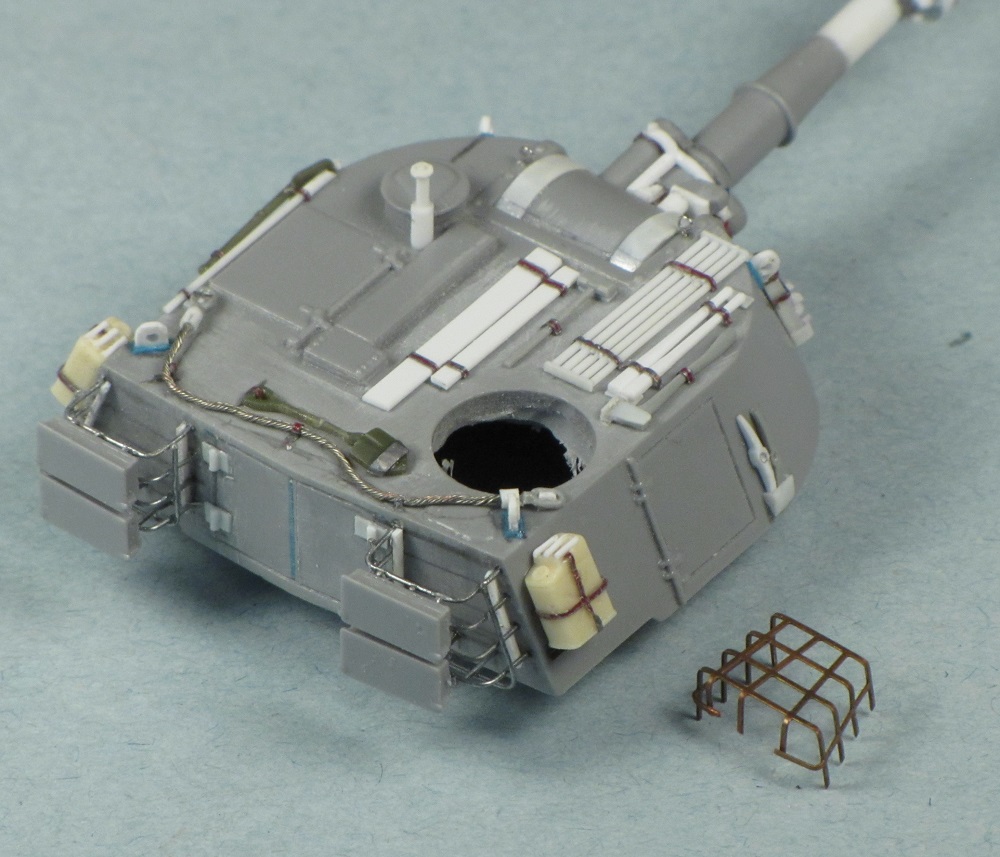
3. Cab (Turret)
I used a Dremel tool to hollow out most of the turret to reduce the weight, and ease the load on the suspension. The kit turret suffers from soft detail, and is
missing several prominent items of stowage. Here's my rundown of turret fixes (ignore the hole in the mantlet area where I got a bit carried away with my Dremel -
it won't be visible on the finished model!):

O. Missing tow cable
P. Missing shovel and crow bar
Q. The circular item is the cover for the panoramic sight (moulded in the closed position). It should have a vertical shaft on which it extended when open.
R. The giant bolt cutters should be a folded M3 tripod for the 50-cal machine gun.
S. A heart-shaped spade (perhaps for filling up a heart-shaped box?)
T. These nondescript rectangles represent stowed aiming posts (top) and spare 50-cal barrels (bottom). I believe both sets of items were stowed in bags. In any
case, like the rest of the stowage that is provided, there are no straps to secure the items.
U. The M109 should have a 5-piece barrel cleaning rod, not 4. Later variants had 7-piece rods.
V. These should be a pair of handles for the mattock and pick axe.
W. Poorly moulded axe.
X. The pick axe and mattock head should be stored here.
Y. The track fixture should be stowed here.
I started by carving off all the moulded on stowage and replacing it with spare parts (axe, sledge hammer, mattock head from a Dragon Sherman;
spade from an S Models M151, shovel from an S Model Renault UE), or scratchbuilt parts (mattock and pick axe handle, pick axe head, barrel cleaning
rods, crow bar, tow rope, track fixture, tripod). I used lead foil to add the missing tie down straps.
I also replaced the stowed aiming stakes and 50-cal barrels to make them look a little more like bagged items. The kit provides the turret lifting
eyes as thick photo-etched parts. I replaced them with plastic sheet, and added lengths of stretched triangular sprue to replicate the prominent weld
beads. I felt the jerry cans provided in the kit were too skinny, so I replaced them with Armand Bayardi items with new handles.

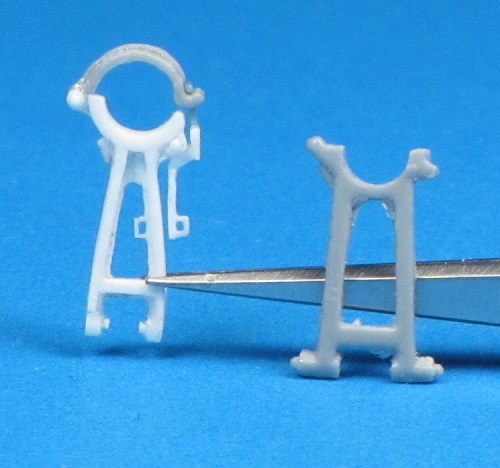
The stowage racks at the rear of the turret are provided as thick photo-etched parts. I folded one of the baskets to shape, and it looked OK, but it
didn't really capture the 3D quality of the real bins, and the bottom of the basket is not complete. I rebuilt the baskets with wire. Consistently
bending the wire to the right shape and curve proved to be a challenge, so I created a jig, consisting of a plastic former to bend the wire around, with
holes drilled to position the wires.
After a moderately successful test run with a homemade jig, I decided the best approach was to drill holes into the cab (turret), then bend the horizontal
bars to shape. When these were installed, I added the fore-and-aft uprights, using superglue to attach the wires, and finally added the u-shaped side-to-side
bars. It took a bit of trial and error, but I think the end result looks good. However, after the resin stowage bins are attached to the baskets, a lot of this
work is hidden, so maybe I should have stuck with the kit parts!

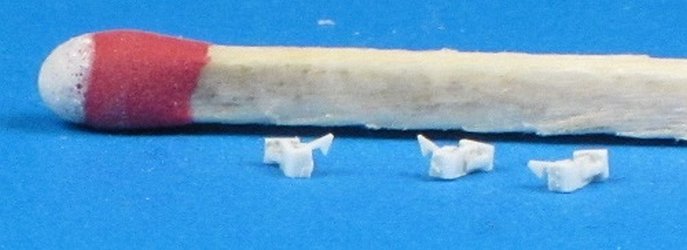
The last little job was scratchbuilding the three hold open latches for the two doors on the turret rear and the door on the hull rear. These are pretty tiny,
but each is made of 10 separate parts. They don't photograph well...
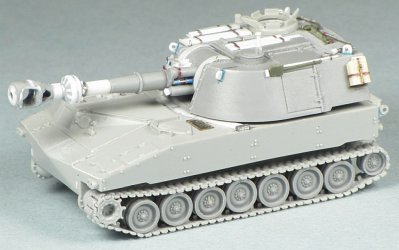
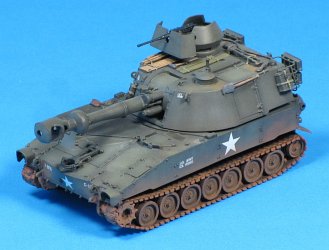
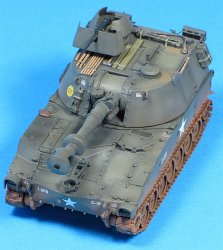
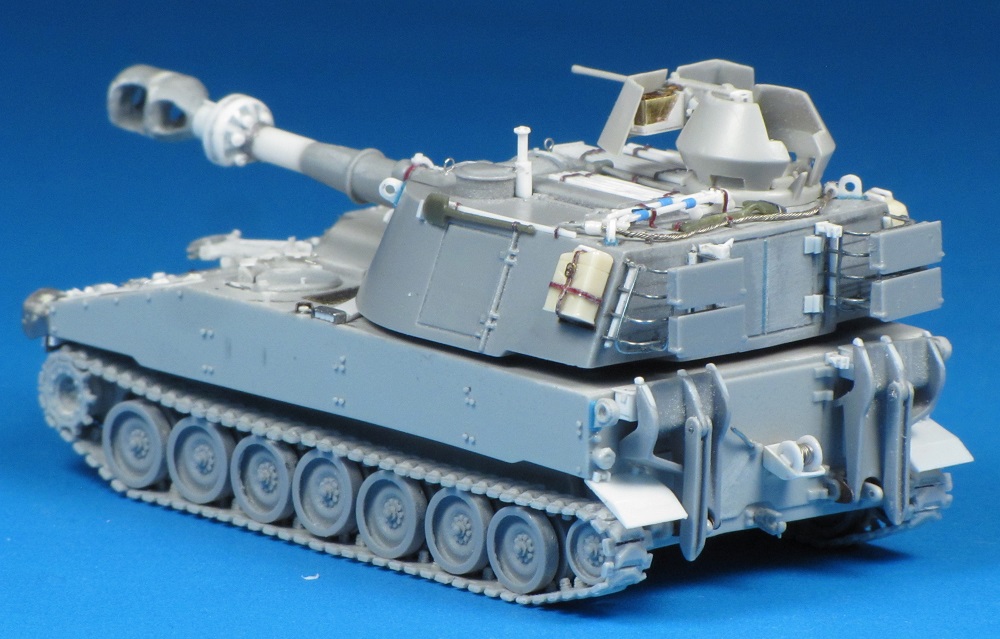
 To add a little interest, I decided to depict an M109 with the standard commander's cupola replaced with an M113 commander's cupola, complete with ACAV gun shield.
I robbed this assembly from a Trumpeter M113 kit. I thinned the shield a little and added the gussets on the inside on either side of the gun slot. I used the
Trumpeter 50-cal, with scratchbuilt spade grips. I used the ammo box and a strip of 50-cal ammo from the OKB kit.
To add a little interest, I decided to depict an M109 with the standard commander's cupola replaced with an M113 commander's cupola, complete with ACAV gun shield.
I robbed this assembly from a Trumpeter M113 kit. I thinned the shield a little and added the gussets on the inside on either side of the gun slot. I used the
Trumpeter 50-cal, with scratchbuilt spade grips. I used the ammo box and a strip of 50-cal ammo from the OKB kit.
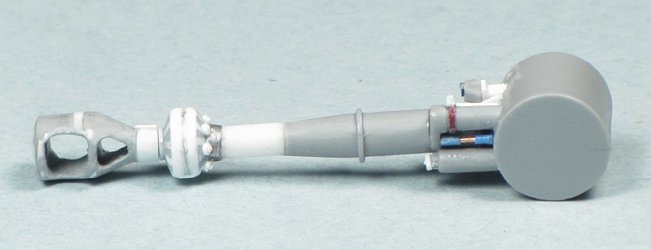
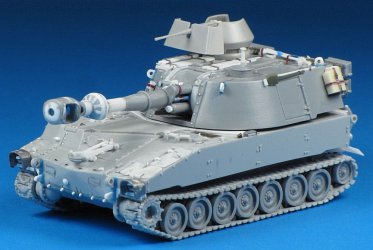
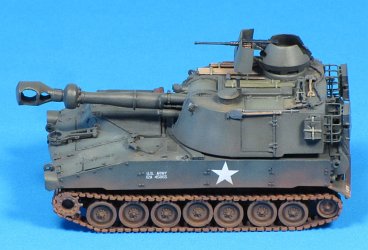
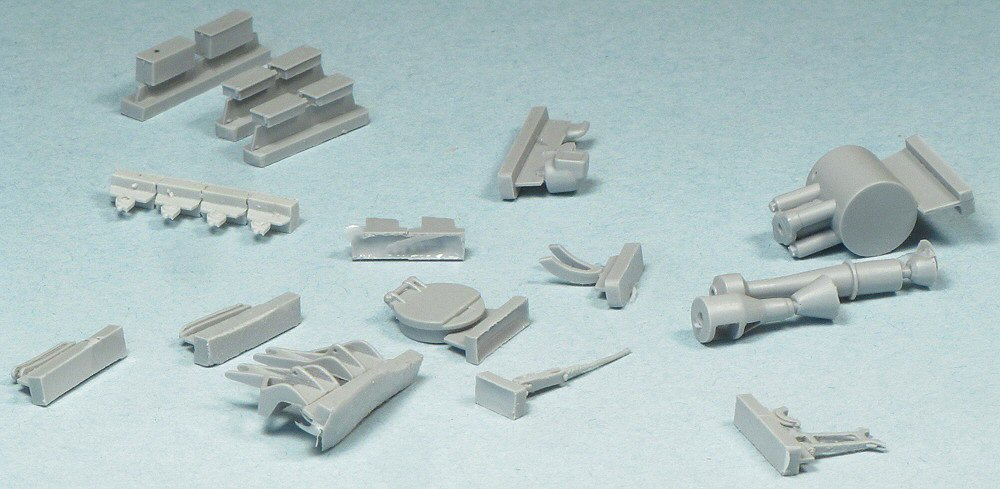
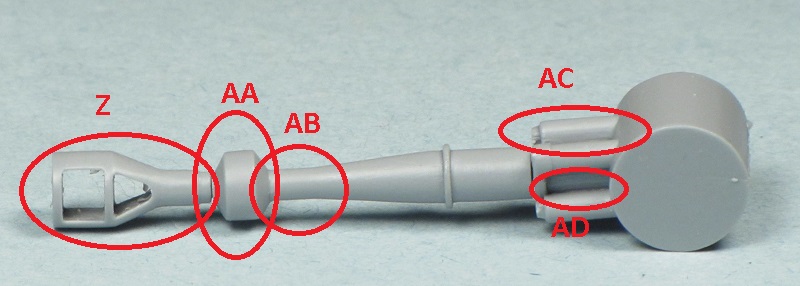
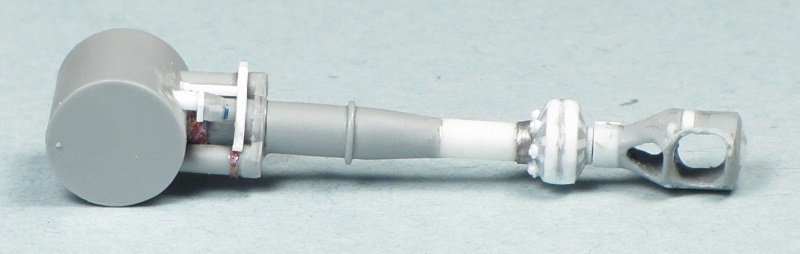
4. Howitzer barrel
Probably the most prominent characteristic of the M109 is the barrel of the howitzer, with its massive muzzle brake and bore evacuator. The kit provides the barrel
as 3 resin parts, and looks like this:
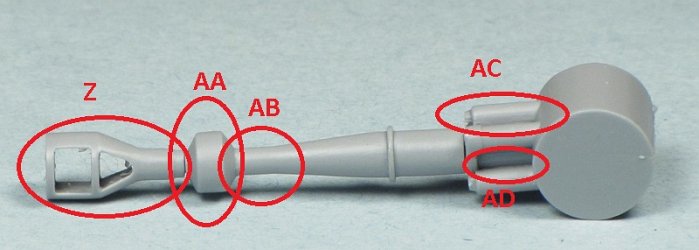
Here's my list of issues:
Z. The kit muzzle brake is circular in cross section, but should be more oval. The end face is flat but should be convex. The rear section is too narrow.
AA. The bore evacuator is too small and missing the prominent bolt detail on the rear face.
AB. The thinnest section of the barrel looks too thin.
AC. The kit has two recuperators (lower left and upper right of the barrel) and two recoil cylinders (lower right and upper left). The real M109 has only one
recuperator (lower left) and an offset telescopic sight to the upper right. The kit provides the offset sight head, but no instruction on where or how to mount it.
AD. The kit is missing a linkage between the recoil cylinder and recuperator, as well as details of the variable recoil mechanism on the opposite side.
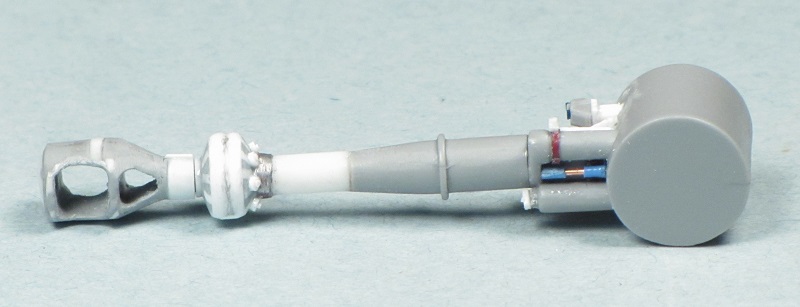
Here's what my barrel looks like after some upgrades:
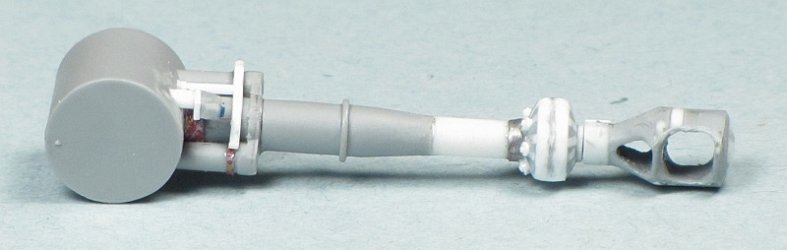
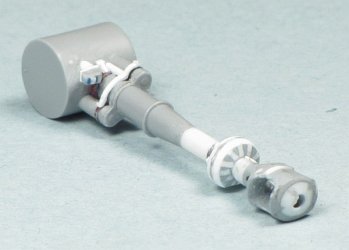
The biggest job was reshaping the muzzle brake. I added crescent shaped scraps of plastic to either side of the kit muzzle brake, and a roughly oval shaped plate
on the front, and then refined the shape with lots of sanding and file work.
I rebuilt the bore evacuator from discs of plastic card, and created the tapered sections from triangular scraps and putty. The section of the barrel aft of the
evacuator was replaced with Evergreen tube.
While studying photos I noticed another issue with the gun. Note the two white bands at the edges of the mantlet. These are missing from the OKB kit, and are
actually a fixed part of the cab (turret), while the cylindrical rotor shield moves with the gun. There should be a thin raised lip on the inside of each of
these bands, which I added later. As designed, the kit gun sits too far forward in the turret, so I removed the rear section of the cylinder moulded at the
rear of the barrel and also used my Dremel to remove more material inside the turret until I was happy with the placement of the gun in the turret. The barrel
was then firmly glued in place. I decided the vague bolt details on the mantlet weren't good enough, so I replaced those with punched disks. Aligning individual
bolt heads is much harder when supergluing to resin!


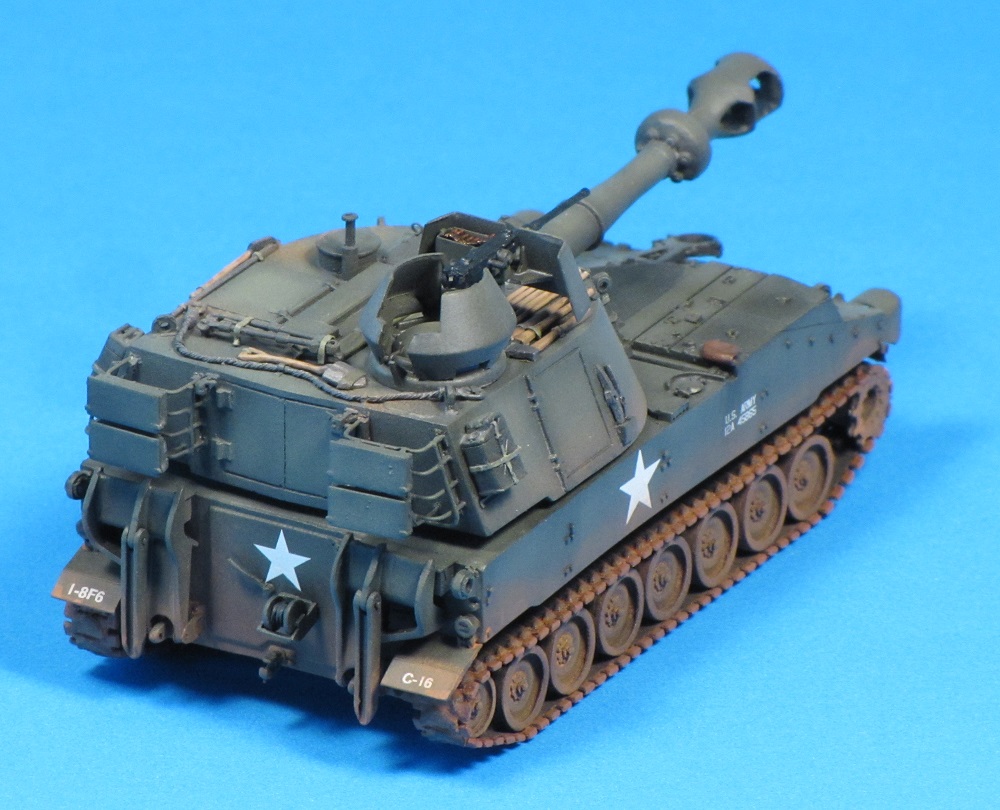
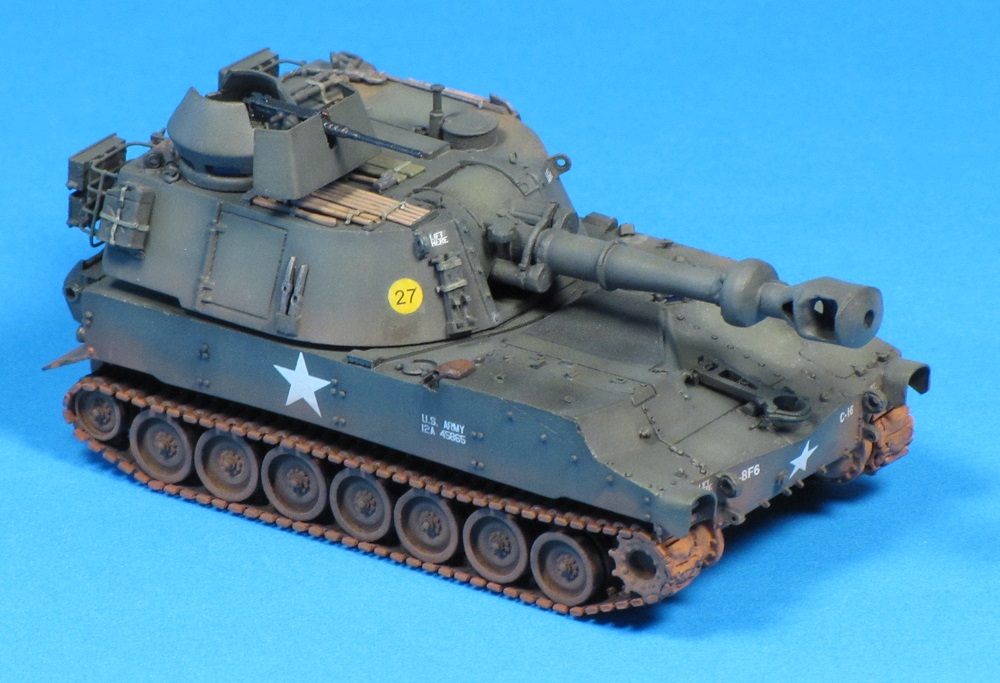
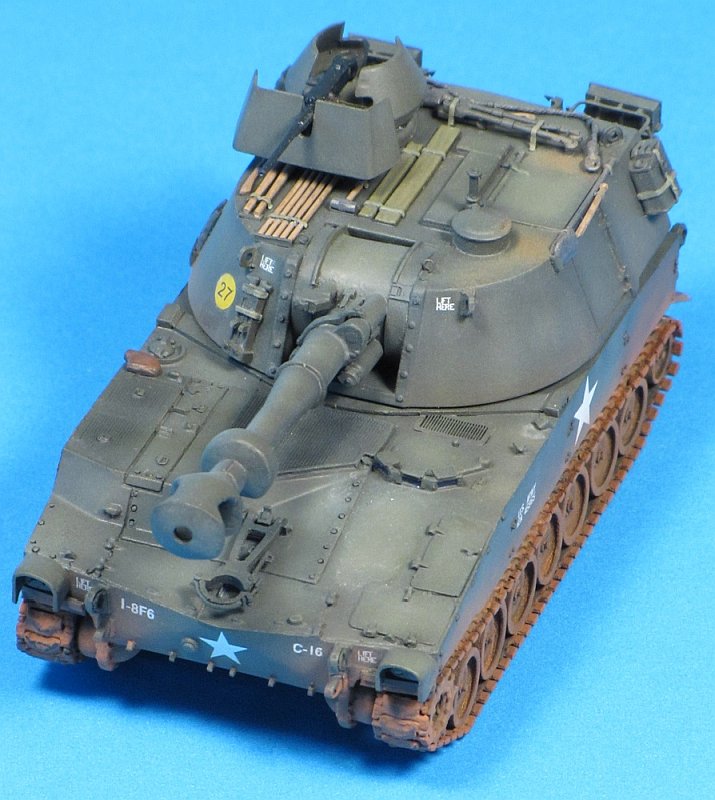
Painting and Markings
I gave the model a coat of flat black as a primer. I found some issues with irregular surfaces on the front right side of the hull and the front left top side that
required filler and sanding.
I played around a lot to get a colour I was happy with - it's based on Testors Model Master Olive Drab darkened with flat black over a black primer coat, with many
thin coats applied. The final colour is probably a bit too light and chalky, but we'll call it scale effect.

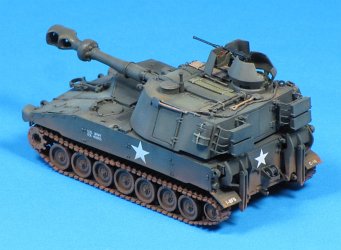
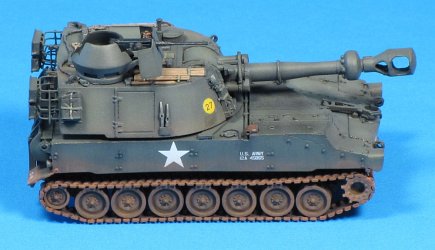
The markings are inspired by the 1/35 Tamiya issue of the Italeri kit which includes a vehicle with the ACAV cupola. The white serial numbers, unit codes and
LIFT HERE markings were ALPS printed by a friend. The stars are from 4 different kit decal sheets. I searched through the whole decal stash to find an appropriate
size of bridge classification sign, but couldn't find anything close. I ended up spraying white and yellow onto clear decal film through a circle template, and
then layering the decals to give a solid colour circle.
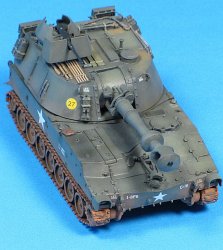

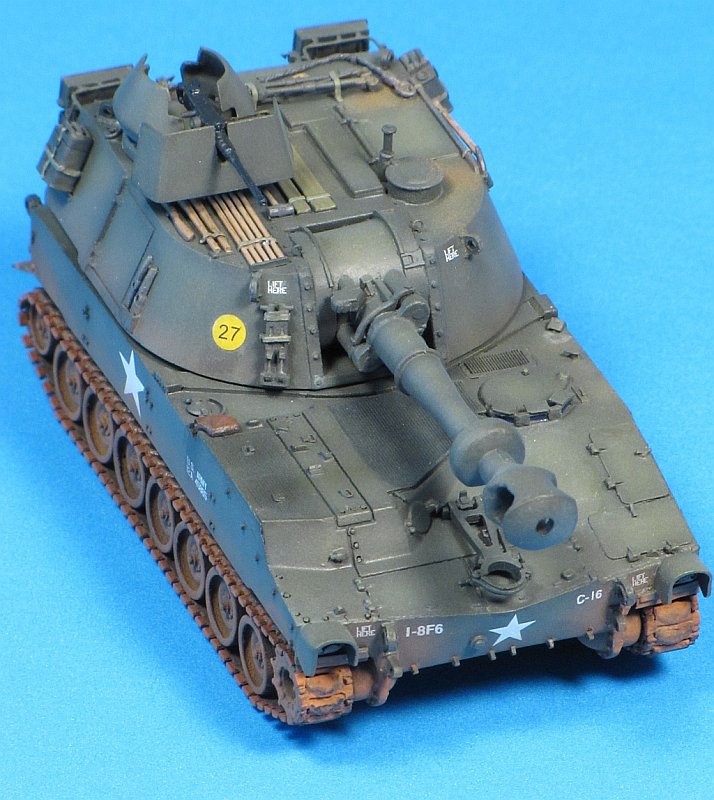
I kept the weathering pretty mild. I experimented with airbrushing Mig pigments to give a relatively light coating of dust, chiefly on the lower hull. I used
Testors universal acrylic thinner as a carrier medium.
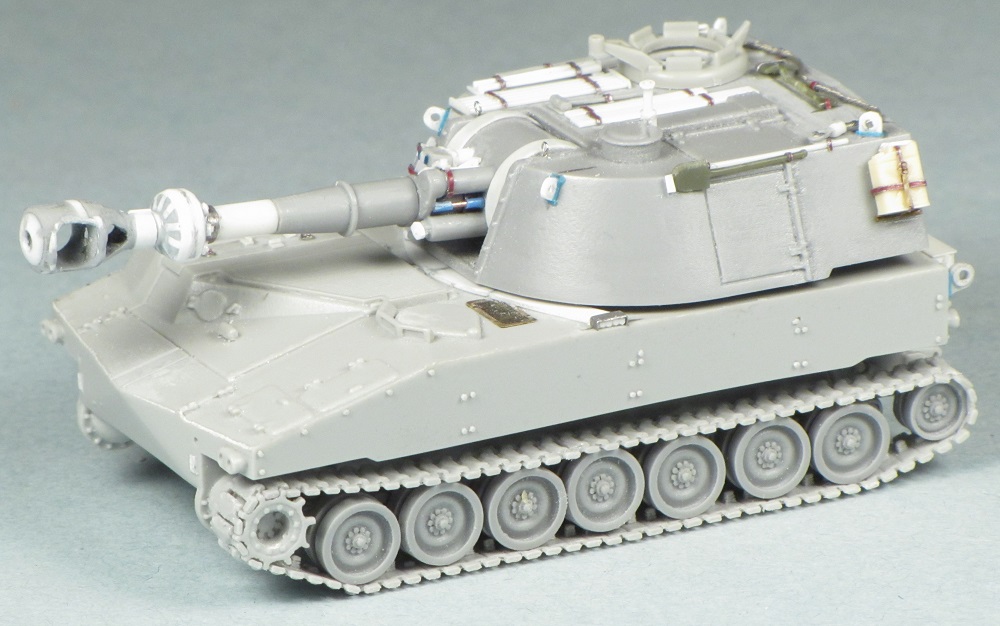
Conclusions
The OKB kit is OK. It is let down by soft detail in some areas, a very poor representation of the 155 mm gun, and some shape issues with the front hull. I
addressed most of the detail issues, but didn't try to fix the hull shape. This was one of OKB's first full resin kits, and newer kits show a lot of improvement.
Since I started building the kit, both Riich (M109A2 and A6) and Revell (M109G) have issued kits. For someone looking to build a Vietnam-era M109 using injection
moulded kits, these could be kitbashed, combining the Revell suspension, hull, turret and gun minus the muzzle brake with the tracks and muzzle brake of the Riich
kit. The cost of this would likely approach that of the OKB kit. OKB Grigorov has also recently released M109 tracks as a separate item. I'm not sure if these
are identical to the parts provided in this kit.
References
- Sheridan:
A history of the American light tank Volume 2, R.P. Hunnicutt
- M108/M109
Howitzer Walkaround, David Doyle
Preview
sample purchased by the author.
This
model can be purchased from

|


