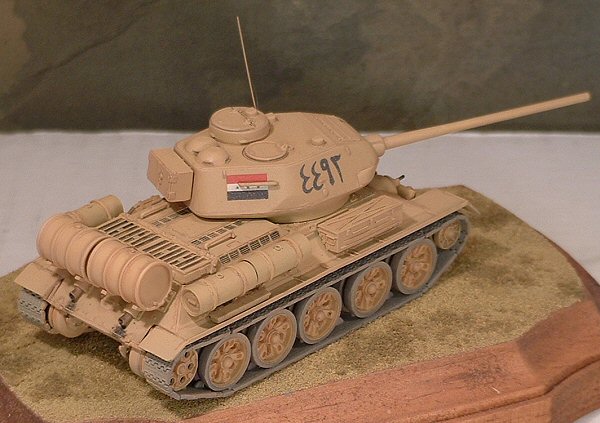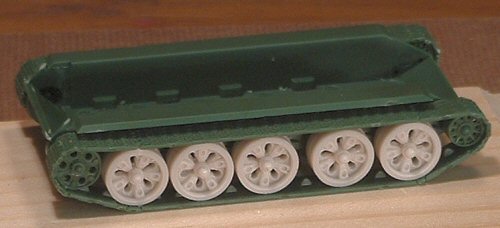
This is a multi-media conversion/upgrade kit (white metal and resin) produced by MR Models of Germany. It is designed to be used with the Revell T-34-85. It consists of resin road wheels, engine covers, fuel barrels, various hull upgrades and stowage boxes, plus white metal bits and pieces. I have to admit that I think the M.1969 designation is a bit of a misnomer - I don’t really think that there was a 1969 "standard", but a whole series of different upgrades, which were or could be applied to the T-34-85. I think what really defines whether a T-34 is a M.1969 or not is the use of the T-55 style road wheels. MR Models provides these, plus many of the other upgraded features. The late style road wheels are really nicely moulded, although there is a bit of a problem with occasional air bubbles and some thick flash around the lightening holes. With a little bit of work opening the attachment holes, these go on to the original Revell hull quite easily. Some people have reported problems with the hard plastic tracks that come with the Revell kit, but I haven’t run short.
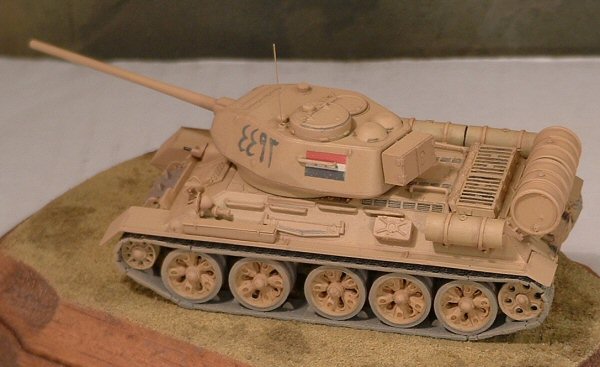
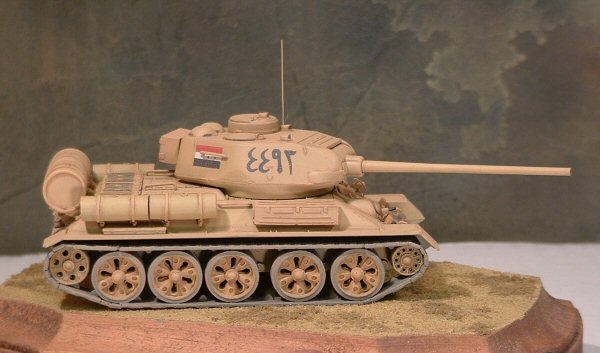
MR Models provides a lot of different upgrade features to pick and choose from. Moving from front to back, on the front glacis you have the choice of two different splash guards (or whatever you call the straight, flat pieces that are mounted across the nose between the two fenders). One is rectangular, the other has cut-outs on either end. Next, there is a hooded driving lamp for mounting beside the driver’s hatch. I had to add the brush guards for this piece of equipment from wire. Next, on the starboard side of the hull, there is a large storage container (purpose unknown). On the port side, I added a brush guard for the headlight, which mounts on the upper hull.
Also on the port side, I added an etched brass cover to the toolbox, and the storage container for the fuel pump. On the rear deck, MR provides two different upgraded covers for the engine vent. One appears to be an armoured cover (perhaps to reduce the vulnerability to antitank fire or molotov cocktails from above). The other is a specialized cover, which would allow the tank to wade underwater (MR includes a snorkel as part of this kit as well). I used the armoured version (even though I think most upgraded T-34s retained the older style screened cover). Finally, for the very rear of the tank, the upgrade set includes oil/fuel barrels and heavy mountings. These really alter the look of the tank. The turret does not change much. I added a turned aluminium barrel by ARMO and added the turret bustle provided by MR. I have never seen one of these mounted, but it looked kind of cool and different, so I used it. Quite a few countries were supplied by the Soviet Union with upgraded T-34s, either for reserve defence or internal security forces. They were simple, reliable, cheap and readily available since the USSR mothballed their fleet of them once they moved to the T-54/55 series and beyond. I have seen examples used in Viet Nam, Yugoslavia, Greece (in Cyprus), Poland and Iraq. Since I didn’t want yet another green T-34 in my collection, I decided to do this one as an Iraqi vehicle from the 1982 Iran-Iraq War. There is a photo of one of these in the Osprey T-34-85 book. Unfortunately that vehicle seems to be rather "plain jane" so I decided to do a more jazzed up version. The decals I used are from a Mi-24 helicopter kit. The vehicle is over-all Modelmaster Desert Tan with a darker wash and a light dusting. The base was purchased from a local craft store and flocked (at the last minute) with railway flocking.
AMPS 2004 While I rushed it a bit, I managed to get this kit done in time for AMPS 2004. For those of you who aren't familiar with AMPS (Armor Modeling and Preservation Society), the organization has developed and uses a very detailed judging system. Unlike most competitions, pieces are judged not against each other (i.e. 1st, 2nd, 3rd) but against a fixed set of criteria (and are awarded a gold, silver or bronze). They judge only your work, not how it stacks up against other models on the table. These criteria are available on the AMPS site. A really great feature of this judging approach is that not only do the judges (usually a team of four or five) take a good amount of time examining your work, but they also provide written comments sheets indicating the score you received in the three major criteria categories (9 sub categories) and why. These are necessarily brief (i.e. seam lines on engine deck, decals silvered on turret, etc.) but usually of great use to the modeller who wants to improve and do better on the next model. Here’s how I did:
Total = 21 out of 30 (with 4 judges the lowest score is dropped, if 5 judges are available, highest and lowest are dropped) All the comments were spot on. As I said, I had rushed to finish the model in time for the show and didn’t fix a lot of things that I would have addressed with more time. A good example of this type of rushing was the side-mounted fuel cans. The ones that come in the Revell kit need a bit of work to avoid nasty seams and, at 1:30 am the night before leaving for Maryland (AMPS Central) I had done a bit of a hack job in finishing them off. As a result, the seams were noticeable and the end pieces didn’t fit very well. When I got home from the show, I ended up replacing them with PST drums, with detail filed off and new straps added. These look a lot better (in my view).
The fourth judge was correct in noting a couple of areas where the green showed through the desert paint. I was thinking that this would be a natural result of the original Soviet green showing through the desert tan but he is right, it doesn’t look right. I should have done more chipping/fading to achieve that result. The flash he mentions is a problem with the Revell cupola – there is a line of flash between the vision slits. Once again, I didn’t take the time to remove that. The grab handles provided by Revell look nice and thin but once they’re painted they end up looking a bit thick. I should have replaced them with wire, as suggested. The end result was a bronze medal (advanced category), which I was very happy to receive. This was a fun build – something very different. It was also my first, tentative foray into the world of post-WW2 armour. It makes a nice contribution to my collection of T-34 variants (which now numbers nine completed kits and growing). |