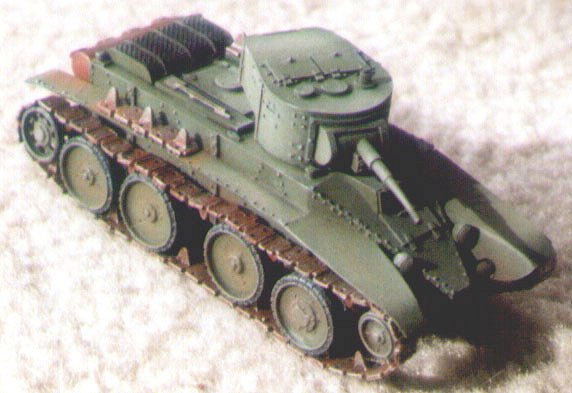
BT-5 Soviet Cruiser Tank
Manufacturer: Modelkrak (Kit No. T001)
Finally we have an example of this historically important vehicle in 1/72nd scale. Although it is not injection-molded, and not readily available in the US, Modelkrak has done an outstanding job in the production of this kit. I hope their kits soon find more distribution here in the US.
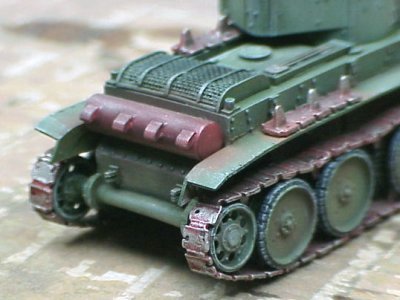
The model is made from six resin and about 40 cast metal parts. The resin parts include the main hull, turret, cannon, exhaust muffler, and two forward fenders. All of the parts are exceptionally detailed and well cast. The quality of the resin is top-notch, with no air bubbles, and superbly under-cut detail. There was a large block of resin on the bottom of the hull to be removed, and another on the bottom of the turret. I found it easiest to grind these off with a mototool. The other resin parts had only small attachment points to their pour blocks. All hatches are molded closed; the headlights are molded onto the forward fenders; there is very fine rivet detail, and some pioneer tools are molded directly to the hull. The engine air intake vent is very well represented, as are the forward and rear towhooks, and all other details, too.
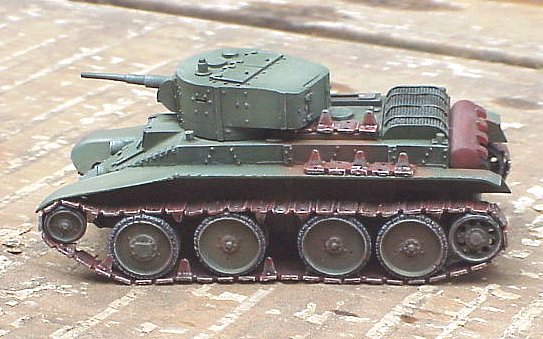
The metal parts include the bogie wheels, tracks and two support axles for the idler wheels. Each pair of bogie wheels is made from two separate wheels, one with a pin for attaching to holes in the hull, and one needing a hole drilled through it to accept the pin. The holes in the hull also needed to be cleaned out some and deepened with a drill. The tracks are a joy to work with. There are about a dozen lengths of track, each composed of eight or so links (I forgot to count them before construction). The links are large, so it is very easy to form the lengths of track into the appropriate shapes for attaching to the wheels and simulating track sag. There are also extra track segments; I glued some of my extra links to the rear hull for spares.
I encountered two problems during the construction of the kit. First, the holes in the hull for the bogie wheel pins were too close to one another for the sprocket wheel and the rear-most bogie wheel (on Soviet tanks, the sprocket wheel is in the rear, and the idler wheel in the front). I had to cut off the pin for the sprocket wheel, and glued the wheel further back on it's axle mounting to allow for a small gap between the wheels. It was a very weak attachment, without the pin glued into the hole, but the metal tracks, attached with a lot of super glue, add plenty of support.
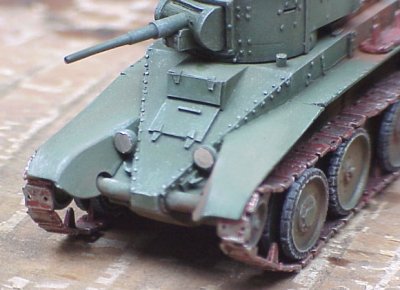
The second problem I had was with the front idler wheel. There are two axle pieces which must be glued to the hull, and then the wheels glued to these axles. The instructions are very unclear as to the placement of the axles. After looking at some somewhat-helpful photographs, I glued them in what I thought was the correct position. After I glued on the idler wheel, and then the fenders, I realised that there was very little room between the fender and the wheel for the tracks to fit. After carefully inserting the tracks between the wheel and the fender, the fender is pressed down onto the tracks, which is quite incorrect. Photographs show a substantial gap between the tracks and the fenders.
Aside from those two difficulties, construction was very easy. I spent a good deal of time trying to smooth over the line where the front fenders attached to the side fenders, only to notice in photographs (after the fact) that there was supposed to be a pronounced line/ledge where the two fenders connect. So if you decide to attach the fenders, don't bother trying to make the attachement point disappear. I say "if" you use the fenders, because many BT-5's did not have the fenders attached, so these are optional parts.
With the exception of the sprocket wheels, Modelkrak did a great job in the spacing of the bogie wheels, i.e., there is supposed to be a large gap between the middle sets of wheels, and the two rear-most wheels are very close to each other. Also, they correctly included wheels with different hubcaps for the forward-most pair of wheels. Be sure to get these right when attaching the wheels.
There are no decals included with the kit, which is not a major problem considering that most pre- and early war Soviet tanks were unmarked. There are two marking schemes presented in the instructions: one for the Finnish Army, 1st Tank Battalion, Carelia 1941, and the second for the Republican International Tank Regiment, Teruel, Spain, 1937. The instructions don't state it, but both vehicles should be painted green. The Finnish tank has the Finnish markings on the side of the turret, and the Spanish tank has the Republican, three-color stripes on the turret.

Modelkrak packs their kits in ziplock bags (separate bags for the resin and metal parts), and boxes them in a bubblewrap-lined sturdy cardboard box. Even with such good packaging, there were a few broken parts in my kit, mainly fender pieces, which were easy to fix. Thanks for using the zip-locks, Modelkrak.
The final model is superb. The detail is much nicer than any injection-molded kit I've seen, and accuracy of the kit is perfect, from what I can tell using my limited references (a small Russian book on BT tanks). I have several other Modelkrak kits, and can't wait to build them too.
| Back to Kit Reviews | Back to Home Page |
| Back to Modelkrak |