|
Military Wheels
|
Volkswagen Type 60 |
|||
| Kit #: 7201 | Review by Neil Lyall - nlyall(at)bigpond.net.au | |||
|
Military Wheels
|
Volkswagen Type 60 |
|||
| Kit #: 7201 | Review by Neil Lyall - nlyall(at)bigpond.net.au | |||
 |
|
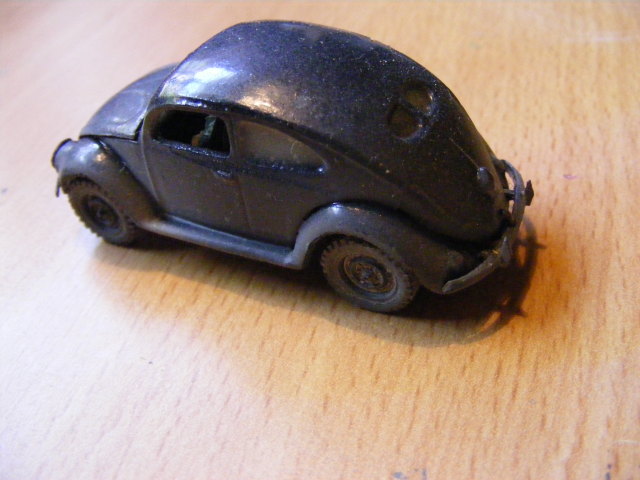
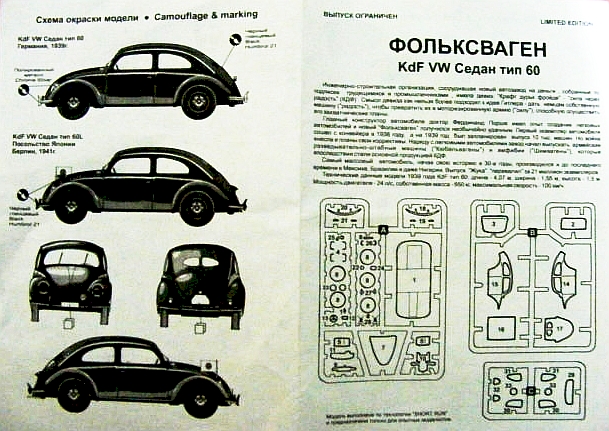
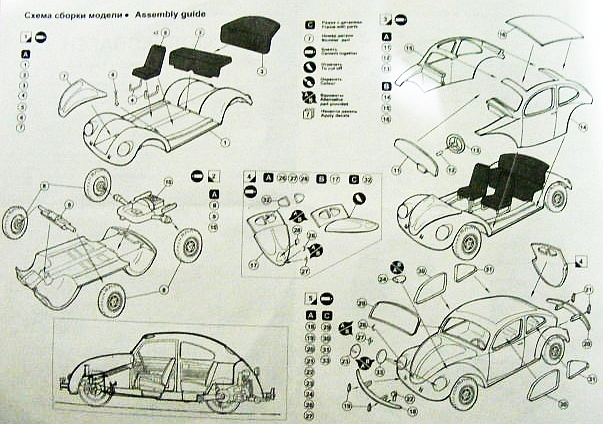
The kit consists of around 40 parts, cast in pale grey plastic, one sprue of clear plastic window pieces, one small set of decals, and one set of black and white instructions, which includes painting and decal application guide. The instructions are in Russian with a few English subtitles. The instruction diagrams are quite clear regarding the assembly. Two short phrases in English are on the first page of the instructions; 'Limited Edition' and 'Short Run'. As per these indicators, this kit does need a bit of TLC to get a good finish, the same as with the other MW VW variants, all of which share common parts. Care needs to be taken in removing parts from the sprues, particularly the smaller pieces as they are joined to the sprue very securely. Most parts need a good sanding also. The wheels have a moulded ridge line right around them, the front and rear bumpers have ridge lines along their lengths, and many parts have flash that needs careful cutting and sanding, including the front and rear wheel axle assemblies. As with other East European short run kits, the plastic is quite soft, making it easy to cut and sand, and it is very easy to 'melt' with liquid cement. This means you need to take care when cutting or sanding, and also when using cement to avoid disfiguring surrounding surfaces. The body shell is cast in two halves, and common to all the MW Volkswagens, this windscreen aperture is not cast particularly well, and requires a lot of care when cutting and sanding the flash from this area. It can be hard to assess where the flash ends and the body starts, you need to test fit the clear windscreen piece frequently, to avoid making the aperture the wrong shape, or too large. The same applies for all the window apertures, they need to be sanded to ensure a good fit of the clear parts, however these are easier to get right than the front windscreen. The entire roof area is a separate piece that has to be inserted. It's a bad fit and needs filling & sanding right around its four sides. The reason it's a separate piece is the pieces are common to the Type 87 Afrika Korps version which has a large open "sun roof". I assembled the lower body and chassis first, then painted the interior of both parts, then loosely attached the body to spray the overall colour. When dry I removed the body to fit the clear glass pieces on most of my other builds, but on this one I used Modelmaster Window Maker for all the windows including the front windscreen. It has an applicator needle similar to Revell Contacta Cement which I find easy to use. This gives a good result (quite clear, and nice and thin). The Window Maker needs to be very well shaken to mix the contents, but this also creates bubbles in the mix, so shake well, and then let it sit for a while to allow the bubbles to disperse, otherwise these tiny bubbles will be injected with the solution into the window aperture. If this happens you can use a very sharp knifepoint to break them, without breaking the film, as it's quite elastic when freshly applied. If you want to use the clear plastic provided for the windows, the plastic pieces are cast very thick - I did a rough estimate that they are a scale 2 or 3 inches thick (talk about bulletproof glass!). If you carefully paint the edges of the clear plastic windows dark grey or black, it reduces reflection, so the thickness is less noticeable after it's inserted into the model. Of course if you want to splash mud, or spray dried dust all over them, this is another easy way to improve their appearance. The body shell is not a very good fit onto the chassis. A small gap exists around most of the join. I used the window maker to inject a fine line of solution into the gap which acts as a filler. Then carefully with an OO brush painted over it with the base colour. If making a post war VW you may want to add an external rear vision mirror for the driver. All the WW2 and pre-war Volkswagens had interior mirrors only, in all the pictures I can find. I don't measure model dimensions against the manufacturer's specs, someone who has measured a more modern bug advises this model is a millimetre or two longer than it should be for 1/72. This doesn't bother me, but I understand it's of critical importance to some modellers. The instructions suggest gloss black as a paint job for this model. The instructions indicate the model can be finished with a small Japanese flag on each front mudguard (not supplied in the kit), evidently a reference to the Japanese ambassador's car in Berlin in 1941, of which a picture exists. Other B&W pictures seem to indicate this vehicle also appeared in grey during the war period. I painted this one gloss black, then dusted it up a bit. Overall, if you are prepared to put a bit of work in, you will achieve a fair representation of the Volkswagen Type 60.
|
| Back to Military Wheels Kit List | Back to Construction Reviews |
Article Last Updated: 16 April 2009 |
Back to Home Page |