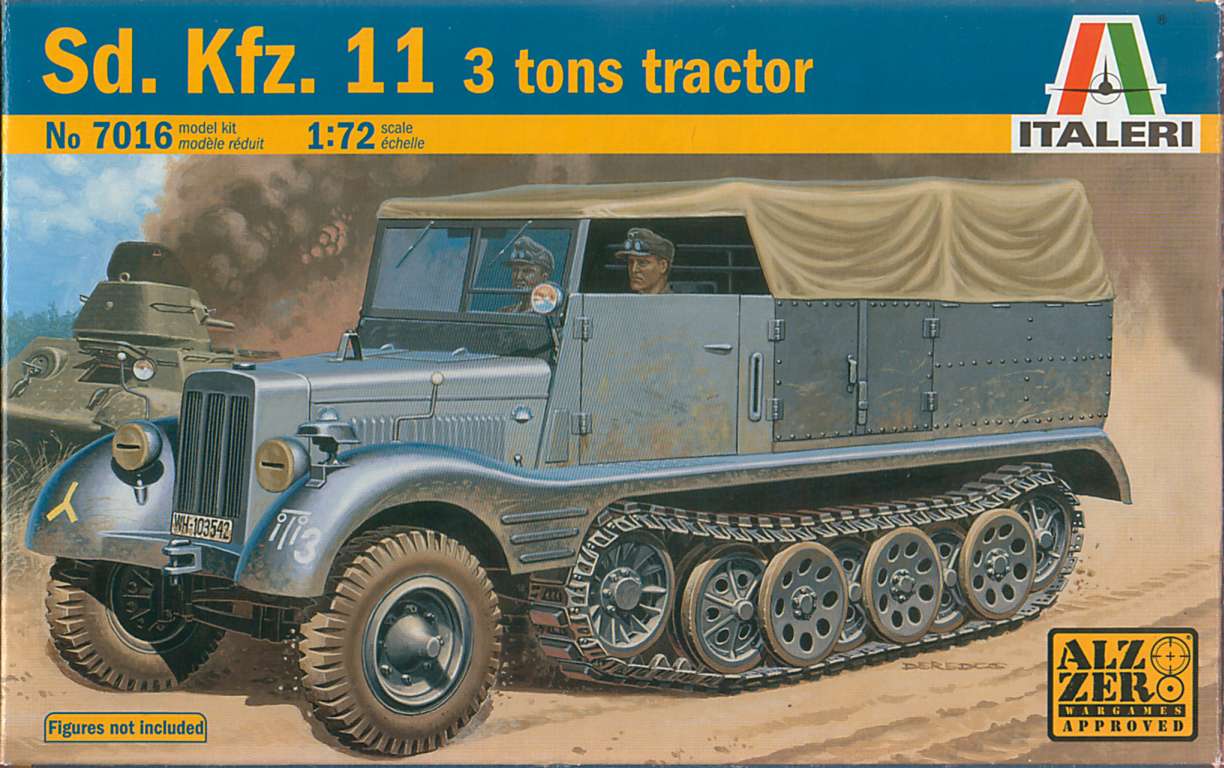
| The kit is the
old ESCI re-proposed by Italeri. In the box I found two light grey
moulds with the vehicle pieces while a third "metallic" grey has the
link and length hard plastic tracks, a transparent sheet, the decal
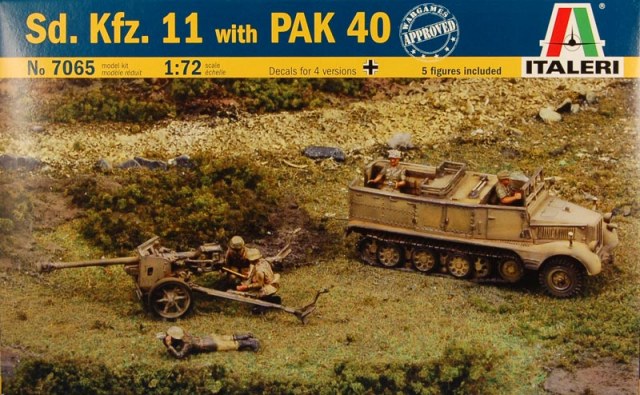
set and the instructions. The kit 7065 has a fourth mould for the
PAK40 7,5 cm antitank gun. I particularly like the Italeri packaging;
on the front a photo shows honestly the assembled kit and the rear
of the box has three colour profiles. No flash or warping, but some
wheels have little imperfections caused by the mould age. Luckily
the old polyethylene tracks nowadays are replaced by the hard plastic
ones. They aren't perfect; anyway they are a good improvement and
being made with hard plastic they can be worked to be detailed if
desired.
Although described in some reviews
as well made and highly detailed (and certainly it was in the eighties)
I found some parts not well reproduced, like the whole suspension
system and the rear of the body, where a bad reproduction of the mudguards'
curve and of the chassis makes this area a bit different from the
original vehicle. Nothing really irrepairable however and some plastic
pieces can solve the major problems.
There is a lot of riveting which look
a bit oversized to me so I sanded them down. I have to say that only
my finicky nature lead me to improve the chassis. If glued to a base
or if left on the shelf it is not visible and the problem can be ignored.
Germans liked halftracks and made wide
use of them. The Sdkfz 11 was one of them and gave the chassis for
the armoured halftrack Sdkfz 251. It towed the PAK 40 as well as the
Nebelwerfer. I didn't make a deep research about it. The basic information
found about the vehicle shows how it was made in three main variants:
troop, engineer vehicle and artillery tractor (Artillerie-aufbau).
The first had three transversal benches and the crew opening with
no doors, the second had a longer rear box-like compartment (and no
side doors) and the third one is depicted by the ESCI/Italeri kit.
After the three basic models (which don't have a "slash" number) further
five specialized versions were made:
- Sd.Kfz.11/1 – smoke generator / ammunition carrier (Nebelkraftwagen).
- Sd.Kfz.11/2 – decontamination vehicle (mittlere Entgiftungskraftwagen).
- Sd.Kfz.11/3 – decontamination vehicles with spraying equipment (mittlere
Spruehkraftwagen).
- Sd.Kfz.11/4 – smoke generator (Nebelkraftwagen).
- Sd.Kfz.11/5 – gas detection vehicle (mittlere Gasspuerkraftwagen).
Minor variations are visible in some photos, like the closed driver compartment. About the general dimensions, I found it was built on 3 chassis: the Kl 3 (1936), the Kl 5 (since 1937 till 1937) and the Kl 6 (since 1938 till 1944) and this could explain the difference I found between some sources. Circa 9,000 of them were produced by Hansa-Lloyd, Hanomag, Adler, Borgward, Horch and Skoda. Keeping this in mind I think it is plausible to have some little differences between the different production plants (also for the German industry) and along the production time line.
Their dimensions were slightly different:
| |
Kl 3 |
Kl 5 |
Kl 6 |
Italeri kit |
| |
1/1 |
1/72 |
1/1 |
1/72 |
1/1 |
1/72 |
|
| Lenght (mm) |
4900 |
68 |
5500 |
76.4 |
5550 |
77.1 |
78 |
| Width (mm) |
1730 |
24 |
2000 |
27.8 |
2000 |
27.8 |
29.5 |
| Height (mm) |
1950 |
27.1 |
2215 |
30.8 |
2150 |
29.9 |
30.5 |
The measures comparisons suggest us
that the kit is a bit oversized for a Kl 6. The piece 9B (the floor with
the mudguards) is 1.7 mm too large (29.50 mm against 27.77 mm); the total length of the kit is 79.50 mm length against the 77.1 mm.
Anyway, the kit forward towing
point is oversized and the length measured without it is 78.00 mm.
This dimension is without the rear towing point, which overhangs the
vehicle shape. The kit height was measured at the top of the windshield,
being the upper edge of the upper hull at 24.5 mm from the ground.
The width reduction looked too hard to be modified, so I kept it as
it is. This was the first compromise. The second one was about the
wheels. They are a bit oversized (and not enough detailed). However,
I didn't want buy a kit just to have a better set.
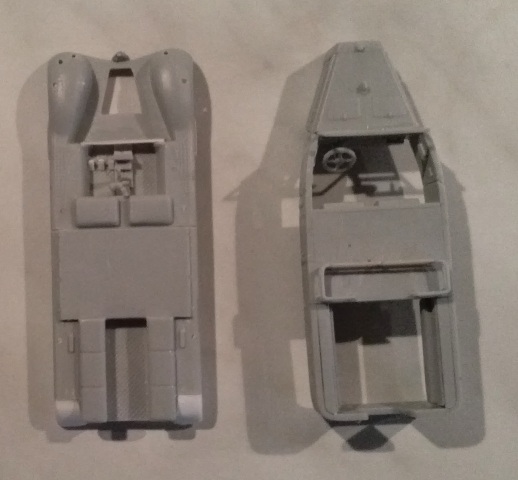
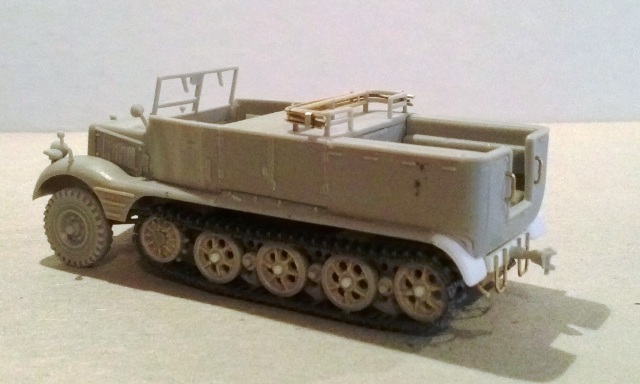
To improve my halftrack tractor I've divided the kit in three parts: upper hull, hull floor and chassis. Then the upper hull was glued to the floor, leaving the chassis apart until painting.
Upper hull
To make it, I glued the pieces of the
upper hull upside down on a glass. This allowed me to have the upper
edge perfectly straight. The external wall of the upper hull wasn't
vertically straight; it was rounded to the bottom, like an old style
bath tub. When the glue was dry I sanded it down to a rounded shape.
- The rear lower edge of the crew compartment needs to be reshaped to receive a more smoothed mudguard curve 11B, 17B, 37B (p. 37B ejector marks were filled). To make it I added plastic by stretched sprue segments and cyanoacrylate.
- The doors 16A and 21A weren't straight
seen from above; they were curved after having filled the ejector
marks and then I engraved the two panel lines and added some details.
Some versions had the kit flat doors.
- The four arms of the steering wheel were thinned.
- The pieces 12B and 18B were glued
inverted (upside down).
- The backrests 13B need to be remodelled
in a single long piece; on the basis of the photos that I consulted
the pieces are tall. The thickness of the finished wall is 1 mm
too thick. To thin them the joint between part 13B, 12B and 18B
were tapered to have a 45° joint. The joint was sanded round.
- The rivetting of the inner wall
(36B) riveting was sanded down and the two ejector pin marks filled
with cyanoacrylate glue.
- The roof (30B) was glued upside
down to have a flat surface.
- The windscreen (45B) is narrow;
I easily widened it with stretched sprue. I removed also the inner
horizontal frame on the port side window.
- Its stopper on the engine cover
wasn't solid; I replaced it with a thin metallic strip.
- The rack 31B, 32B and 33B frames
thickness is oversized while its width is narrow and the rods layout
not completely correct. A patient thinning and re working was needed
to have a more likely look. To this rack were fastened the fabric
cover frames with four hooks which I made with thin metallic strips.
I made them with metallic wire bent on a simple template. The fabric
cover roll was made with thin paper (I use the tea bags paper).
- Handles were replaced with metallic wire.
Hull floor
- The upper hull interlock holes were filled with stretched sprue. Then the ammo floor was filed to make it a bit narrower.
- The fenders weren't a single piece, they were divided just behind the driving compartment, I engraved the separation line.
- The forward towing point was erased.
I made a new one with a piece of plastic sculpted with a file; then
with a drill I made the holes where I glued the pin made with stretched
sprue.
- To give a likely sight, I opened the engine floor, using the inner edge of the chassis forward arms.
Through that the bottom of the dummy engine, glued to the chassis, is visible.
- In the photo I've seen the two forward seats were a single bench, I kept them as suggested by the kit maker. Anyway I closed them on the lower surface with plastic sheet.
- The driver compartment was closed in front of the crew with plastic. Other plastic pieces were used to make the raised gear box, added between the two places.
- I added the stationary brake lever made with stretched sprue.
- I also added the three driver pedals.
- The inner edge of the mudguards are rounded (the outer edge of the seats, were you'd have the legs when seated), the original vehicle photos show them hard edged. I left them as they are.
- The rear fenders shape is wrong.
I cut them off and I made new ones with plastic sheet pieces using
the upper hull lower edge as a reference.
- The rear edge of the floor was thinned;
it is not visible under the lower edge of the upper hull in the
original vehicle.
- The rear benches in the photo I've seen were a single piece that slightly over hangs the lower wall. I cut off the walls and made them new with plastic to have the same effect.
- The three stiffeners on the fenders sides between the wheels and the tracks are not well done; I replaced them with stretched sprue.
- After having glued the floor to the upper hull I added the lights 46A, 47A and 48A; each of them required a drop of glue to fill a little sink mark.
- The width indicators rods are a bit thick and were thinned.
Chassis
The chassis is very simplified. The
three pieces which composes the main structure also need to be heavily
modified before being detailed. I understand, unless the model is
upside down, nobody can see the problem. Anyway I usually find things
like this disturbing. So:
- I modified the shape of the two sides 1B and 2B. The rear edge was filed nearer the idler axle and a more rounded profile was given.
- The suspensions system was made
with torsion bars. I cut off the spring suspension system and replaced
them with the torsion bar arms (to tell the truth the wheel pins
shouldn't be symmetrically aligned). They were external but the
idlers' were internal.
- The track tensioner rods were made with stretched sprue.
- Also the large cylinder was replaced with a piece of sprue.
- The structure 45A forward arms were
thinned from underneath because they weren't horizontal, they were
folded up. At the rear the thickness was heightened with 1.00 x
1.00 mm rod segments shaped in place.
- I replaced the rear bar with 1.00 x 2.00 mm rod and the angled ones with two plastic 1.00 x 1.00 mm rod segments. Then I made the inner towing point arm.
- I detailed the rear towing point because it is very simplified.
- I replaced the torsion bars in the correct positions.
- I added the transmission gear and axle between the sprockets. The result is still simplified, but more acceptable.
- The gear cover in front of the sprocket wasn't a flat box; I reshaped the part with a file to give it some tapered at the front and rear.
The floor around it was erased to give the impression of depth to allow work on the gear cover.
- The wheels suspension system was glued in line with the rear track set being a bit too much lowered if glued in the suggested kit position.
- I replaced the structure pieces 8A with stretched sprue lengthened to reach the main chassis structure in front of the transmission axle.
- Above these I added the rods of the steering system made with stretched sprue.
- The exhaust piping was made with stretched sprue.
- Last, I added the two rear steps with metallic wire.
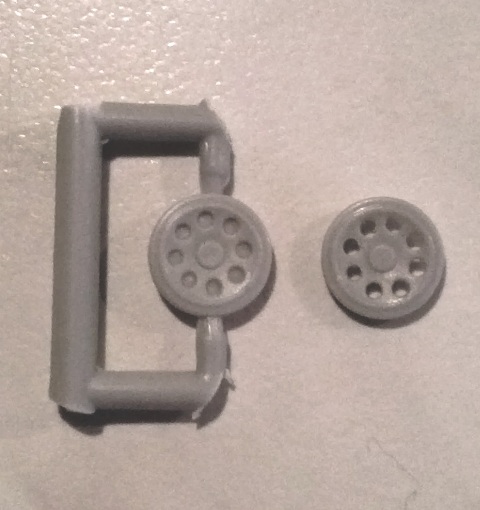
Wheels and tracks
The wheel set has some faults (dimensions
apart). A replacement set could be found in an Sdkfz 251 kit. Anyway
I choose to use the ones in the kit. They look a bit oversized, but
the final effect doesn't show the problem and if detailed the set
doesn't look bad.
- The outer wheel sets have the holes closed (96 in total!). I opened them, of course.
- The inner wheels stiffener ribbing
and hubs are missing. I made them with stretched sprue (may be a
little oversized) and plastic rod. The original ones weren't single
solid wheels, they were a couple. To make a better work I engraved
the separation between them, but I didn't.
- Also the sprocket stiffener ribbings and hubs are missing. As for the inner wheels I made them with stretched sprue and two plastic diskettes. I forgot to drill a hole between each teeth couple.
- The hard plastic track inner sides
are flat without any detail. If one wants every single link line
can be engraved and guide teeth added in the exposed segment between
the sprocket and the first wheel.
To ease the work, the windscreen transparent
sheet will be cut and glued after the painting of the body as well as
the outer wheels rows.
Decals
I have the kit 7065. Three vehicles are provided:
- 21 PzDiv in Normandy
- Werfer-Brigade 5 in Italy
- 4 PzDiv in USSR
I didn't find photos of these vehicles.
I have no idea if the second and the third are correct. About the
21 PzDiv vehicle (which being in Normandy is my choice), this unit
made a wide use of captured French vehicles but its use is likely.
I will not use the divisional marking: I never saw one in any Normandy
21 PzDiv vehicle photos.
Conclusions
Well, it is an old kit and it clearly
shows its age. My corrections didn't make a perfect replica of it,
but they improved the kit enough to have a more likely one, which
is what I wanted. It can be converted in other versions, which had
a different rear and the straight doors. The use of the fabric cover
helps to hide the inside details also for the kit suggested version.
A replacement wheels set will help to avoid further work. Anyway its
correction is not impossible. And I liked modelling it.
References
http://www.cybermodeler.com/armor/sdkfz11/sdkfz11_walk.shtml
http://www.panzer-modell.de/referenz/in_detail/sdkfz11/sdkfz11.htm
http://the.shadock.free.fr/Surviving_SdKfz6_SdKfz11.pdf
http://www.kfzderwehrmacht.de/Homepage_english/Motor_Vehicles/Germany/Hanomag/le__Zgkw__3t/le__zgkw__3t.html
Review sample purchased by the author.


|