|
Italeri
|
www.onthewaymodels.com |
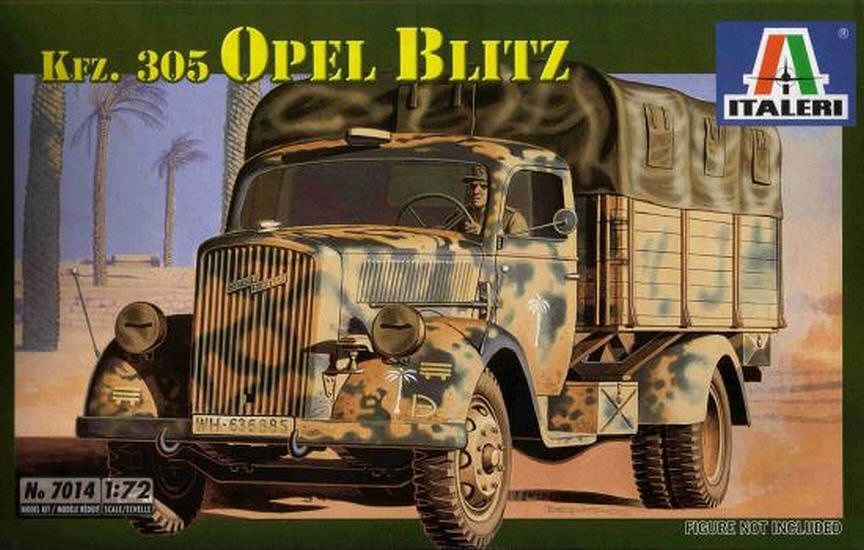
Opel Blitz and Kfz 305 |
|||
| Kit #: 7014 and 7055 | Article
by Danilo Carli - 172normandyafv(at)gmail(dot)com
Edited by Marc Mercier |
||||
|
Italeri
|
www.onthewaymodels.com |
Opel Blitz and Kfz 305 |
|||
| Kit #: 7014 and 7055 | Article
by Danilo Carli - 172normandyafv(at)gmail(dot)com
Edited by Marc Mercier |
||||
 _______ _______ |
Close
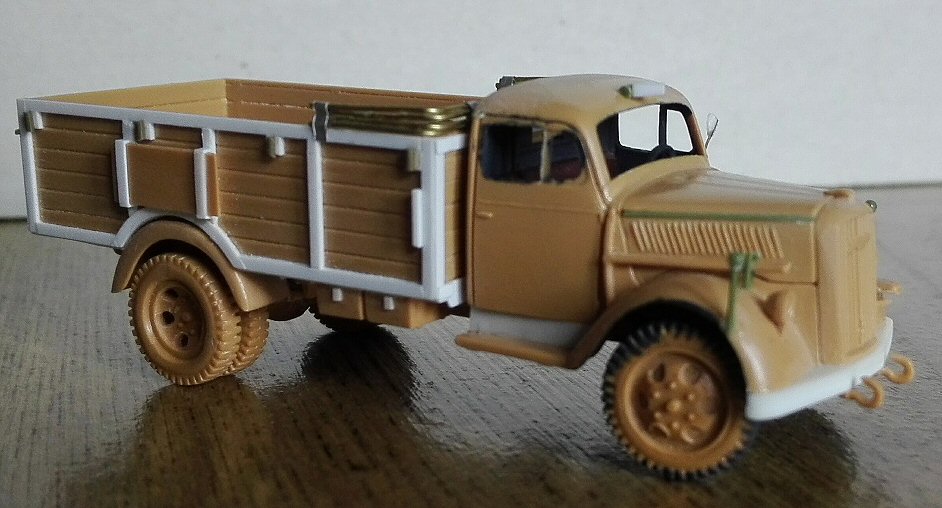
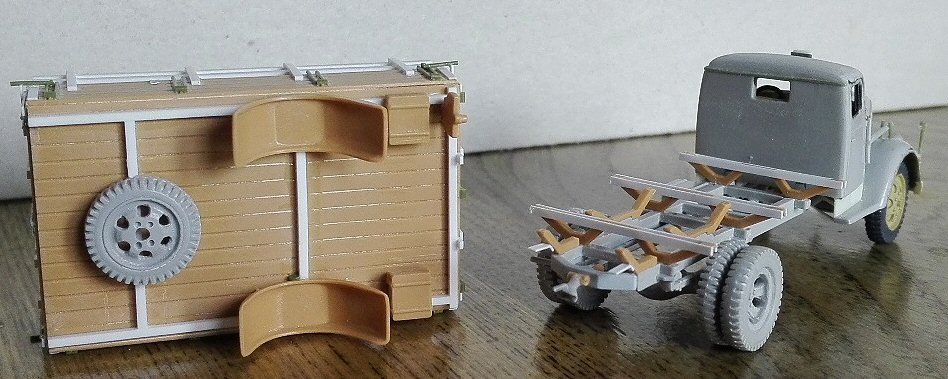
observation reveals the age of the kits. Some details seems to be
shallow. No benches are provided for the flat bed cargo and the “ambulance”
interior is missing although the rear doors could be glued in the
open position. The wheels, slightly undersized, are correct for the
early production and, as far as I can understand from the photos I’ve
seen, the later eight holes/eight bolts type depicted by Roden were
retrofitted to the earlier vehicles making this the only real "mistake"
of the kit. Furthermore they have three pin marks each and (worst
of all) the rear outer ones had them on the outer side! The cab is
a little undersized. However, this makes it compatible to the Airfix
one as shown on a ML
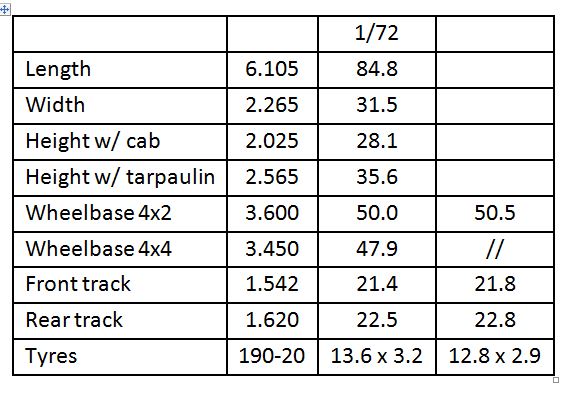
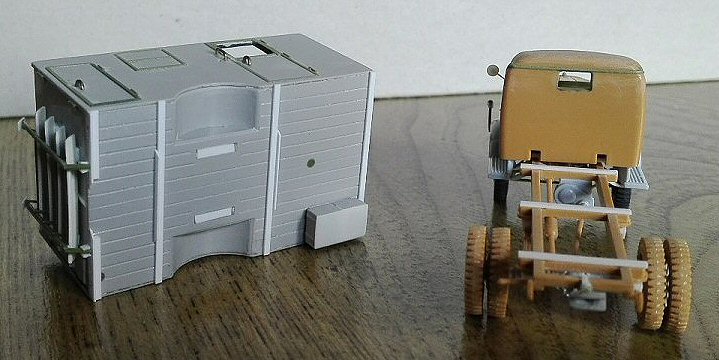
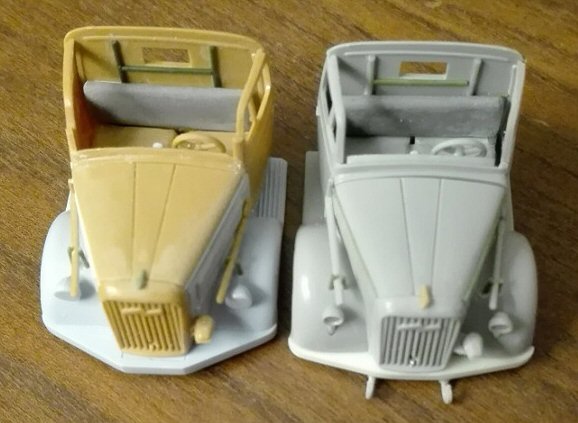
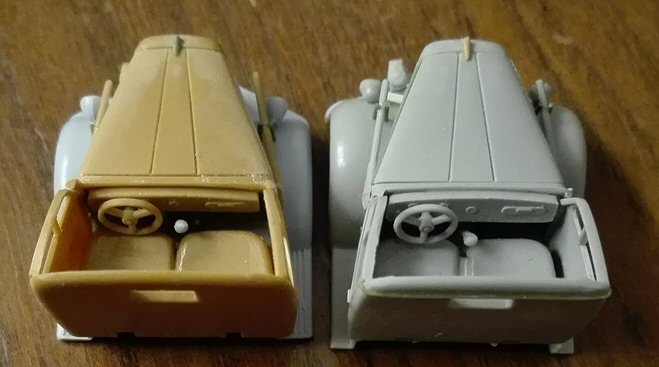
article . The Italeri chassis depicts the 4x2 Opel Blitz 3,6-36 S (S for Standard). There was also the 4x4 Opel Blitz 3,6-6700 A (A for Allrad - all wheel drive). Although they could look similar there were some differences between them and converting an S type in an A type doesn’t mean simply adding a drive shaft and a different axle. The wheelbase was 15.0 cm shorter (2.1 mm in 1/72) being the front axle shifted backward. This became well visible in the bonnet sides where there was a different space between the mudguards and the bumper. Although the kits longitudinal frames are straight, the real chassis forward part had the sides converging. The thing is quite visible in a naked chassis, but on the vehicle, the engine area hides most of this feature. The cab is, correctly, the standard one for the 4x2 truck, used until 1944, when its roof was modified to provide more room. From August 1944 it was replaced by the wooden cab depicted by the Academy and the MAC Distribution kits.
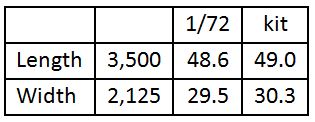
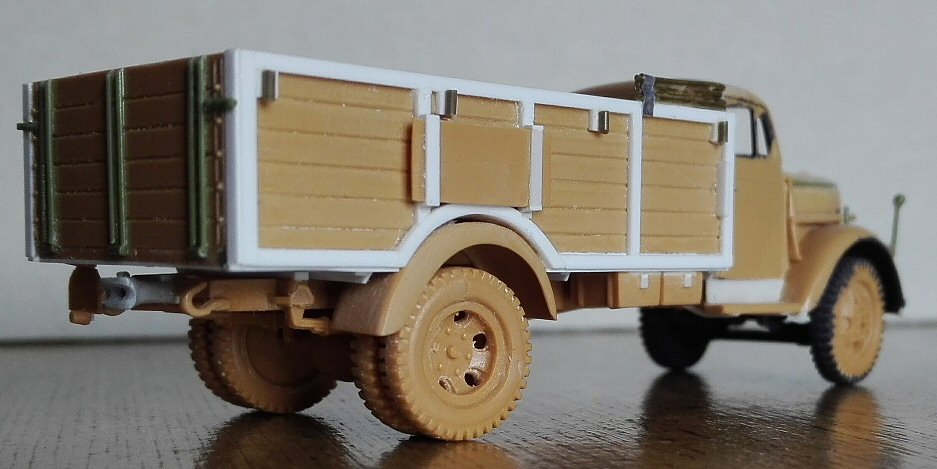
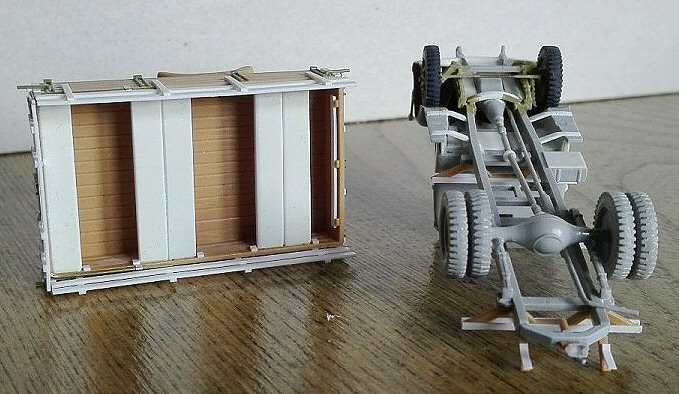
The flatbed bodies divide the production in three series. The kit depicts the second type : it has the raised bed (the first type produced had it fixed directly on the chassis and the mudguards protruded in the body) and the high foldable sides (the third type had them lower). Dimensions are quite well respected.
Closed
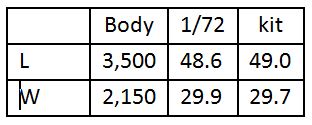
bodies were used for a range of different special purposes truck variants.
Standardized bodies, called Einheitskoffer or Einheits Kofferaufbau,
were used for the vehicles that formed the very numerous family of
the Kfz 305 which sub-variants are partially visible here.
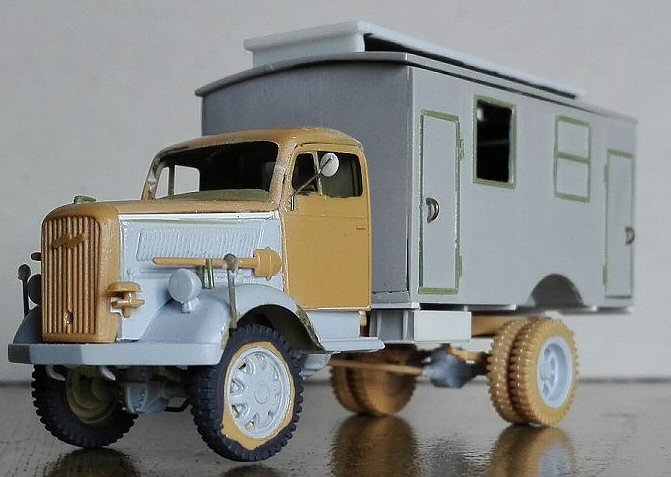
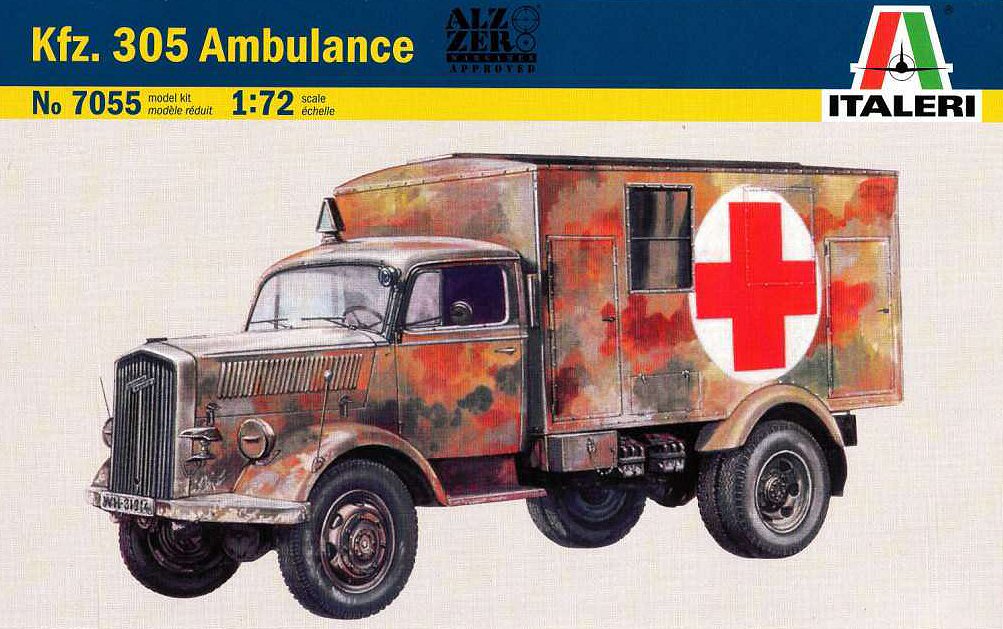
The variant proposed by Italeri should be the Sanitatsgeratekraftwagen
Kfz 305/76, which had its specific features: two little doors and
two windows on the left, a little door, window and a larger door on
the right, a rear double door with the wide stairs and the skylight
on the roof. Sanitatsgeratekraftwagen means transport of medical equipment.
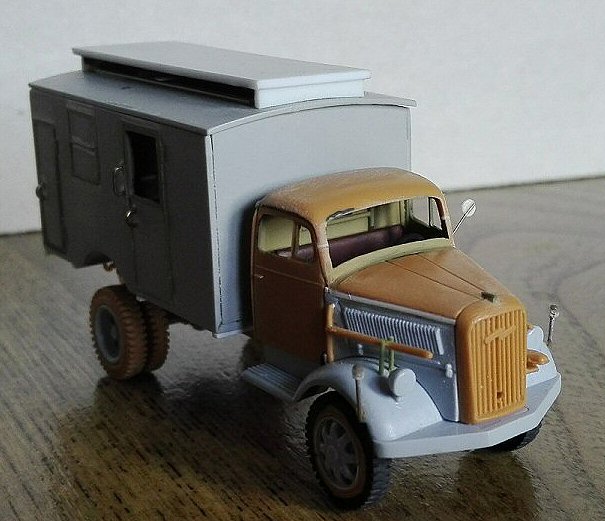
In theory, as far as I’ve found, this medical body should be
mounted only on 4x4 chassis trucks (and on Maultiers). However a photo
shows a Luftwaffe Blitz which looks to be a Kfz 305/76 (plate number
WL12217) that is clearly a 4x2 chassis, suggests some exceptions or
a very similar variant.
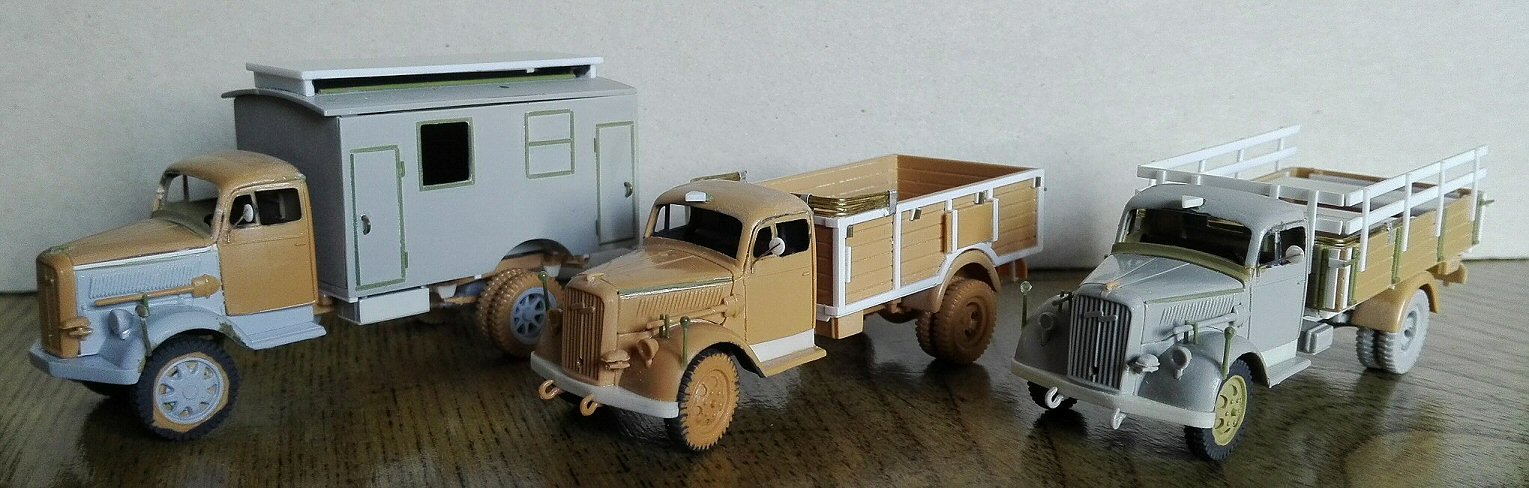
Useful walkarounds can be found here: http://www.fahrzeuge-der-wehrmacht.de/Lkw.htm https://www.net-maquettes.com/it/pictures/opel-blitz-3-6-walkaround/?afg902_page_id=1#afg-902 I choose to depict a 1st series 4x2 truck, an early 3rd series 4x4 truck and a later medical 4x4 Kfz 305/76 in service in Normandy. Here
is what I did : |
 |
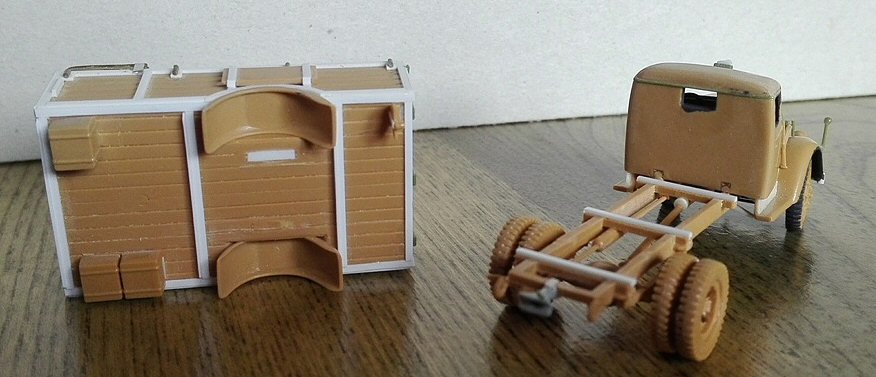
Cab (4x2)
|
Chassis (4x2) •
I used the wheels filling the ejector pin marks with cyanoacrylate
glue and opening the rear wheel holes. I know this make my models
not really correct for a late production truck, sorry. |
The flatbed bodies
Series 1 truck |
| Kfz
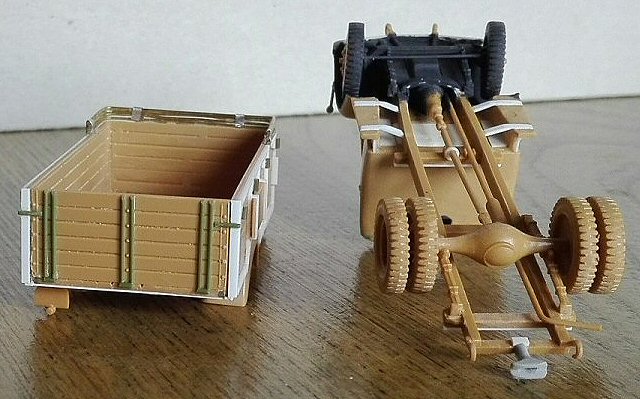
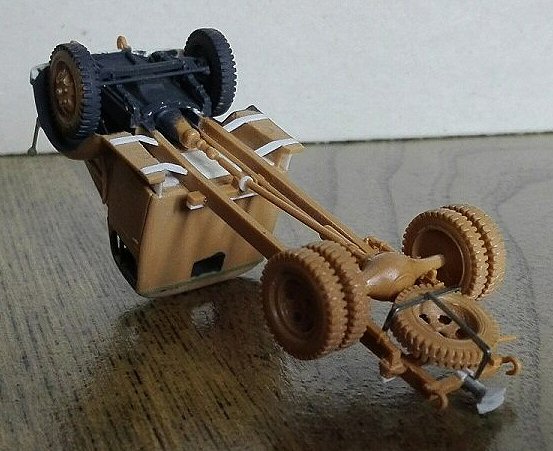
305/76 As written above, the Kfz 305/76 should always have a 4 x 4 chassis. The problem is that the cab was different, having the mudguards shifted back and the bonnet looks longer (it wasn’t). The bumper which went from the radiator to the mudguards edge was bent more rearward. Some time ago I found this post , where is shown how the Italeri and the Airfix cabs are compatible, despite the declared scale being different. Although on the photos I’ve seen the Roden looked better, after having read the post I decided to use the Italeri kits because in this way my Opel trucks would have the same cab features and dimensions. Cab (4x4) • The floor of the engine area was cut off and the sides were filed straight to fit the Italeri chassis. • The hole under the radiator was closed by the forward part of the Airfix chassis. • I filled the ejector marks on the cab belly. • The belly is solid. I filed the rectangular hole for the tank and then I made it by thick plastic. • The vertical side of the step is doubled being present on both halves of the cab. I filed it on the lower half to thin it. • I fixed the cab firmly to the bonnet. When dry I filed off the crew compartment from the door forward edge on the sides and the bonnet top. • I added the gear lever and the hand brake by stretched sprue as for the Italeri vehicle. A third lever was added on the left for the four wheel drive. Once more I didn’t add the pedals. • I made the Italeri cab, fixing it strongly to the crew compartment. When dry I filed off the forward part and under the doors on the sides and forward of the seats on the floor. • I replaced the single backrest by a shaped resin sprue segment. • On the inner side I used stretched sprue for the “H” structure. • On the bonnet front I glued the Italeri radiator, opening the crank hole and the Italeri Notek light. • On the bonnet I glued the Italeri top, after having shimmed it by 0.5 mm. • I erased the moulding on the bonnet sides, just over the louvers to round a bit more the bent line of the two swinging covers. The moulding was replaced by stretched sprue. • I replaced the dashboard and the steering wheel with the Italeri one, a bit larger. • On the rear I glued the Italeri crew compartment. • I also replaced the tools although the Airfix ones are well done. • The steps had two supports each. I made them by plastic strips after having glued the cab to the chassis. • I added the mirror using metallic wire and a plastic punched diskette. Chassis (4x4) I used the Italeri chassis with the same corrections made for the 4x2 chassis. To this I added the following changes: • The Italeri forward suspension springs were glued 2.0 mm backward. On them I glued the Airfix axle, widened by metallic rod to have the correct track. • The 4 x 4 chassis always had wheels with 8 holes and the Italeri ones have 6. The Airfix wheels are 11.8 x 2.3, but have 8 holes. However the rims have almost the same diameter, so I matched the Italeri tires and the Airfix rims on four of them, I kept the inner rearward from Italeri. Obviously I turned inside out the rear tires to have the surface free from the ejector marks. The rear couple was shimmed to reach the same Italeri couple width, 6.0 mm. I closed the eight holes of the forward wheels by a ring made of stretched sprue. • The front was adapted to the Airfix cab belly for the correct assembly. • The rearward suspension springs were shimmed by a 1 x 1 mm rod segment, shaped in place and then I glued the Airfix axle, which needed to be shortened to have the correct track. • On the second traverse I glued the Airfix gear box and to this the drive shafts. • I added the steering rods made by metallic wire. The transversal one was bent to avoid interferences to the drive shaft. • To get a reference point for gluing I made an interlock by plastic sheet just in front of the engine. • The interlocks placed over the rear axle can be kept for a raised flat bed truck, but for the Kfz 305 bodies have to be erased (see below). • I had to raise the three transversal bars that stay behind the cab by plastic strips. • The Kfz. 305’s body boxes were fixed directly on the chassis and the spare wheel was placed as for the 1st type flatbed truck, so I cut off the mid length “H” support being unnecessary. Metallic staples gave me the material for the spare wheel housing. • The spare wheels were emptied by a motor tool and the holes were drilled open. Box body • The proposed layout looks to be a mix between a standard box body (right side) and a non standard box body (left side). The windows are shallow and don’t respect the correct position and dimensions. I erased every detail and made them new by stretched sprue, sanded down when dry. To the doors I did also the hinges by stretched sprue and the curved handles by metallic wire. Two windows were opened to receive the transparent (made in packaging clear sheet) after the painting. • The air inlets were removed from the roof. • The skylight is very narrow and a bit short. I made a new one by plastic sheet and enlarged the slot in the roof. • I closed the interlocks for the rear swinging doors. • Under the belly there was a frame. I made it by plastic strips. • Two boxes were glued together and shaped to make the larger bins seen under the body at left. On the right side in different photos there was another box, a couple of smaller boxes or nothing at all. • The rear had a large stairs, missing in the kit. I had to scratchbuilt by plastic sheet and stretched sprue. Again the dimensions were taken scaling down some photos and keeping in mind Germans used metric measures. Just in the case one notes it : in the photo of my model the different lateral overhanging, strangely enough, while the supports were symmetrical, the steps weren’t, being shifted to the right. |
Decals Using the plate numbers to identify them, I didn’t find most of the vehicles depicted, so I’m not able to confirm their correctness on the following ones:
I only found historical evidence of three vehicle number but they didn’t match the original vehicles: Truck
WH536285_21st PzDiv. I didn’t find its particular photo,
but got the very similar WH636289, 21st PzDiv at Derna, September
1942. It was a 4x2 series 1 with eight holes wheels, painted in dunkelgrau
partially dirtied by dry mud. |
|
Although there are more modern Opel Blitz plastic kits, comparison reveals these old ones can still be considered quite good, less its weak points. The Roden kit, which I’ve just seen in the box, looked very good to me, while the Academy kit has the same wrong area under the cab doors, over sized radiator grille rods, solid flatbed supports and a very strange wheels layout: the front wheels have eight holes, the spare wheel and the inner rear wheel (hidden by the outer ones) have six and finally the outer rear wheels have no holes at all! The tires fall in the “no comment” category. After having seen this I left it on the shop shelf and avoided any further investigations. About the chassis, only Roden gave the correct layout, but the engine area hides the frame and correcting the Italeri chassis is quite easy. Fujimi has released what, on photos look to be good 1/72 kits, but honestly I’ve never seen them in the flesh. Italeri could add a third mould to give optional wheels and some of the missing details for the flatbed truck or give some interior for the “ambulance” or to have a different body house variant (radio, for example). Nevertheless, I consider this kit still valid if you have some plastic strips and it is the only which have the six holes wheels for an early truck. An update of the moulds would be welcome as well as more attention to the decal set. |
| Preview sample purchased by the author.
This
model can be purchased from
|
Back to |
Back to Home Page |
Article Last Updated: 18 Nov 2018 |