|
This is the re-release of the old ESCI kit. My kit was composed of two olive green and one silver gray plastic moulds, the latter replacing the ugly flexible tracks
which are found in the 1980's boxes.
The kit depicts quite correctly depicts an early batch of this tank: the 6pdr gun has the short barrel; the smoke discharger and the trailing hook are missing.
I don't care much
about little discrepancies, so I found the general dimensions quite correct (the hull side air intakes could be a bit too prominent making the overall width a
bit wider) and there is a good amount of detail. Only the turret sides in my example suffered of a very little warping.
If made out of the box its worst part lies in the turret/hull interlocking, in the turret front/mantlet and in the mud discharging area. Luckily nothing that is
irrepairable. The parts I didn't like in this kit (turret/hull interlocking problem apart) were the front fenders molded solid to the sponson. They were often removed
and I would have preferred them as separate parts.
Here and there you will find little imperfections that need to be fixed but fundamentally the base is still quite good nowadays, even after thirty years. This is
almost surprising if one considers when the molds were sculpted, and if built with a little bit of care it can still defy more recent kits.
As in almost every ESCI kit I've made there's also a figure. In this kit it's a British tanker, the head is a bit over sized, the legs look a bit short and the general
look is a bit stiff. Anyway it will be useful after a little sculpting job.
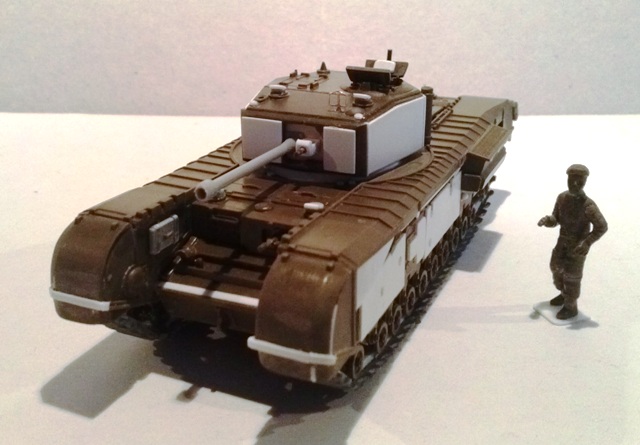
The Churchill Mk III fought in Tunisia, Italy and in Normandy. It was used as the base for some specialized armored vehicles used on D-Day, while fighting vehicles
were updated to the new standards with a reworking program. I choose to make one of them depicting a Normandy campaign tank, so I added the appliqué armor,
an interesting option which is quite easy to do. I used a 6pdr long barrel, but a 75 mm barrel can be used too.
Here is how I proceeded:
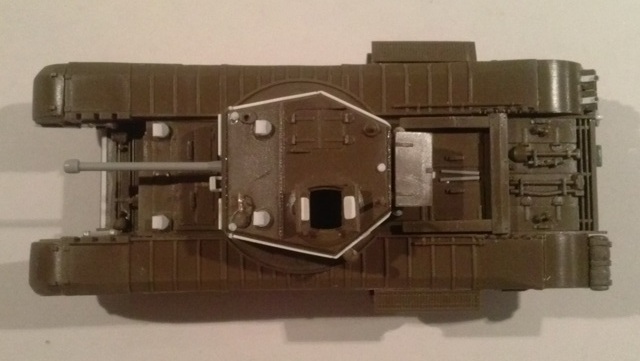
Hull
The hull roof is placed a little less than a millimeter under its real level. This is very little, but it was enough to require a turret base alteration (see below).
When I realized the problem it was too late. After having considered a pair of options I choose to let it as it is and going on in this way:
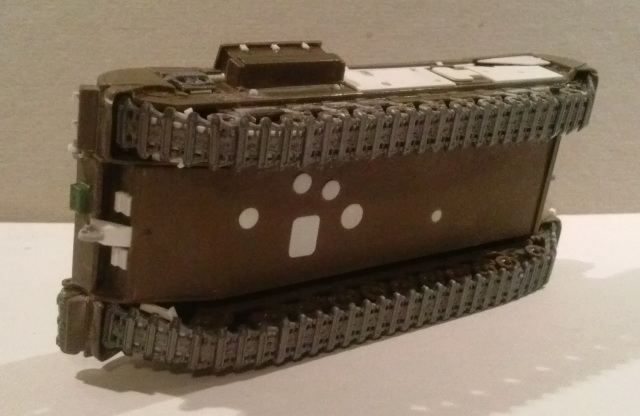
1. The catwalks are a bit too long. When you put them on the hull, you will see that when the central part is correctly placed, the curved front and the curved
rear don't touch the vertical plate of the fenders molded to the sponson. To correct the problem I carefully cut off the curved ends of the catwalks and glued the
straight central parts (you will note that they stand a bit higher). In each central rounded flat area (this is the turret rotation zone) there is an ejector mark. I
filled them and sanded (the cyanoacrylate glue is transparent and in the photo the mark is still visible, but is already filled and sanded), removing also
the inner relief, that should reproduce the outer parts of the turret base ring. I removed the smallest inner half moon segment: this gave me the measure for
the new turret ring.
2. On the hull roof the edge strips were removed between the half moon catwalks flat area.
3. A 0.50mm thick base was added as large as the external turret ring. I made this because I flattened the bottom surface of the turret ring to have a
smooth rotating area.
4. A 23mm diameter ring was made with 0.50 x 1.50mm plastic strip, glued to the hull roof after having positioned the catwalks. It was still 0.50mm
higher, but it looked better than before.
5. I glued the fenders, trimming to the correct dimensions (the forward ones will need a careful job of filling and sanding to find the right shape and the
reconstruction of the external sloped edge).
6. The flexible part of the four fenders was thinned after having assembled the sponson.
This is not only one way to approach the problem; obviously everybody can find another and better way. If I were to make another Italeri Churchill I'd try to shim
the hull halves to reach the right roof level. In that case the 23 millimeters ring high described above would be consequently reduced.
Details
- The hatch handles (crew and engine) are too much raised, I sanded them down a little.
- The periscopes guards are a bit undersized. I replaced them with a 2.5mm diameter x 1.0mm thickness plastic section, flattened forward and with a
2.0 x 1.5 x 1.0mm plastic piece placed over, sloped in place.
- On the visible side of the front of part 35B there are 3 (three!) ejector marks. I filled them with cyanoacrylate glue and sanded down.
- The front upper edge of part 34B was shimmed so it could be filed it at 90° without removing too much material.
- In the Mk III, the upper run of the tracks lie on two "L" shaped rails that went from the idlers almost to the sprockets. In the forward section they were
supported by three sloped rods. The half moon devices that are molded in the kit aren't totally wrong: they are right for a Mk I/II. I didn't remove the
catwalks (a common occurrence visible in the muddy campaigns) and the only visible part is where there are the mud dischargers. I made these rails
(with their track lengths) before closing the catwalks with 1.0 x 1.0mm plastic strips and stretched sprue.
- The sponson molded catwalks side slots were closed with 1 x 0.5 mm plastic strips. I don't know why the old ESCI cast makers did them; I didn't find
photos that show them.
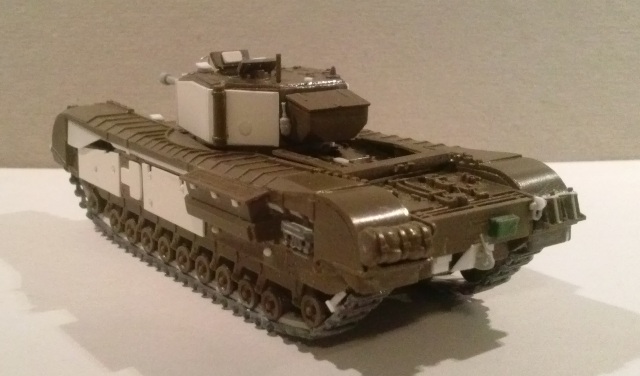
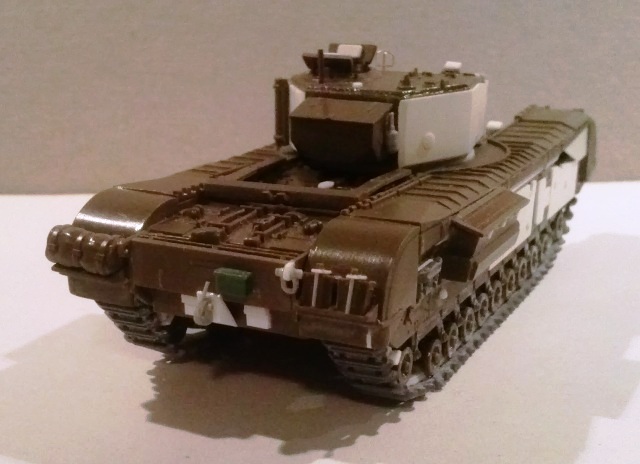
- I added the appliqué armour on the hull sides. During this operation, I realized that the sponson bolt heads weren't symmetrical (just after having
glued two identical plates!). So I corrected the right side one that is in the wrong position.
- The mud dischargers were made with an "L" shaped profile, not with a solid one. However having chosen an up-armored tank I didn't have to make them new:
in this configuration there weren't any.
- The trapezoidal plates over the holes for the mud discharger need to be replaced with thin plastic (it wasn't made with armor plates!) with the upper side
16mm long.
- The track cleaning system also had a mud scraper placed between the tenth and the eleventh wheel couple (being forward the first). I had to add it by
scratch building with plastic strips.
- Just back of both side air intakes there are single spare track links molded in place. They are well done but they are too shallow, missing the guide rail.
To have something more realistic I removed and replaced them with shimmed track links (see below).
- The 1 gallon oil can (14A) must be placed in one of the two rear fender racks, not on the turret side. I added their holders with stretched sprue and thin
plastic strip.
- Extra items are always welcome and ESCI nicely often provides them. Here we have two tent rolls to be placed on the turret sides. I put one of them in the empty fender
rack. As always the soft items need to be shaped to the hard surface were they will lie or they will look much too stiff. The second roll went in the spare part
box: two identical rolls on the same tank are surely unrealistic.
- The wooden jack bases, made with 6.00 x 4.00 x 1.00mm plastic pieces, thin metal sheet strips and little thin stretched sprue segments, were added to the inner
sides of the idler holders.
- The upper rear plate was modified for a NWE tank. I removed the 32½ gallon drum tank supports and filled the slot of the interlock. An outside telephone box from
an UM Sherman was added on the rear plate.
- The smoke dischargers were added by 1943. I scratch built them (in closed position) with 1.00 x 1.00 x 3.00mm and 1.50 x 0.50 x 3.00mm plastic strip segments.
- I added also the towing hook, installed by 1944 scratch building it with plastic and sprue pieces using photos.
- A "U" towing hook, taken from a Dragon Churchill, was added.
- Also the belly received some care with maintenance hatches made with thin plastic.
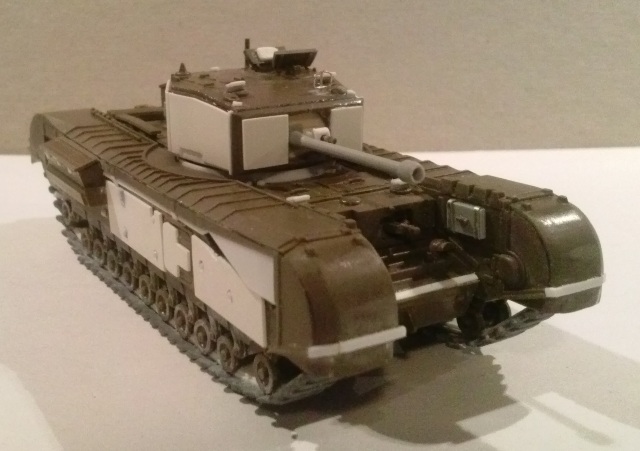
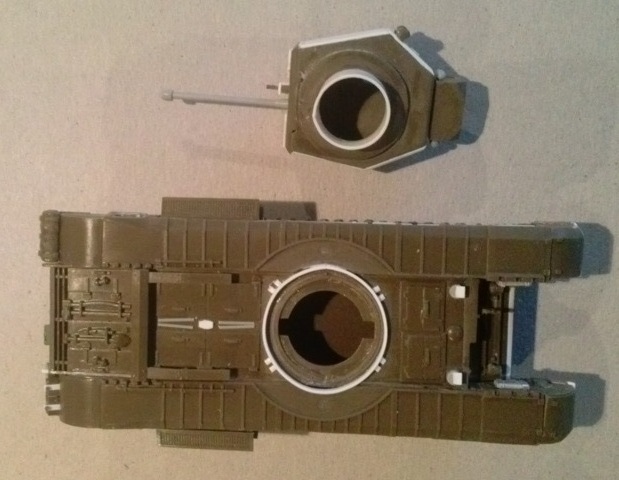
Turret
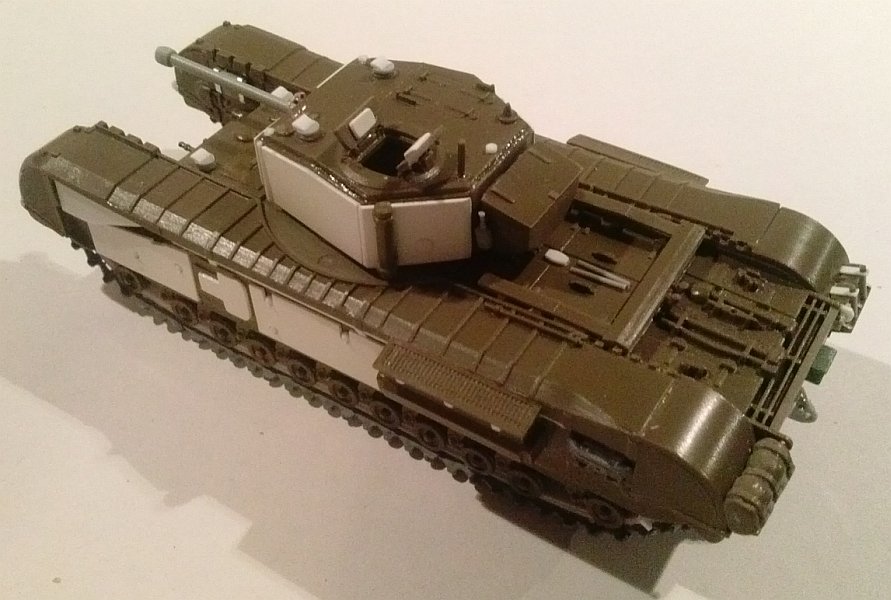
- The mantlet window is a little too tall and too narrow; to make it more realistic I widened it to 7.0mm, working on the Besa side, paying attention to the
shape (it is asymmetrical). A new interior mantlet made of thick plastic closed the hole from inside.
- The rounded base is higher and narrow. This was done because the catwalks/hull roof gap is a little short of a millimeter too high (see above). The
two strips along the hull roof side edges were "L" shaped to keep bolted the catwalks to the hull. On the central portions they were absent because
here the level was flat. With these strips the larger kit turret ring doesn't permit a flush turret/hull connection and a thin gap remains, so a last
narrower ring was added by the cast makers. This ring looks bad and unrealistic. I erased the interlocking ring and the narrower ring. Into the larger ring,
a new interlocking ring was made with plastic, after having flattened its bottom. Maybe this job was futile but I preferred to make a raised flat rotation base
(see above) before adding the external 23mm hull ring.
- The front outside thickness was reinforced with 0.5mm plastic shim before being restricted in place to reach a 0.5mm overhang.
- I added the appliqué armor, paying attention to the way they overlap each other. I replaced the two pistol ports. The upper and lower plate's edges were
tapered in place with a file and sand paper.
- The co-axial Besa MG shield was widened a little with thin plastic strips and a front was added, to be sculpted following a pair of good photos.
- The gun barrel is of the short type. To make my reworked tank I used a spare Dragon long 6pdr barrel. As an option I could use a 75mm barrel: at the beginning
of the Normandy campaign, there were 150 Churchill Mk III tanks with the 31st AB and the 34th AB (barring the 141st RAC) aside to the Mk IVs. Most of both
marks were up gunned with a 75mm gun, but 82 of them (both Mk IIIs and IVs) retained a 6pdr gun
(Flames of War has more info here).
- The periscopes are a bit undersized. As for the hull roof, I replaced them with a 2.5mm diameter x 0.5mm thickness plastic disc, flattened forward and with
a 2.0 x 1.5 x 0.5mm plastic piece placed on top, sloped in place.
- The three lifting points were added with short stretched sprue pieces.
- The hatch interior received pads.
- A pair of fire extinguishers (spares from a Dragon M4) was added to the bin sides.
- I also added the aiming device, scratch built with thin copper wire.
- The rear panel had a circular bolted plate. Being hidden by the bin I ignored it.
Wheels and tracks
- The idlers and the sprockets have a wrong tooth count. And they are too much spaced. Anyway most of them are hidden by the mudguards or the track links
and only few of them are visible and need to be detailed (I retained the front fenders). I cut off two teeth from the hidden side and glued them between
three of the existing teeth, to have five teeth in the place of three. The toothed wheels were glued in place using a track length to reach the correct
position and leave the corrected area visible.
- The idlers have three holes where there should be four. As the sprockets will be completely hidden, I didn't research if they had the holes too, being
irrelevant for my tank. If I were to make another tank without the fenders, I would modify or replace the idlers with the Dragon or Hasegawa counterparts.
- Each suspension unit (22!) needs an interior part or they look hollow. I closed the space between the arms with plastic rectangles to give the idea of a
solid piece.
- The tracks are of the light type. Their exterior is quite well done (the slot is a bit exaggerated) and only the transversal bar thickness ends need to be
tapered with sand paper. The interior is totally flat, missing the guides. In the Churchill tank, these were made with a wide segmented rail which I easily
replaced with plastic strips (I didn't drill the 264 visible holes for the sprocket/idler wheels teeth). I kept the catwalks; this means that the whole
upper length is not needed, being hidden. Only the links visible through the mud discharger were used, the remaining went into the spare part box.
Painting
As for my Dragon Mk IVs, I will not use a green camo color as suggested. Instead I will use a home made S.C.C. 2 brown. Anyway, the Mk III also used other
camouflage colors. For a better comprehension of the British camouflage colors story I used "British military markings 1939-1945" by P. Hodges and M.D. Taylor.
For the paint mixes for the colors used by the British tanks during the WW2 have look here.
Decals
Italeri improved the ESCI kit with a six (!) option decal set: three tanks in North Africa, one in Italy, one in Normandy and a Russian tank. Unfortunately
there is something to say about their accuracy.
- 25th AB 51st RTR "Apollo": This Regiment had the AoS number 162, not 163 (which is for 142nd RAC) as supplied. The only Mk III named Apollo in my sources
was T31793 in Tunisia, 1943, while a second "Apollo" was a Mk IV. I didn't find info about T68213, which anyway is correctly a Mk III census number. The triangle is
correctly yellow. A photo of the tank can be seen here.
- Kingforce, T31665: This was one of the six tanks of this unit. Anyway the dark color should be brown SCC2 or green 3, and not gunship gray. The AoS number 510
should be hand painted on a cardboard fastened to the left fender. It should have also the famous frontal apron to avoid the sand storm generated by the
engine cooling system.
- 34th AB 147th RAC: Sadly I don't have the photo of this tank. Anyway as part of the 3rd troop of the B Squadron, it should wear a name beginning with "SI".
The AoS number is correct, the Brigade badge is missing. The square is correctly yellow. T68165 is correctly a Mk III census number.
- unknown unit tank: I don't have a photo. Anyway, here you will see T68782
is recorded as a Mk IV named
Cookstown, 1st Troop C Squadron, North Irish Horse 21st AB. If this is correct, this tank was in Italy after December 1944 (formerly the NIH was part of the
25th AB), the circle is correctly red. The AoS number and Brigade badge can be seen here.
- Russian Army tank: Is not in my sources. Anyway T31992 is correctly a Mk III census number.
- 25th AB 142nd RAC: No markings are provided, however you can use the Brigade badge and the AoS number supplied for "Apollo".
Here you can see the exact camo pattern.
Conclusion
Strangely enough if one considers the newer Churchill kits on the market, this kit is still useful to make a good model. As already noted, I
don't care much about a millimeter discrepancy if it doesn't change the shape of the part and I liked the final effect even if some little bolt heads are missing.
Surely it needs some work, but it has some detail which I found better than that found with newer Dragon releases, like for example the exhaust
system, the tools, the air intake grates or the turret cupola. About Italeri, which re-issued the ESCI mould, I think that more attention to the decal set
would be welcome.
References
[1] Tamiya photographic album no. 3
[2] Osprey Vanguard "The Churchill Tank" by B. Perret
[3] armourinfocus
[4] primeportal
Preview sample purchased by the author.

This model can be purchased from

|