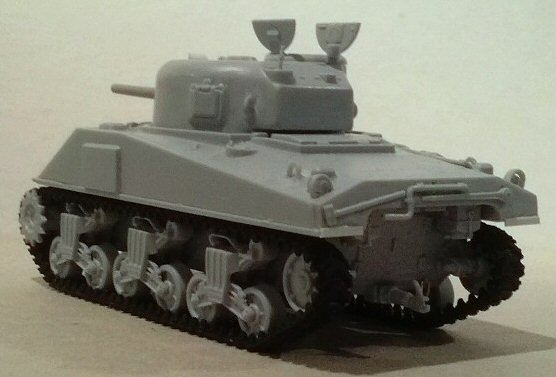
Never
say never with a Sherman tank. I already have enough tanks in my US
platoon, but when I saw this kit, I immediately had to buy it!
The kit is composed of four light grey plastic moulds, a black vinyl
mould with the tracks and a nice decal set. The plastic is a bit too
soft for my taste. A two large page colour instruction is provided.
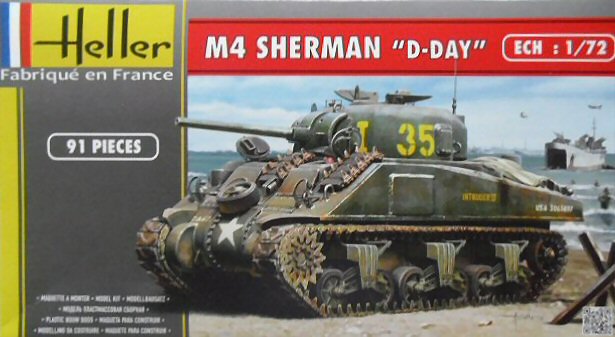
At first glance it looks very fine. The tools are separate parts and
there are also some personal items. The kit is made with the modular
concept in mind, which allows using some moulding for other Sherman
versions.
Out of the box, the kit depicts a mid production ALCO or Pullman Standard.
With a little work anyway, is it possible to have a Baldwin or a Pressed
Steel Car (PSC) tank, thanks also to some spare parts related to the
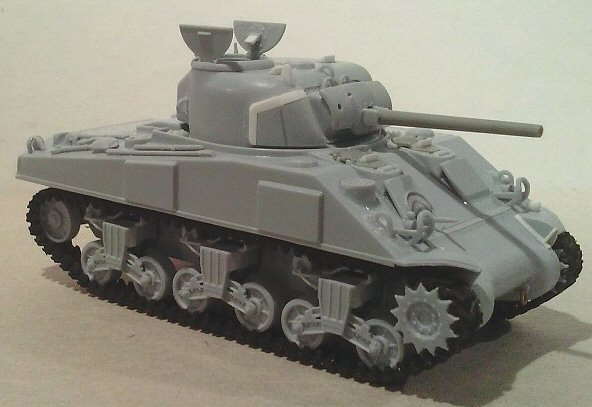
sister M4A2 kit. The turret has the appliqué armour and the
pistol port and option for a M34 gun mount is provided. The hull has
the option between a cast (both rounded and pointed!) or bolted transmission
cover. This means that one can depict also an early batch tank. With
a little work, it is also easily possible to make a late batch, adding
the turret cast-in armour chick from scratch (the pistol port is a
single piece and not moulded on the turret).
A welcome option is a deep wading kit, quite well done.
Dimensionally
correct and well detailed, it is a good kit. Some details aren’t
well made (gun barrel, gun mantlet, turret appliqué armour…)
however by the way it is engineered it is the easiest kit to convert
into a PSC or Baldwin production tank.
• To make a Baldwin tank: file the rear sloped edge to 90°
to have a vertical rear plate. Use the DV hoods. Use the “D”
shaped antenna bracket leaving a slot on the straight side of the
“D” and rounding the bolted cover. The transition plate
between the belly and the rear plate needs to be filled with a half
sprue segment, filed to get a curved plate. The tool B28 was mounted
in the inversed sense, with the head in the centre of the plate and
the end pointing the side edge. Fill the external interlock hole on
the plate and keep the central one for reference.
• To make a PSC tank: file the rear sloped edge to 90° to
have a vertical rear plate. Early batch tanks had the DV hoods and
the riveted hull. I’m not still sure about the correct B28 tool
position (sorry).
Useful sources are my usual references: the Hunnicut book and the
Sherman
Minutia website.
Being quite well done, few minor workings were required to make an
ALCO mid production M4:
|
|
Hull
• Heller nicely gives us three transmission covers. I choose
a casted one for mine. The bolted one is really good (the flanges
could be a little more narrow) while the rounded one is perhaps a
little too rounded. Whatever casted type you’ll use, this assembly
will leave a hole on the lower edge, partially covered by the lateral
bolted plates, that needs to be closed. I used two little plastic
pieces.
• The kit gives us the option between a cast or direct vision
hood. I used the cast one for mine, accordingly to a Pullman/ALCO
tank (and correct also for a 1943 production PSC tank). I removed
the central line between the hoods, this being only correct for the
M4A3/M4A4 and not for a M4 (or a M4A2). The horizontal one was sanded
down, being this welding seam not so raised and crisp. The joints
between the hoods and the horse shoe bullet splash needed to be filled
with cyanoacrylate glue. The direct vision hoods are good for a Baldwin
tank or a 1942 production PSC tank.
• I replaced the crew hatches with Dragon spare parts, more
detailed (to tell the truth just because they were lying around in
my spare parts box). The Heller ones are quite good and have interior
details. The periscope guards are missing, I choose to ignore them.
Anyway there are PE aftermarkets set for this. Since the periscopes
are closed, I made them with triangular plastic segments.
• I thinned the fenders. The structure on the inner side of
the fenders was made with 1.00 x 0.25 mm plastic stripes.
• The antenna bracket C9 is correct for an ALCO or a PSC tank,
the C8 goes on a Baldwin M4. To make a Pullman tank add a larger base
to the C9 type with thin plastic and a raised lip on the back. See
here.
I left a ring of cyanoacrylate glue around the base to simulate the
welding seam.
|
|
• The 1 ½ inch glacis appliqué armours need their
welding seams (very huge on the tank); I did them with cyanoacrylate
glue and stretched sprue. See here.
• The siren provided is the type used by April 1943 (finally!).
Well done, it needs only the guard strips to be thinned. The former
type was placed on the left fender without the brush guard, my M4
had this type, so I’d scratchbuilt it.
• The lifting points are well done. However they are a bit too
thin, I used them but added a layer of cyanoacrylate glue on the sides
to make them look fat.
• Strangely enough, the brush guards are very thick. I thinned
them from the inside; to avoid damaging them I did it when they were
still on the sprue. The glacis ones are also not well aligned: the
rear arms should be horizontal when in place. I carefully sanded the
forward ends to reach the correct position.
• The hull deck has smooth and straight reliefs near the edges
that simulate the welding seams. I made them rougher and shallow with
a razor blade.
• The engine deck is well made; on D8 I’d preferred the
air intake cover as a separate part. Anyway it is quite correct as
it is and I used them with no second thought.
• Like in a larger scale kit, the tools are done as separate
parts (well done!). I cleaned the piece B34 after having it glued
in place, being too fragile. In some cases I did not completely file
away the sprue attachments points to simulate the buckle as if the
tools were fastened. The tool B28 position was horizontal, when carried
sloped it was inversed, with the end fastened to the tool B11. I filled
the unused interlock hole on the plate.
|
|
•
The optional deck D9 has the upper part and the whole rear side vertical
where they should be sloped backward. If corrected it can be used
also without the trunk D12/D13 (sometimes it was kept in this way
for a period after the Normandy landing by some tanks) but the horizontal
interlock needs to be erased and the hole closed with a PE mesh after
having thinned the walls.
• The 1 inch hull appliqué armours (only a bit too short
each) don’t have location references on the side, pay attention
to get the correct position. The right forward one can be used as
it is or with the upper right corner cut off (check on the photo of
the tank you are depicting, if visible). See above for reference.
• The sand skirt supports are too narrow. I doubled their height
with a thin segment of stretched sprue (and fully added it on the
rear plate sides, where it is absent). On the rear plate I used 1.00
x 0.25 mm thin plastic strip segments.
• The rear plate is correct and the air filters are very well
done. After the Normandy landing, some tanks kept the lower part of
the rear trunk. As for the engine deck, after having cut off the upper
part, the hole needs to be closed with a PE mesh.
• The exhaust received two larger pipes in place of the short
and narrow one moulded on, being visible if not covered with a mesh.
• The belly plates are missing. I made them with thin plastic.
• Four “U” hooks were made with metallic wire for
the four towing points.
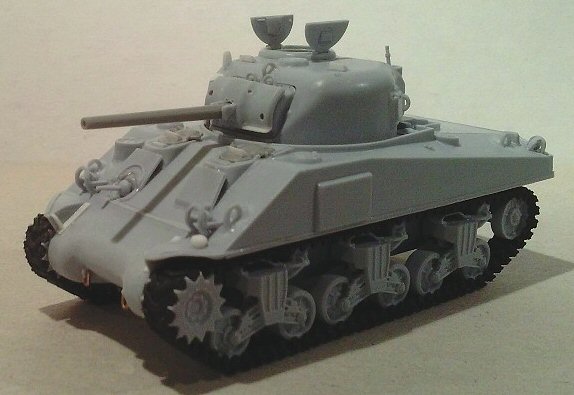
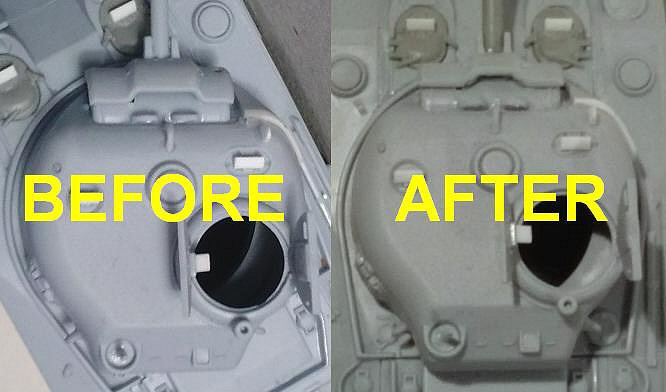
Turret
•
The tank commander’s cupola is a separate piece. This is correct
and gives us the possibility to change the position of the hatches,
like in the real tank. Anyway in the photos I’ve seen, it is
quite rare to see it with the hatches opening forward and backward
instead of sideways. The hatch interior has three ejector markings
and I had to fill them with cyanoacrylate glue sanded when dry.
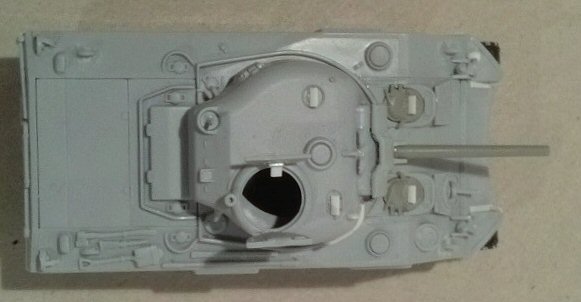
• Heller gives us the turret with the pistol port as a separate
part. This is helpful should your tank lack it, but then the kit doesn’t
give us the cast-in armour for the right side. In such a case this
needs to be made with a plastic layer carefully blended in with the
turret surface. If used, the pistol port edges, being a relief in
the casting, also need to be smooth with the turret wall.
• The hole for the smoke grenade was used by November 1943.
For my earlier tank I closed this hole with a thin segment of stretched
sprue, my tank having the former pistol port/appliqué armour
turret.
• The appliqué armour is a little undersized: it should
be 7.60 mm max high (4.25 mm min height) x 10.5 mm long (see references
above). The dimensions are without the welding seams. This meant I
had to add 1 mm on the upper side and on the rear side. Not a lot,
I know, but it is enhanced by the presence of the aiming blade and
the M34A1 bolted flange.
• The aiming blade is missing. I added it with shaped thin plastic.
|
|
|
•
The gun mount is correct for the first type. It only misses the two
lifting points almost hidden by the mantlet. I added them using the
M34 mount lifting points. To have a later type mount, the right side
should be shimmed to cover the lateral bolted flange, not my case. Get
a look here.
• The M34 mantlet is a millimetre too wide. I used the later type;
anyway this too has dimensions problems. The M34A1 gun mount is a mix
of the first and the second type. The mantlet, which is a millimetre
too high, is correct for the second type, being 15 mm wide. See here.
To be used as a first type mount I had to file it on the gunsight side
to reach 14 mm width. The lateral edges were rounded with sand paper
as in the original. The mantlet raised central portion (which corresponds
to the M34 mantlet) is also too much wide (see photo). I had to glue
two stretched sprue segments internally before carve it slim to reach
the correct proportions to the full mantlet. The screw holes were drilled.
The erased lip under the MG was made new and the MG replaced with a
stretched sprue segment.
• The gun barrel is too short and slim. It looks very bad. I replaced
it with a spare 76mm barrel from a Dragon M4A1 kit (it has three of
them!), worked to the correct dimensions.
• The turret lifting points are a bit thin. Having to reinforce
the welding seams at the base, I applied a layer of cyanoacrylate glue
to make them “fat”.
• The periscopes are closed; I replaced them with triangular plastic
segments.
• The periscope guards are missing, I choose to ignore them. Anyway
there are PE aftermarkets set for this.
• The .50 HMG is very well done and needs only the separation
of the handles and the filling of the lower ammo case side. |
|
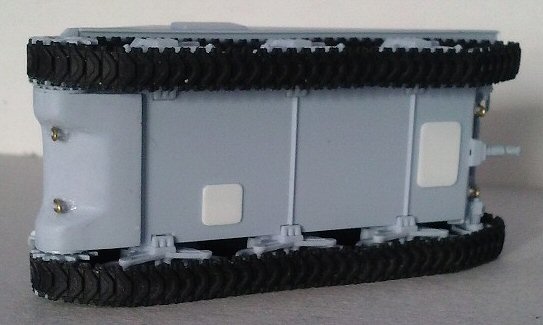
Wheels
and tracks
The
kit provides us two full sets. One of the pressed type and one with
open spokes type. The pressed type is well done while the open spokes
(correctly five) has the holes that looks a little too small to me
(look here).
The bogeys have too much space for the wheels. To correctly align
them, after having glued the assembled bogeys to the hull, I glued
the wheels (still free) in the fixed position, gluing the first and
the last, and then I glued the intermediate ones aligning with these.
The tracks provided are the usual T48 rubber chevron type. They are
sufficiently soft to be wrapped around the bogies/wheels set, but
are also not enough stiff to avoid their warping into the sprockets,
between the toothed wheels. I added a plastic shim to avoid this problem.
|
Decals
Three
well known tanks are depicted:
• 2nd AD 67th AR I-35 “INTRUDER II”; the only two
photos I’ve seen of it doesn’t show the transmission cover
and the serial. For sure the drain holes tell us it wasn’t a
PSC tank. The suggested serial number 3065897 is for a February-March
1943 ALCO batching tank. If correct, the bolted transmission cover
is right, the antenna bracket is rounded (not “D” shaped
as suggested) and it should have the fender siren horn. The hull forward
right appliqué armour plate was clipped. Anyway the 2nd AD
speed numbers were carried also on the bustle, so the third one is
missing. Furthermore the 67th AR “I” company tanks had
a different speed numbers font with a dash between the letter and
the numbers (see I-22). The font of I-35 is the same as the quite
known I-3x “INEZ”, leaving us the 66th AR as a more correct
unit for this tank.
• 2nd AD 66th AR H-2 “HURRICANE”; quite famous,
it was an ALCO tank (third batch June-October 1943); it had the cast
pointed transmission cover, the cast-in turret armour and no pistol
port. The third speed number (on the bustle) is missing. “HURRICANE”
was photographed later in July with no speed numbers and black/OD
camouflage.
• 4th AD 8th TB B-16; Heller suggested the use of the DV hoods.
Anyway the serial 3039164, is for a Pullman (which had the cast ones)
second batch tank (circa June/July 1943 if my counting is correct).
Photographic evidence can hardly confirm the turret appliqué
armour due the foliage camouflage and the sun light/shadowing, the
positive/negative inversion of the photo suggest its presence and
anyway the production period supports this theory.
|
Conclusion
This
is actually the most complete 1/72 M4 tank on the market and if you
buy two of them the decal problems are easily solved in a moment.
It compares only with the Dragon one (which plastic type I prefer
and which has the gun/mantlet corrects, but a problematic engine deck).
Where the Heller kit beats the Dragon one, is in the options supplied
(DV hoods, antenna bracket, standard engine deck), having two different
wheel sets, the more correct deep wading in/exhaust and the always
welcome presence of additional items such as jerry cans, helmets and
backpacks). The instruction leaflet uses some poetic license concerning
the three tanks proposed, but to check these whenever possible is
a must for me to avoid strange fantasy hybrids (a hard lesson learned
years ago…).
It could be easily improved with an aftermarket PE set (if you like
these). It can easily be converted to a PSC (as seen) or a Baldwin
tank. The kit can be finished as an early or mid-batch, but a later
batch is easy to make too, simply adding the turret cast-in armour
and leaving the appliqué armour and the pistol port in the
spare part box. What looks strange to me is that after the effort
they went to mould every tool as a separate part, the air intake cover
is moulded solid.
Anyway, with all this variants possible, the reediting of the old
Bison #72009 decal
set (US Shermans in Normandie 1944, see
the review)
would be very welcome to get even more finishing options.
|
|
| Review
sample purchased by the author.
This
model can be purchased from
 |