| Flyhawk |
Pz.Kpfw.
I Ausf. F |
|||
Kit : # FH3006 |
Construction Review by Rob Haelterman |
|||
| Flyhawk |
Pz.Kpfw.
I Ausf. F |
|||
Kit : # FH3006 |
Construction Review by Rob Haelterman |
|||
History While most modelers are familiar with the Panzerkampfwagen I Ausf.A and Ausf.B, the Ausf.C (VK 6.01) and Ausf.F (VK 18.01, also known for a while as Pz.Kpfw.I Neue Art Verstärkt) are somewhat more obscure. Even though all four Ausführungen shared the name "Pz.Kpfw I", the Ausf.C and Ausf.F had very little in common with the Ausf.A and Ausf.B, or with each other for that matter. The Ausf.C was meant as a very fast light tank, while the Ausf. F was meant as a very slow and heavily armored AFV. If the Ausf.F had anything in common it is with the Pz.Kpfw. II Ausf.J (VK 16.01), which, incidentally, Flyhawk has annouced as its next kit. A Versuchsfahrgestell
(prototype) and thirty 0-Series vehicle were built in 194, while the
100 1-Series vehicles that were originally ordered were cancelled
before construction started. These vehicles were used by 1.Kp./Pz.Abt.z.b.V.66
(attached to Pz.Rgt.29 of 12.Pz.Div. and later renamed as its 8.Kp.),
Pz.Inst.Abt.559, 2.Polizei.Pz.Kp. (neu) and Pz.Rgt.1. |
||
The kit Even
though this is only the third kit by Flyhawk (the first two were FT-17s),
the company has already established a solid reputation for highly
detailed kits. Even modelers that are not familiar with the company
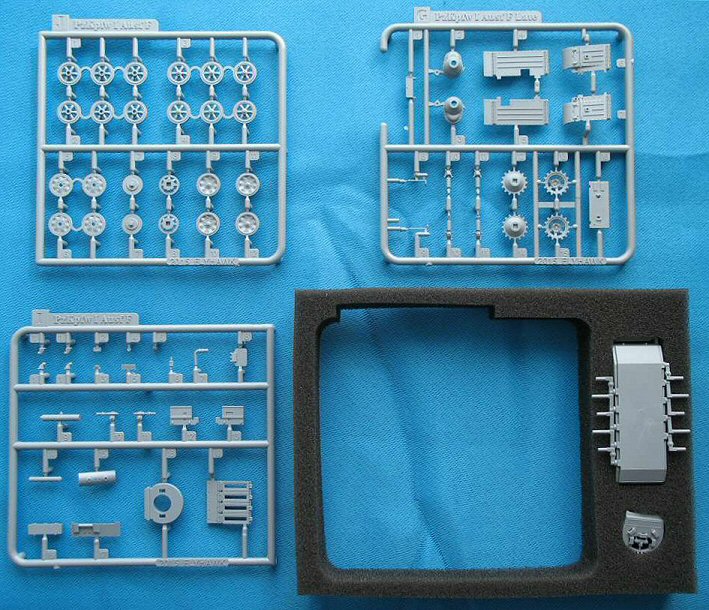
will be suitably impressed by the packaging of the kit. The boxtop
is nice, but more impressively, the kit comes in a very sturdy cardboard
box with the individual sprues protected by foam cut-outs. |
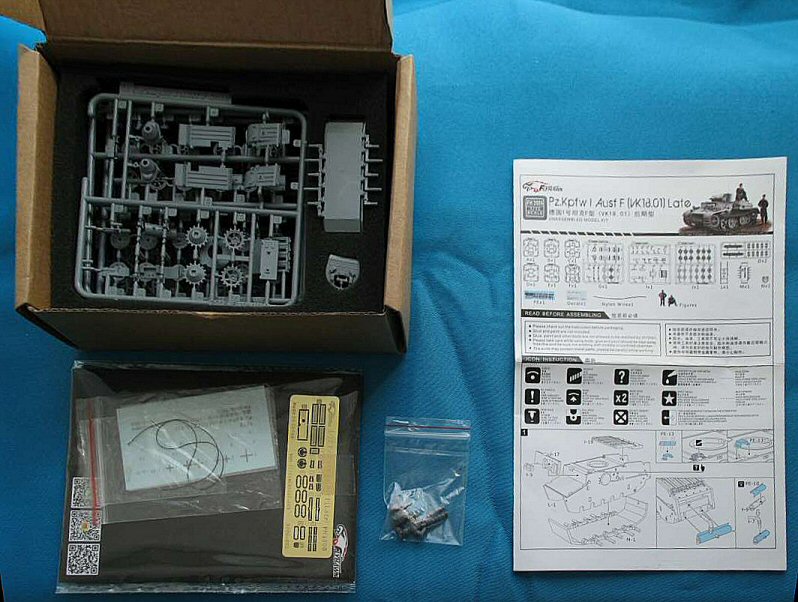  Picture from the preview by Henk Timmerman. |
|
|
|
||
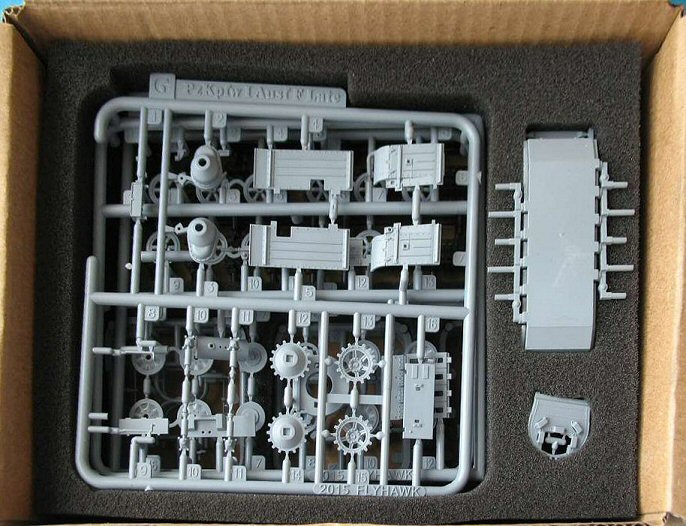
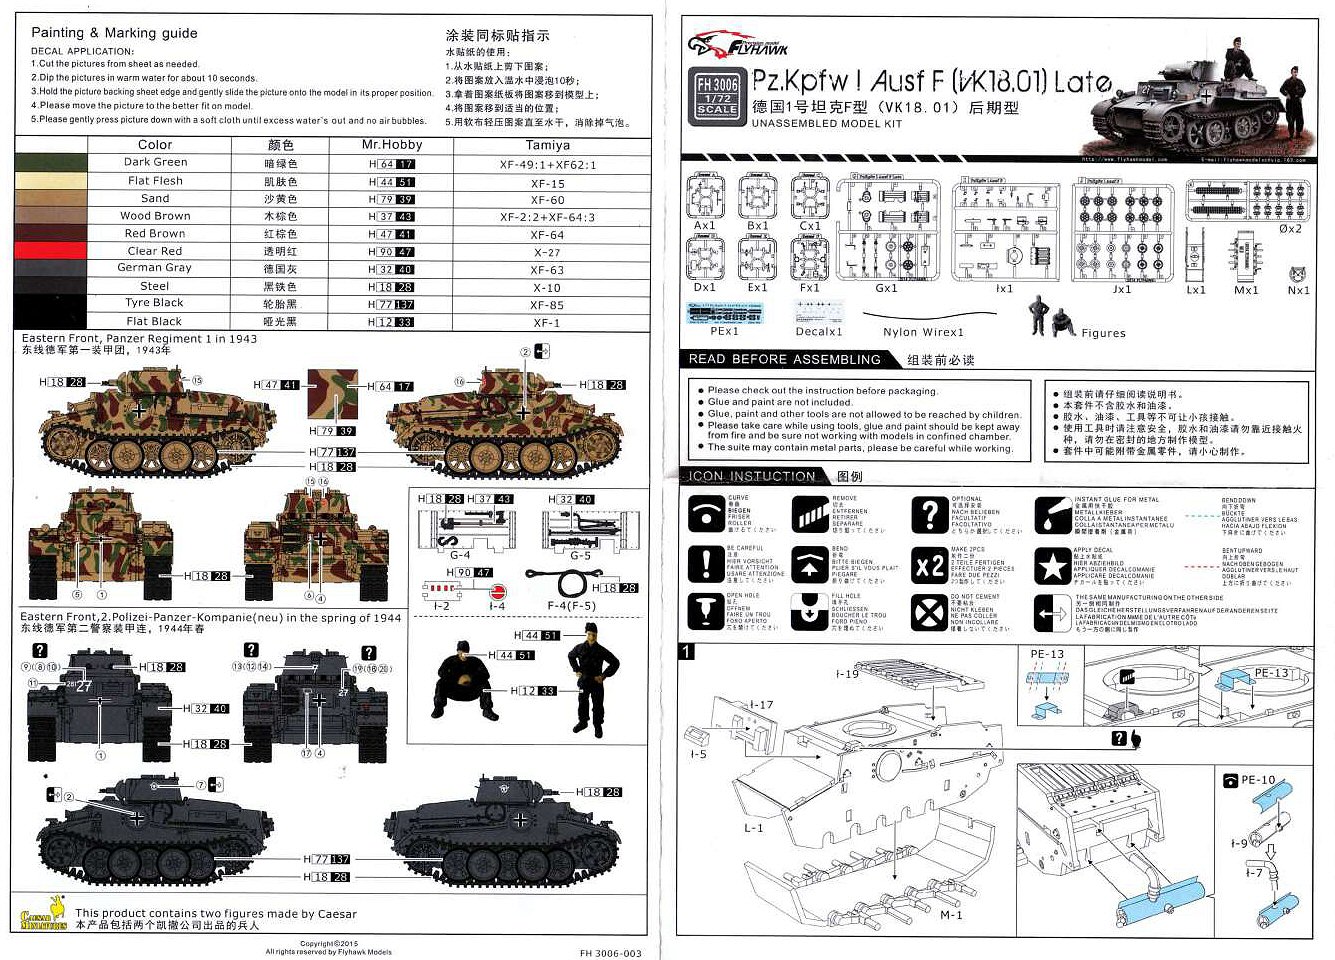
More scans of the parts can be found in the preview of the kit by Henk Timmerman. The manual is excellent and even uses color to indicate different parts in an assembly |
||
|
||
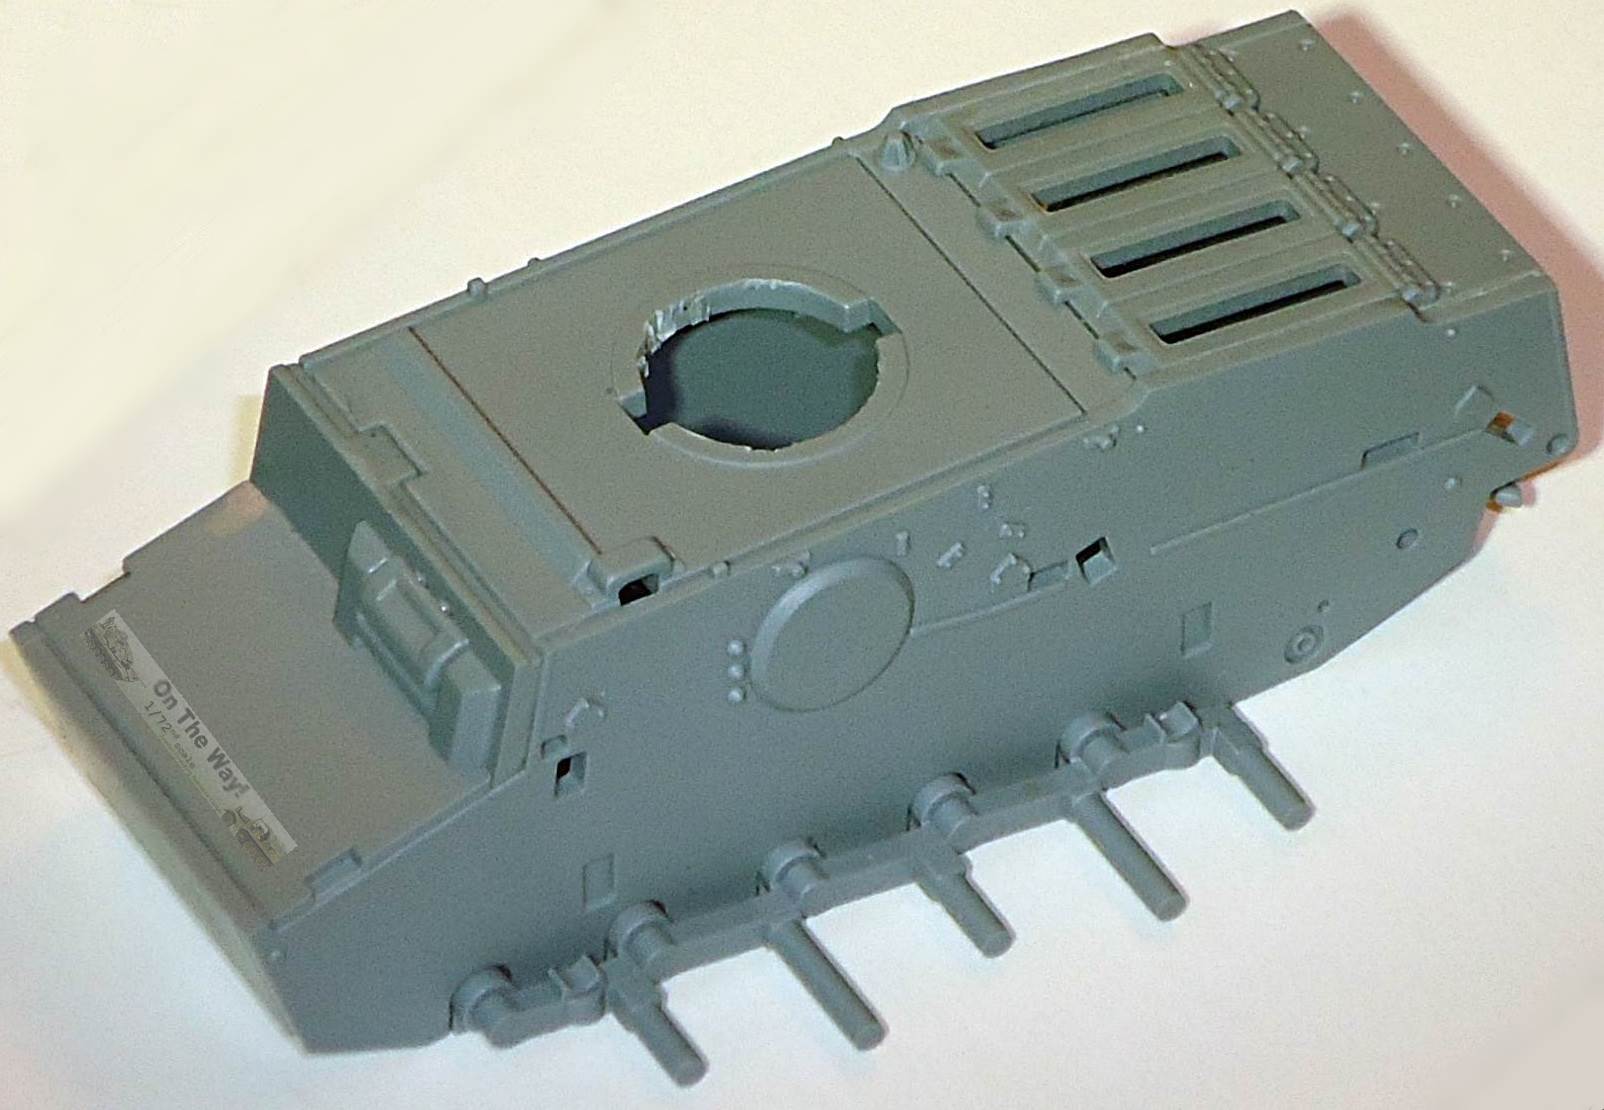
Construction So far I've finished step 1 of the construction sequence, and I must say the fit is perfect. The way the kit is engineered opens the way for anyone that would like to add an engine and I am wondering at this point if I should have painted the interior of the engine compartment, even though I don't think much will be visible after the meshes are added. The visor (part I-5) is installed, and the instructions are not very clear where to put it exactly. In fact, being a separate part, the modeler can choose to put it in the open or closed position. Closed is just as low as it can be placed; open would put the upper edge just below the centerline of the binocular sighting ports of the driver (see picture), meaning that it slightly overlaps these holes. The muffler is added to the rear, and I am not sure if the etched part for the shroud is an added value as I had difficulty bending it to (semi-) tubular shape. We will see how much is visible once the rear hull plate is in place. It would be a good idea to paint the area around the muffler black at this point, as it will be difficult to access this area once the hull is closed. At this point, I have let the plastic periscope cover above the driver in place, as I am afraid that the etched alternative part will be eaten by the carpet monster if installed too soon. Note that, if you choose not to use the etched part and want to install the vision block, now would be too late. It would be best to install this before mating the hull halves. At this point, I compared the basic dimensions against plans in [1], and if my measurements are anything to go by, then this kit is as close to 1/72 in all major dimensions as can be. (Note that in the picture on the right the roughness inside the turret ring is entirely my doing. It will be cleaned up later.) |
 |
|
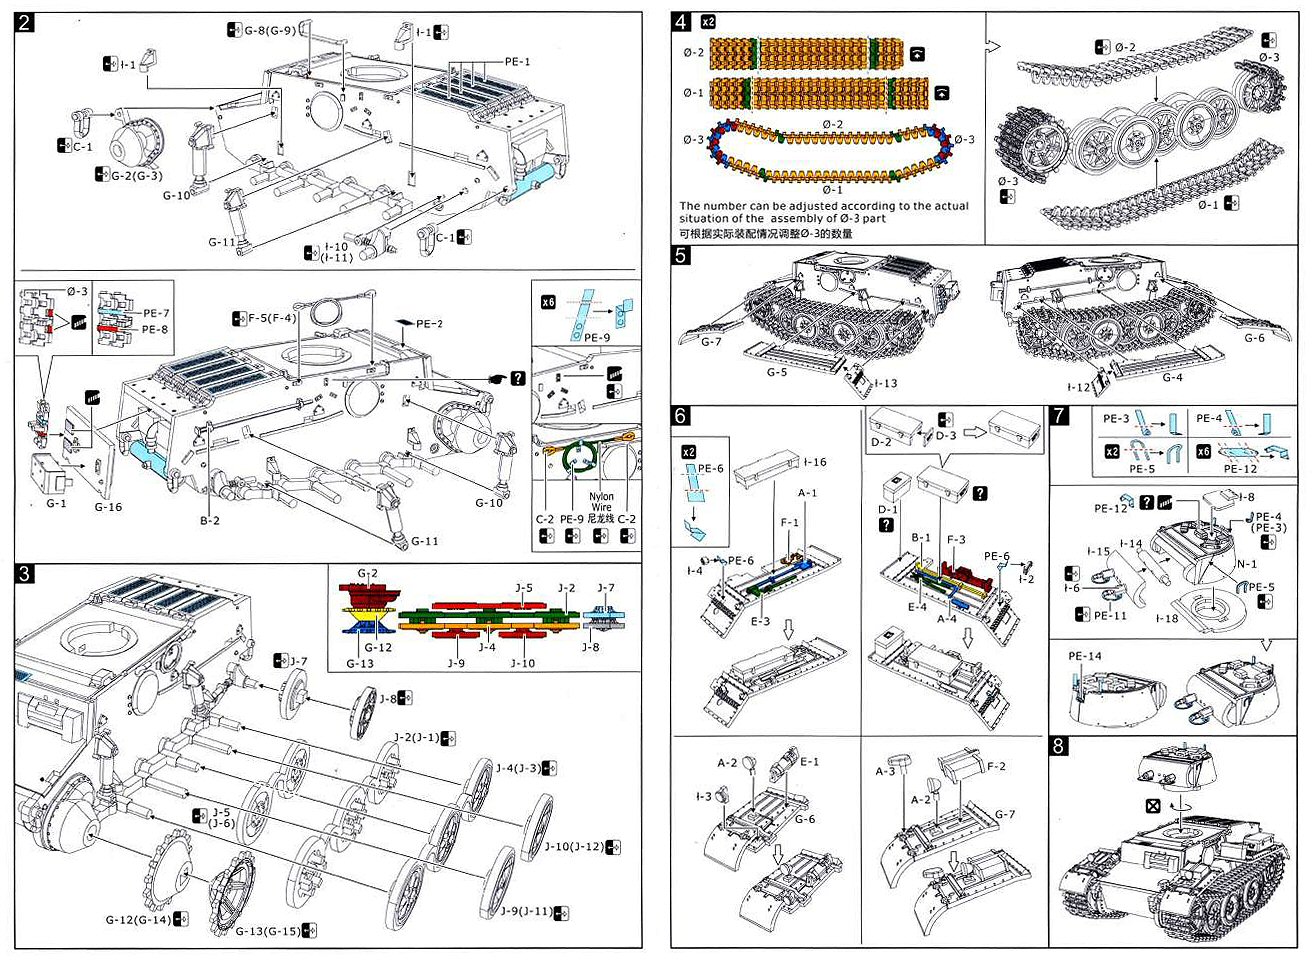
Moving
to step 2 and 3 of the manual, I started to stray from the proposed
building sequence, leaving off smaller parts for later. The suspension
is made up of a lot of individual elements: shock absorbers, bump
stops, etc, which all have a very high level of detail. I guess the
way the kit is engineered might allow for an articulated suspension,
although a little surgery will be in order. At this point a single sink hole was found in the idler mount, which will be hidden by the tracks. I also discovered that the rear hull plate will stay in place without glue, allowing access to the exhaust. It is just an example of how well this kit goes together. In the pictures below I dry-fitted the roadwheels, sprocket, idler and turret. (The idlers are not perfectly aligned yet.) The interleaved suspension is done in the (by now) classical way of connecting a row of wheels with an arc that ensures perfect alignment. I again compared the look of the kit against pictures and plans in [1] and found no mistakes. Flyhawk even captured the slightly different layout of the bolts between the left and right drive sprocket. |
|
|
|
||
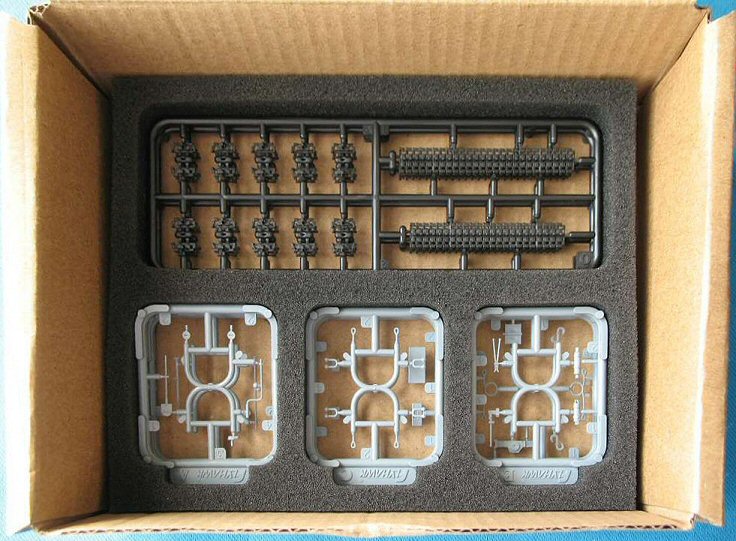
As it will be difficult to paint the area behind the roadwheels once the tracks are in place, I painted this area first after having decided to go for the dark gray painting option. As mentioned earlier, the roadwheels are given in the "neo-classical way", being connected by arcs. Up till now, all manufacturers that have chosen this approach have presented their roadwheels in exactly the same position, which doesn't look entirely realistic. I therefore decided to sever them and install them individually, taking care that pairs of roadwheel halves are aligned. The fit of the wheels on the axles is so tight that it doesn't pose a problem to keep them in line while adding realism. The tracks have a level of detail that I haven't seen in any other kit. Track faces are very crisp, track teeth are hollow (!) and individual tracks pins are represented. The individual links actually click into these track pins. The fit of these is tight, so tight that working track links are starting to appear on the horizon of possibilities. Flash is nowhere to be found and as the tracks are given in dark gray (the rest of the kit is light gray) they will not require much painting, perhaps just some dry brushing and weathering. |
|
|
.JPG) .JPG) |
||
I measured the roadwheels and tracks against [1]
and found them all to be within measuring tolerance of 1/72. As with all tracked kits, getting closure is always a hit-and-miss affair. While the right track demanded an integer number of track links to get a around the whole suspension, I ended up with a rational number on the left side. I have no idea why this happened as both the left and right side seem to have the same dimensions. Severing the idler from its axle and moving it a quarter of a milimeter more to the rear allowed me to insert the last track link. Even with the two links needed as spare tracks on the rear hull, I still have 8 track links left. As a lot of manufacturers give just enough track links to have one too few, this comes as a relief. Actually, if Flyhawk, for some reason, would specialize in manufacturing tracks of this quality as separate sets, they might prove very popular. After the tracks were fitted, the fenders were put
in place. In this area the instructions let you choose to install
the two boxes on the left rear fender or not, without being specific
when you should use them. Both color schemes in the painting guide
show them, but if my references are anything to go by it seems that
the first marking option (the three-colored one) didn't carry them,
while the gray one did.
|
|
|
At
this point not much was left to be added, apart from the majority
of PE and some very small parts. There was a time when I embraced
PE parts with reckless abandon; being a bit older, I have become
more sceptical and I am not sure, given the quality of the casting
in this kit, if a fair amount of parts that are now only done in
PE could not have been rendered in plastic (or both, so the ham-fisted
modelers, like me, can still decide).
|
||
| Camouflage and markings Flyhawk gives two marking options. Well, not quite, you get four. I'll explain in a minute. The first option is in the late war, three color scheme. I am pretty sure it is the vehicle from Pz.Rgt.1 shown below. It also looks an awful lot like the vehicle preserved in Kubinka (see below).
The second
option is a dark grey one, and as for this option you have a choice
of three turret numbers, you arrive at a total of four options.
As you might have guessed, I am going for this option. Note that there are decals on the sheet (in casu decal 3, a Balkenkreuz) that are not needed for any option. A bit more annoying is the fact that the decals are not entirely in perfect register. This shows up best in the Balkenkreuze. Admittedly, it's just a little bit, but you easily get used to perfection when building a kit like this.
Conclusion This a great kit with superb detail and, in general, extremely good fit! (Readers will notice at the bottom of this review that this was a free sample and might be lead to think that my judgement is biased, but I believe that few modelers that buy this kit will disappointed.) The price is relatively high for such a small kit, but nowadays there are other brands charging similar prices for lesser kits. A few caveats are in place though:
A PzKpfw.II.Ausf.J has been announced by Flyhawk as the next release. This will share a number of parts with this kit, which means that it will be probbaly of very similar quality.
Notes:
References [1] Panzer
Tracts 1-2, Panzerkampfwagen I (Kl.Pz.bef.Wg. to VK18.01), T.L.Jentz
& H.L.Doyle.
Review sample provided by Flyhawk |
||
Back to Flyhawk Kit List |
Back to Construction Reviews List |
Article Last Updated: 27 June 2015 |
Back to Home Page |


.JPG)
.JPG)
.JPG)
.JPG)
.JPG)
.JPG)
.jpg)
.JPG)
.JPG)
.JPG)
.JPG)
.JPG)
.JPG)
.JPG)
.JPG)
.JPG)
.jpg)
.jpg)
.JPG)
.JPG)
.JPG)
.JPG)
.JPG)
.JPG)
.JPG)
.JPG)
.JPG)
.JPG)
.jpg)
.jpg)
.jpg)
.jpg)
.jpg)
.jpg)
.jpg)
.jpg)
.jpg)