Bergepanther - Part 1
Fine Scale Factory (Kit
#TL 018)
By Dave Showell
Introduction
One of the bitter lessons
that the Wehrmacht encountered at Kursk was that they could no
longer count on holding the battlefield and recovering their
damaged tanks and vehicles at leisure. This problem was
compounded by the size and weight of the new Panther and Tiger
which were rolling off the assembly lines. Three Famo recovery
vehicles were required to salvage one Tiger under ideal
conditions, and Famos were always in short supply and vulnerable
in battlefield recovery situations. Part of the answer was the
Bergepanther. Appearing soon after the introduction of the
Panther, they were based, initially, on "ausf D"
vehicles returned to the factory for repairs. The turret was
removed, a lightly armoured box with folding wooden sides was
added, and a whopping big winch (windlass) was placed in the
fighting compartment. The Bergepanther was capable of a 40 ton
straight pull or, using mechanical advantage and a spade attached
at the rear, 80 tons. To all accounts, this was an extremely
successful conversion, although there were never enough to go
around.
Fine Scale Factory, a
producer of extremely nice and often exotic small scale armour,
provided this kit to Doug Chaltry for review on his site "On
the Way!" To my great delight, Doug passed it to me to take
a look at. Here is what I found.
First
Look
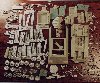 As you will note from the photo,
this is not a kit where you give the box a shake and out pops a
finished model. It has a massive number of parts, moulded in
beige resin and metal. Parts are contained in three zip lock
bags, two for metal parts and one for resin. The kit comes in a
sturdy card board box with shredded newspaper for packing. I
noticed only one minor bit of breakage (a crack in the box
structure) but this was not a problem to fix. A photocopied sheet
of instructions is included, with a short description (I think)
in German and a number of "exploded" views.
As you will note from the photo,
this is not a kit where you give the box a shake and out pops a
finished model. It has a massive number of parts, moulded in
beige resin and metal. Parts are contained in three zip lock
bags, two for metal parts and one for resin. The kit comes in a
sturdy card board box with shredded newspaper for packing. I
noticed only one minor bit of breakage (a crack in the box
structure) but this was not a problem to fix. A photocopied sheet
of instructions is included, with a short description (I think)
in German and a number of "exploded" views.
The kit is extremely well
detailed, with full interior and a lot of small "bits and
pieces". There is some resin flash to be trimmed off,
however in a number of cases, such as the opening for the main
compartment, the engine compartment or the driver's area, this is
done on purpose to avoid, I assume, breakage of the hull. The
smaller metal parts have a considerable amount of flash, which
tends to be thicker and harder to remove. The tracks, moulded in
white metal, are really very nice - well detailed with teeth on
the inside. They do not seem to be a recast of the Revell tracks,
although they may be based on them. The upper hull would seem to
be based on the ESCI Panther ausf A with considerable work done
to it. This has always seemed, to me, to be a bit wide, making
the angled sides look slightly "off" - particularly
when compared to the Revell or Hasagawa Panthers. I didn't think
this would detract from the overall model however. The lower hull
is quite beautiful, with the interior moulded in place. The
engine, transmission and main work area, where the winch will go,
is well cast. The fire walls are detailed as well. My copy seemed
to have an ever-so-slight misalignment that made the engine
compartment look slightly askew compared to the rest of the hull,
however this could just be an optical illusion.
Building
the Bergie
Let me state my prejudice
right off, I don't like working with metal. Part of this is bad
experience with metal kits in the past and part of it is simple
inexperience with the medium. It should come as no surprise,
therefore, that I had trouble with the all metal running gear of
the kit.
When I first sat down to
work on the kit, I was convinced that I was missing parts. There
were nine outer wheels, eight middle but only two inner road
wheels. A quick check of the instruction sheet showed that it
included full inner wheels but then I came to the realization
that the instructions for this section were just a cut-and-paste
of the Revell kit instructions. In fact, when I began to dry fit
the wheels and their torsion bar extensions (more about these
later) I realized there was really no way you could fit inner
wheels on. FSF had realized this (I assume) and only included
inner wheels for the very last position, where they might show.
This was not reflected in the instructions. This issue resolved,
I trimmed the white metal crank-shaped torsion bar extensions and
began happily super gluing them in the holes provided on the
resin lower hull. I then realized that all of the torsion bars
provided were the same size. I would have to cut half of them
down to accept the middle road wheels, which I did. However, once
all the cranks were on and I began to try to add the wheels, I
found the joint between the resin and the metal wouldn't hold as
I pressed the wheel on. I attempted to rectify the situation by
swearing at the model and supergluing my fingers together, all to
no avail. I then pulled off all of the cranks and glued them
instead to the wheels first. I still had the same problem of
attaching them to the resin hull, but I could cheat by also
gluing the inner side of the outer wheels to the face of the
middle ones. This inelegant approach seemed to work although I
wouldn't want to try dropping the model very hard onto a table.
Some of you may be wondering "Why is he using super glue
instead of two part epoxy?" The answer is, I never thought
of it. I can, however, recommend not using super glue.
With the road wheels in
place (I left the drive and idler wheel off, knowing I would have
to bend the metal tracks around later), I turned to the tracks.
Here lies a problem. The lower hull is moulded with the hull
overhang in place. Revell got around this by having the track
assembly as a separate unit which you slid up to the overhang
once all the tracks were on. FSF requires you to put the upper
tracks on by sliding them into place sideways - an extremely
difficult trick given the nice teeth on the inside of the track.
I accomplished this by carving off the inside inner teeth - where
they would have to slide over a road wheel - and jamming them
into place. I next turned to the drive wheels and idlers. The
metal track bent around the idlers very nicely, although the
teeth kind of bunch up. The drive wheel was a different story.
There must be some way to fit the track over the teeth but I
couldn't seem to do it. I ended up carving the teeth off and then
bending the track around (the coward's way out). I figured I
could fix any problems by using mud (the other coward's way out).
Having done this, I was able to finish the tracks with a minimum
of trimming and fudging. A couple of nasty gaps magically
appeared once I was finished but, hey, that's what mud is for,
right? (see Coward #2, above). As well, because of the eyeball
method of sizing the torsion bar extensions, my drive wheel ended
up to close to the hull side. I had to carve the tracks a bit to
get them on the front. The result is, from the front, the tracks
look just a bit "pigeon toed".
Having bodged my way
through the running gear, I now heaved a sigh of relief and
started on the "real" model. I decided to go with an
approximation of red primer for the floor and half-way up the
sides of the vehicles interior, and the engine compartment. The
rest of the sides I painted ivory. I then dirtied it up using a
dry brushing of black and some lead pencil work. The transmission
and radio I did in coal black (slightly shiny) since apparently
that was common on German vehicles. The engine I finished in flat
black. All the black items were then lightly dry brushed with
light grey to bring out the detail. The winch, which is a
beautiful moulding, was finished in a similar fashion, with the
cable picked out in dark grey with highlighting of orangey red to
simulate rust.
I then turned to the
instructions to start figuring where all the little metal parts
should go ... hmmmm. In the original copy of this document, it
may have been clear i) which part was which, and ii) where all
those little arrows were going, but in my copy the instructions
weren't much help. For example, in the engine compartment there
were a couple of little do-hickies which were labelled something
like "kuhlwasser something". However, the picture gave
me no hint about what parts might form the water cooler thingie
and absolutely no clue as to where they might be stuck. I decided
to leave them off, since I was building the engine hatches closed
(a shame really).
This pattern was repeated
everywhere - an indistinct picture of a part with an arrow
disappearing into the picture of the kit. For exterior detail,
there are at least a number of good references (Squadron's
Panther in Action is one) and there are a couple of 1/35th
Bergies displayed on Track Links which can be studied. The only
place I had real trouble with was attaching the spade. This is a
very complicated assembly which requires considerable thought and
testing. In dry fitting the rest of the parts, I came across a
little problem with a tool bin fixed to the inner side of the box
structure interfering with one of the wheels of the winch. Maybe
I got it wrong, once again the instructions are not much help,
but I had to carve away part of the box to clear the winch.
Overall
Impressions
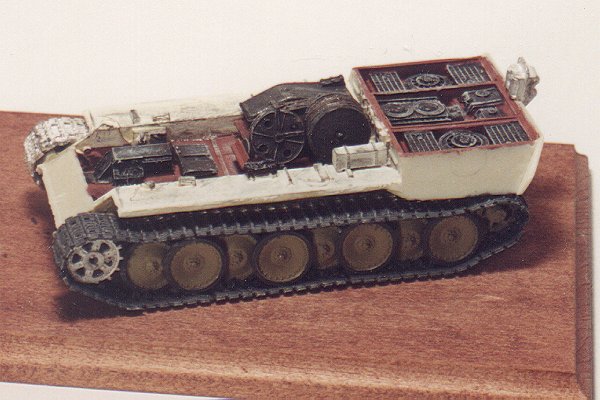
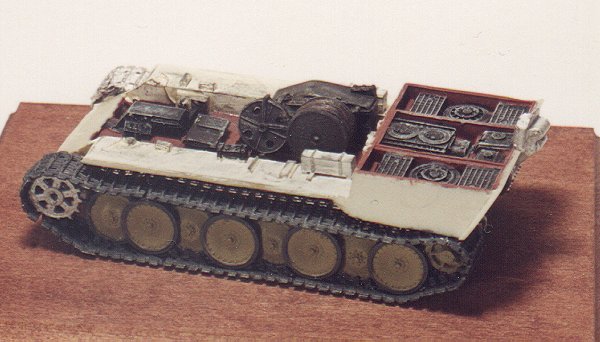
As you can guess from the
photos, I have not yet completed the kit. I will add a
"Bergie Part II" article when things are complete. My
overall impression of the kit is that it is an absolute
"tour de force" of multi media kits. Despite the
criticisms I have made above, my feeling is that this kit will
look fantastic when it is complete. It is, however, not for the
inexperienced or the faint of heart. It also requires a
considerable investment of time. To bring the Bergepanther to the
state shown in the photos took approximately 20 hours (not
including ungluing my fingers). This is far more than I usually
spend. Finally, this is not an inexpensive kit. I have seen it
advertised in the US for around $35 US. This price reflects the
high quality and detail of this kit, but quite a chunk of change,
even for a resin kit.
References
Panther In Action,
Bruce Culver, Squadron/Signal Publications, Carrolton, TX.
German Tanks of Word
War Two, George Forty, Arms and Armour,
London, 1987
Stay
tuned for Part 2 ...
 As you will note from the photo,
this is not a kit where you give the box a shake and out pops a
finished model. It has a massive number of parts, moulded in
beige resin and metal. Parts are contained in three zip lock
bags, two for metal parts and one for resin. The kit comes in a
sturdy card board box with shredded newspaper for packing. I
noticed only one minor bit of breakage (a crack in the box
structure) but this was not a problem to fix. A photocopied sheet
of instructions is included, with a short description (I think)
in German and a number of "exploded" views.
As you will note from the photo,
this is not a kit where you give the box a shake and out pops a
finished model. It has a massive number of parts, moulded in
beige resin and metal. Parts are contained in three zip lock
bags, two for metal parts and one for resin. The kit comes in a
sturdy card board box with shredded newspaper for packing. I
noticed only one minor bit of breakage (a crack in the box
structure) but this was not a problem to fix. A photocopied sheet
of instructions is included, with a short description (I think)
in German and a number of "exploded" views.