|
Attack Hobby Kits
|
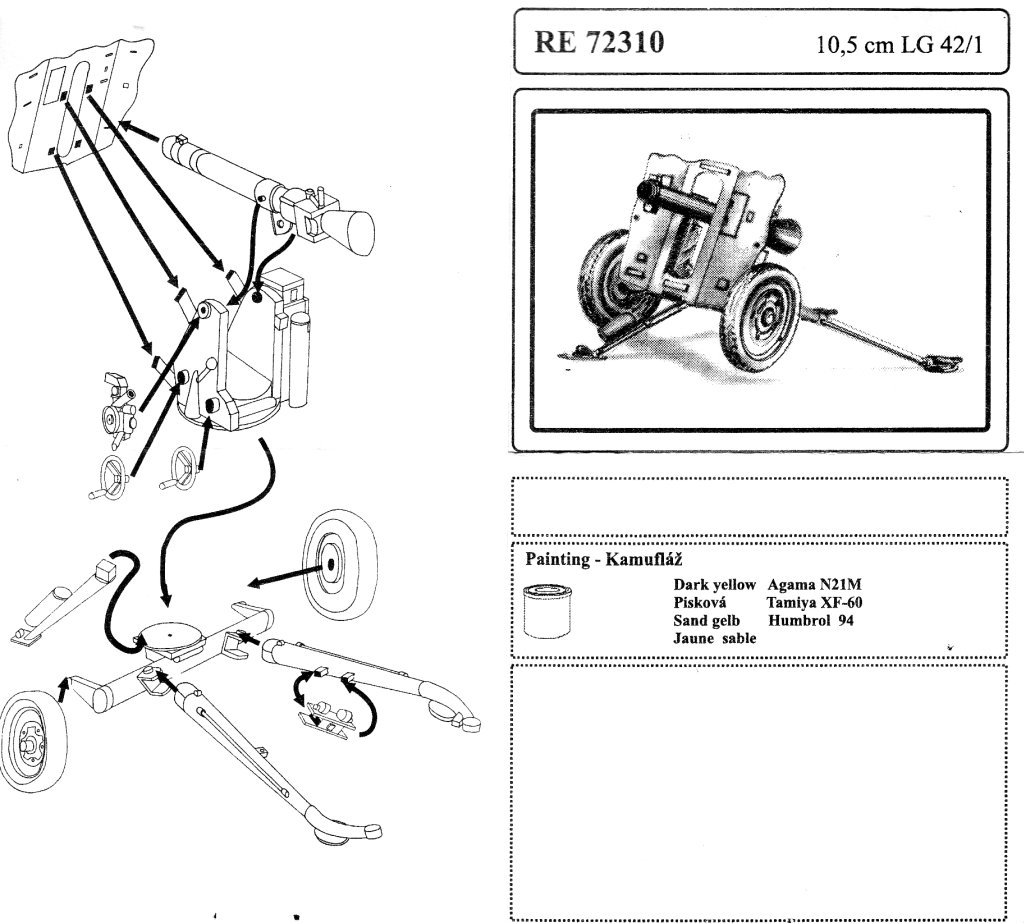
10.5cm LG 42/1 |
|||
| Kit #: RE 72310 |
Review by
- Al Magnus
|
|||
|
Attack Hobby Kits
|
10.5cm LG 42/1 |
|||
| Kit #: RE 72310 |
Review by
- Al Magnus
|
|||
 |
|
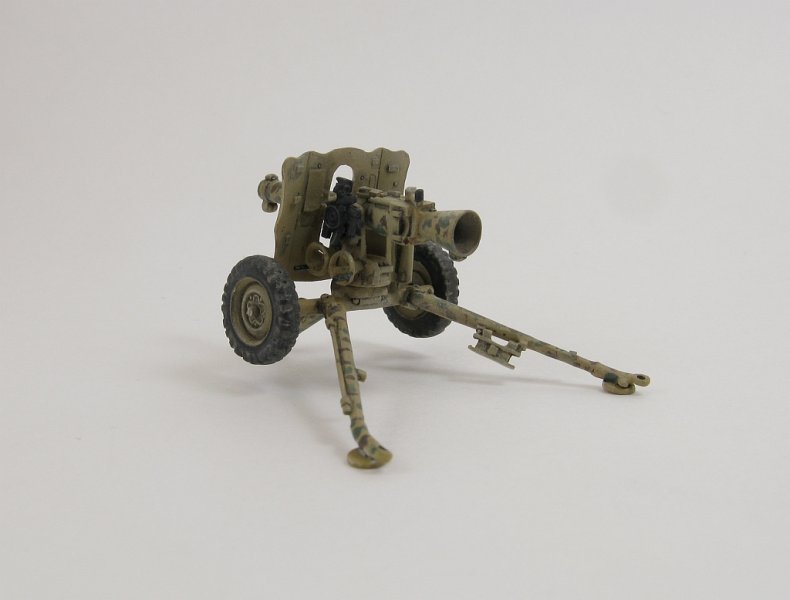
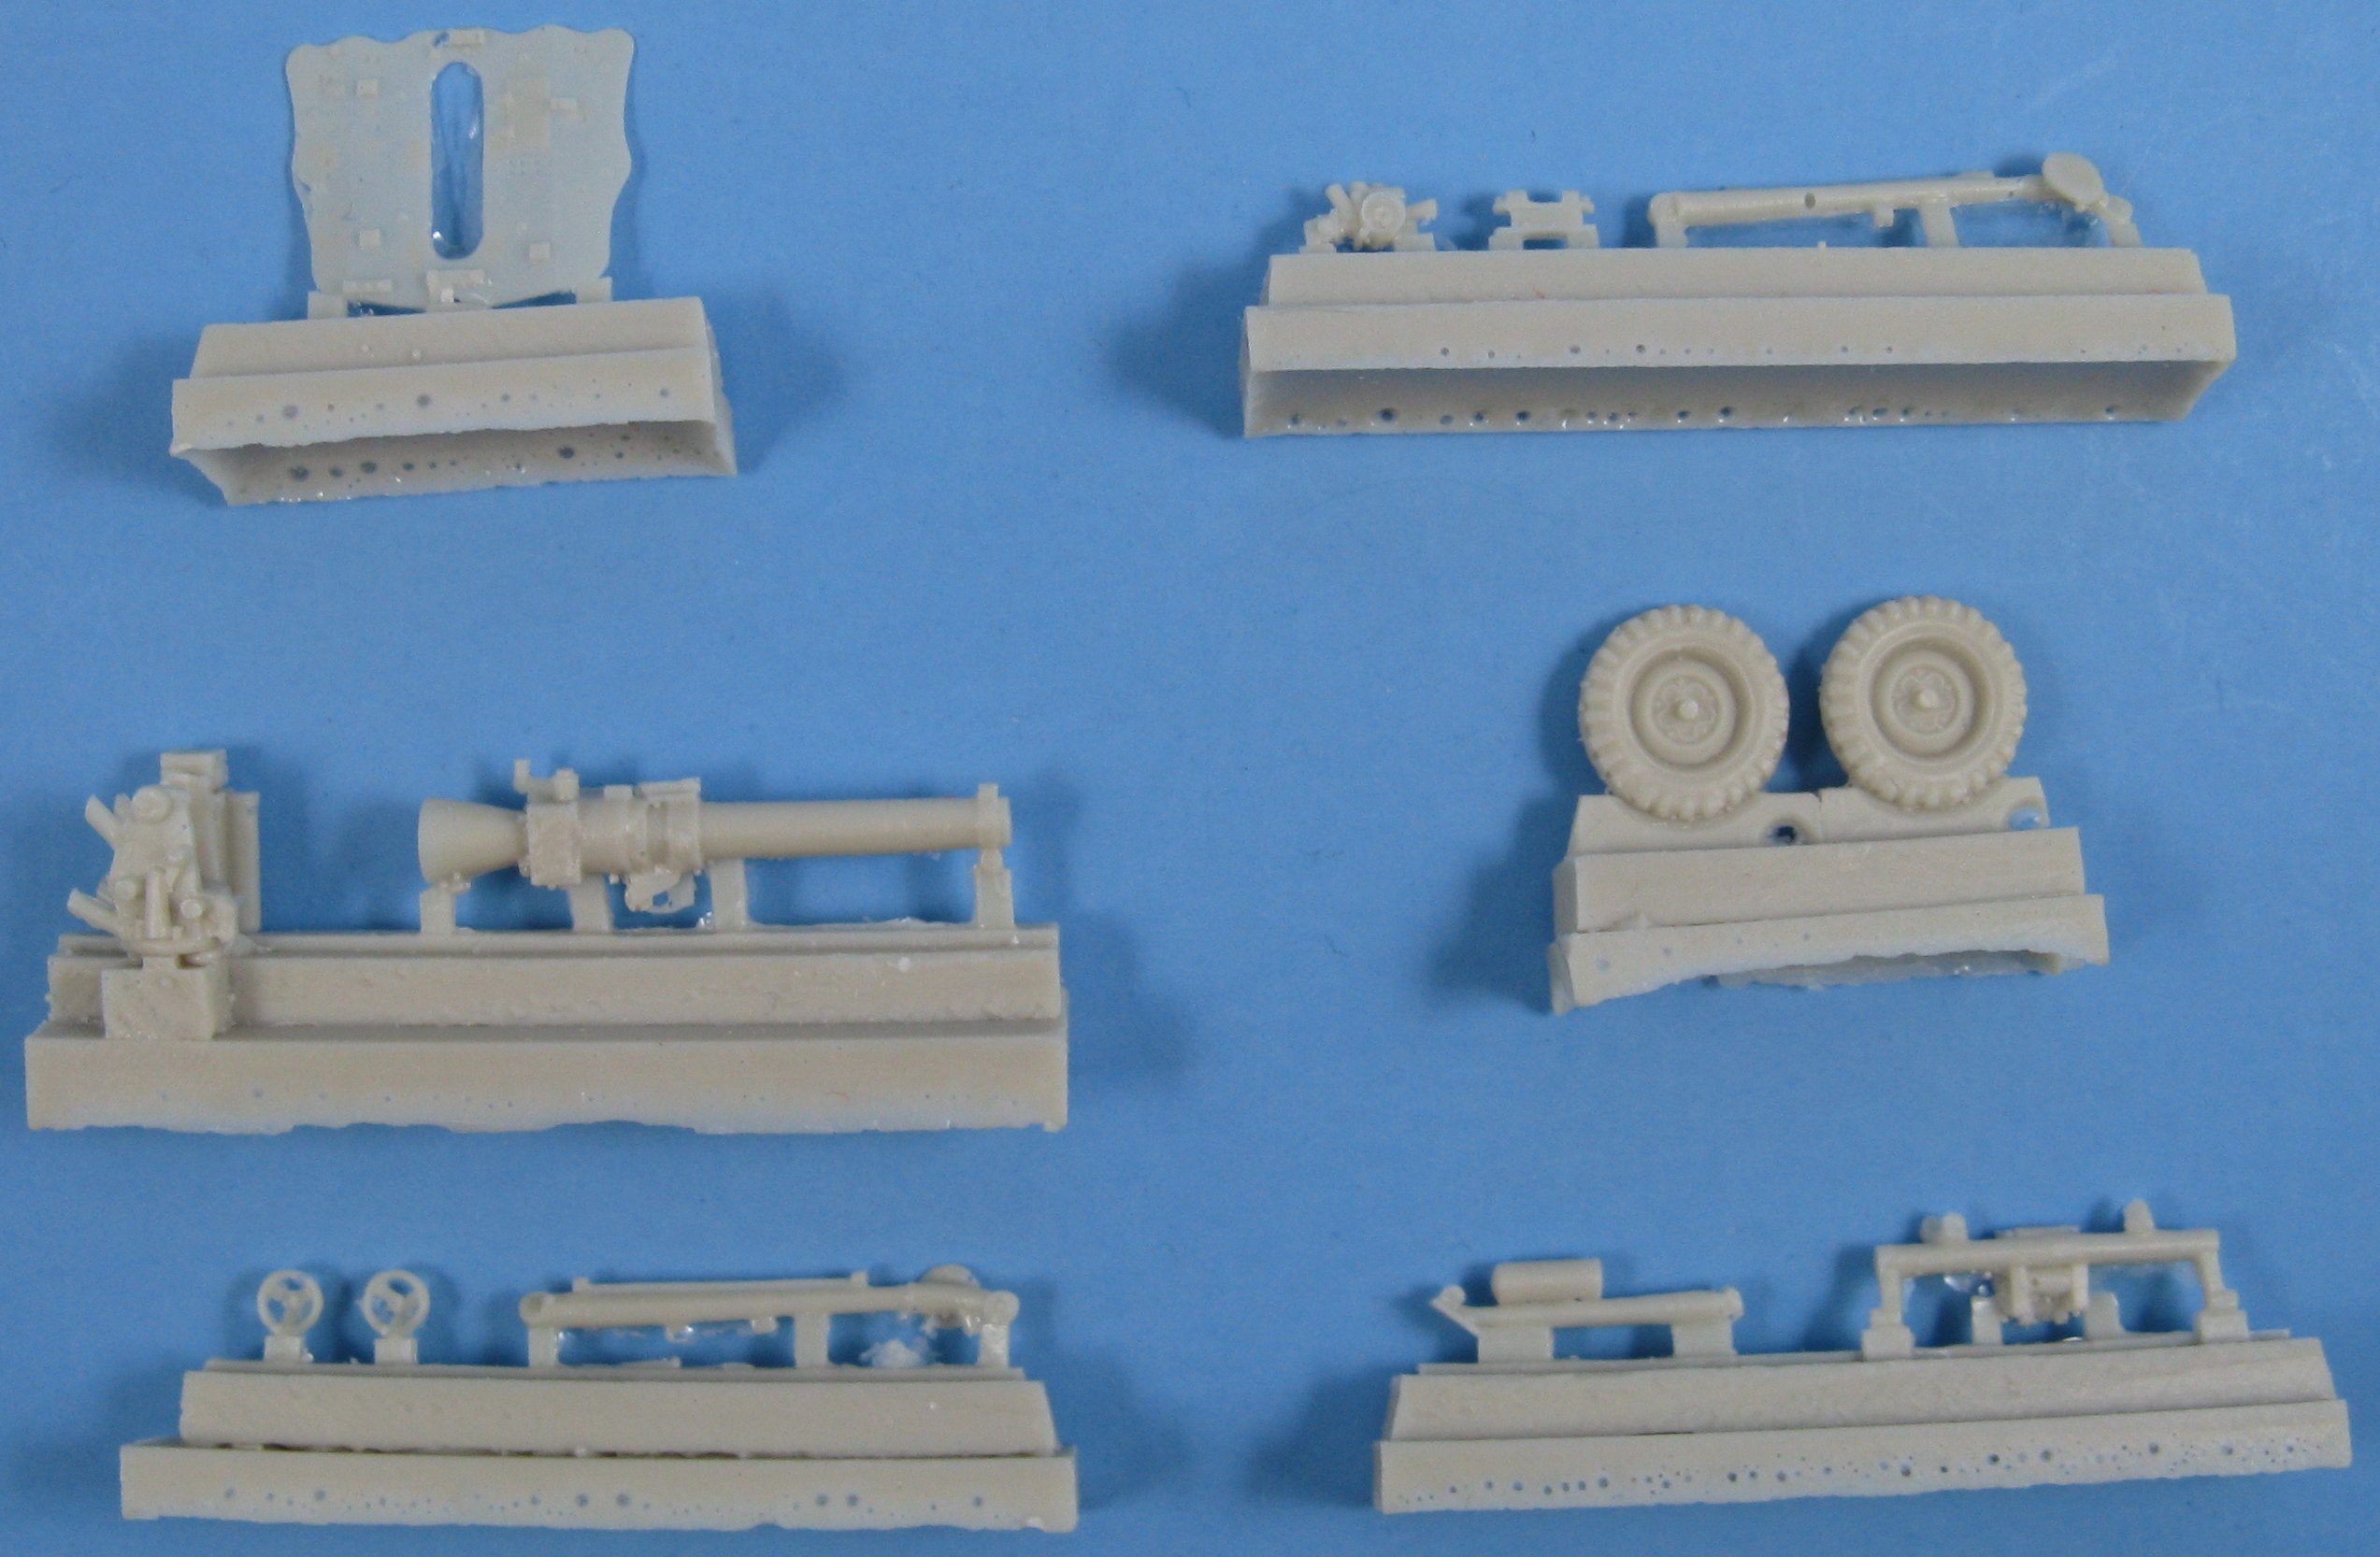
The Rheinmetall Leichte Geschütz 42 was designed as a special lightweight recoilless weapon for portable artillery support. The lack of recoil was attained by allowing part of the propellant gases to escape through a rear venturi tube. This removed most of the strain from the mount, which needed only to be strong enough to hold the piece and provide elevating and traversing gears, and also allowed he gun to be compact dimensionally. The back blast was quite substantial and required persons to be well clear of the gun's rear to avoid injury. The design allowed for rapid assembly and break down into five loads, making both air and pack transport possible. The gun saw service from 1943 to 1945. This kit is small. It comes packaged inside a small plastic box stapled to a 79mm by 105mm piece of cardboard. Inside there are 6 casting blocks containing a sum total of 13 parts cast in pale yellow resin. A small instruction sheet in included outlining the build in the familiar exploded diagram format. No decals are provided. First I have to point out that there are more than a few pin holes, bubbles and short casts to fix. I'm sure that the extent of these will vary from one kit to another. In my example, if you take a close look at the large photograph of the parts, you can see that the shield is a bit short shot on the top, bottom and left side (as viewed from the front), and the elevation gear on the bottom of the barrel is for the most part missing. There are also pin holes to be found on most of the parts as well. The kit's wheels appear to be modelled on the preserved example at the U.S. Army Field Artillery Museum in Fort Sill, Oklahoma, and though they show excellent hub detail I can't say for certain if they're completely accurate due to limited picture coverage I could find on the web. The tires are easily the kit's worst parts with the tread detail being sketchy. At the point where the casting lug is found, their width narrows, and both are short shot creating substantial voids. The elevation/traverse wheels are nicely done. The sights were warped slightly. Filling and fixing the voids and pin holes took the majority of the build's time. Fit is marginal. Much trial and error was needed during the build to get parts to match well and align properly. The attachment points for the legs are vague. I used slow drying super glue to allow me to get them positioned before the glue set. The cradle to carriage join is poor and I spent some time here ensuring that the joining surfaces were flat. I found it easier to replace the round levelling pads on the rear legs with some disks punched from plastic sheet than to try and fill the bubbles found between the kit's pads and the legs. The business end of the barrel comes with a moulded in depression but I drilled out the barrel some more to give it additional depth. I also drilled a hole at the inside apex of the venturi tube, and lastly, the towing eyes were also drilled out. To ease painting I built the gun in four sub-assemblies: barrel, wheels, sights & gun mount (with the shield already attached). Painting suggested is the later war German overall yellow/tan camouflage. Once painted I decided that this looked too bland on such a small model so I added some spots of green and brown. This kit was also used as test run for my first attempt at using weathering powders. I used the soot colour from the Tamiya Weathering Master set 87080 to darken the inside of the venturi tube and on the tire sidewalls. Final assembly proved to be somewhat problematic when it came time to add the barrel. I had test fit the barrel during the build and found that it easily passed through the slot in the shield. What I didn't notice was that the barrel touched the right side of the slot due to the fact that the shield's slot didn't quite line up with the cradle, so when I slid the barrel in place, it aimed to the left and as a result the interference would not allow me to adjust the barrel to the right. This forced me to trim the slot. The end result is that I have a barrel that's not quite centered in the shield's slot, but at least it points straight ahead. Oh well, that's the way the cookie crumbles! Whew! A lot of work to get something passable, especially for a kit of but 13 parts. As far as I know, it is the only game in town if you want one of these for your collection or to put in a diorama. References:
Review sample purchased by the author. |
| Back to Attack Kit List | Back to Construction Reviews |
Article Last Updated: 28 June 2012 |
Back to Home Page |