Academy


www.onthewaymodels.com

GMC CCKW-353

Set #: Academy 13402 Review Carli Danilo 172normandyafv(at)gmail(dot)com
Edited by Marc Mercier

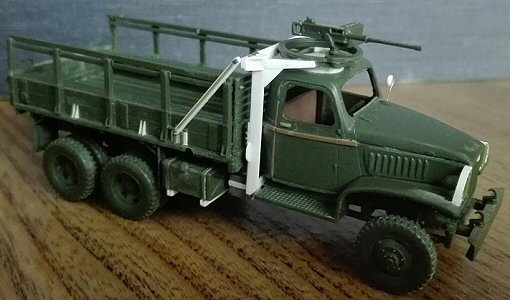
Since I wanted another US Army truck, I bought the Academy kit to get an early production closed cab. The closed cabin CCKW has also been produced by other brands such as PST, Force of Valor and Pegasus (the last one with post war radiator grills).

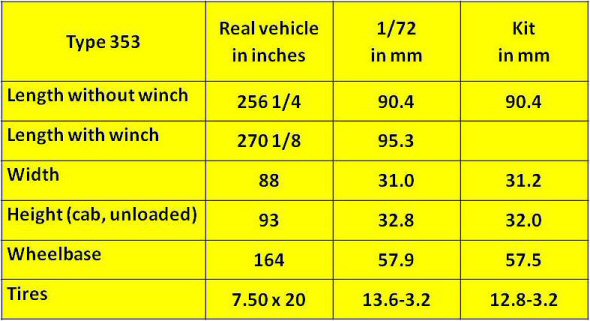
In the box you get two dark pine green sprues, a transparent set, a decal set and some instructions. A third sprue has some extras : boxes, jerrycans, barrel and MG’s to fill the cargo area. At first glance, everything looks very well done: the parts look crisp and well depicted. The plastic is a bit hard but can be worked very well. Dimensions are correct:

Dimensions are correct:

The variant proposed in the kit has a closed cab with a wooden type body, produced until February 1943 (when the asymmetrical brush guard was introduced), proceeding the introduction of the open cab of the late production (4th, 5th and 6th series). The supply catalogue number for the truck 2 ½-ton, 6x6, GMC CCKW was G508.

The 1st batch, produced from December 1940 till January 1941, had a civilian cabin and was called CCKWX. The 2nd and the 3rd series were produced January 1941 to March 1943 and their closed cabin could have a rounded hole for the MG. Two types of chassis were used for the CCKW, the type 353 (used in this kit), was the longer one. The shorter version, used for about the 10% of the CCKW production, was called type 352. Another closed cab version, called CCW-353, was a 6x4 variant.

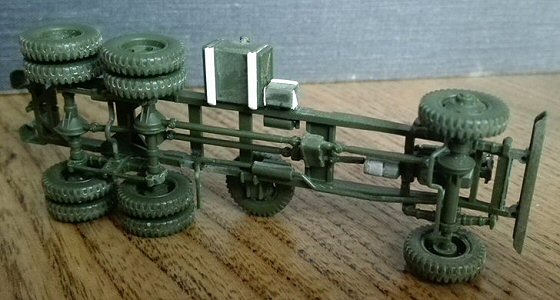
The kit gives you the option between the standard bumper and installing the winch, which was used on almost half of the total production (both chassis type, short and long). The kit chassis has a Timken split axle. The Chevrolet banjo type was also used, but this different axle type meant also a different layout of the drive shafts.

Compared to the open cab truck kit, the conversion possibilities are even bigger (see Heller/Airfix CCKW review for a short wheelbase 352 conversion) because the closed cab truck kit could also be converted (with some more work) into the 1.5 ton 4x4 variant G506 made by Chevrolet. The 108”x 86” flatbed cargo G506 with the winch was called G7117, G7107 being the number without winch.

Good info sources of information on the net can be found on dedicated sites such as www.cckw.org or www.gmccckw.nl , here www.ww2cckw.org/jimmy_ancestry.htm, you can find a very interesting article in ten parts and last but not least, the technical manual TM 9-801 and TM 9-224 are full of useful info too.
A very important thing when using photos of restored vehicles is to remember that they could be subject to personal interpretation (such as home made MG mount) or have a post war up grade (such as the shortened rod of the radiator grill).

A lot of ejector marks need to disappear. The kit doesn’t provide a tarpaulin, so I couldn’t measure the body height.

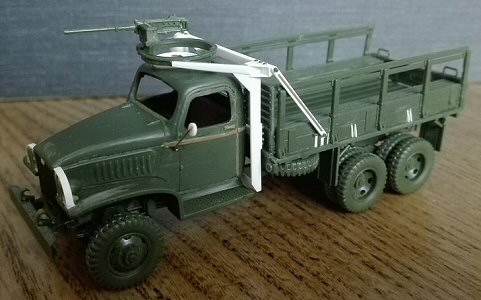
Here is what I made to improve my closed cab truck:

Chassis

  • It is quite well made. I wanted a truck without the winch so I used the optional bumper.
  • The fuel tank is quite well made, but lacks the two supporting arms on the bottom. I made them by plastic rod and sanded down the belts, much too raised. About the engraved “X” I’m not sure it was ever used. In the trucks I’ve seen it wasn’t. Anyway it is a nice detail so I kept them.
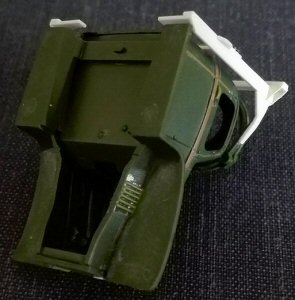
  • I filed the battery box forward side to make room for the gun mount (see below) and added some details.
  • The rear pipe of the exhaust is 1 mm too short and if placed as it is will interfere with the body mudguard (which in reality was just behind it). I cut the longitudinal section and replaced it with a stretched sprue segment of the correct length.

Cab

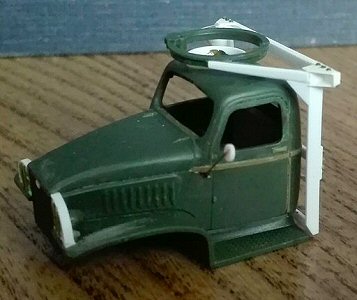
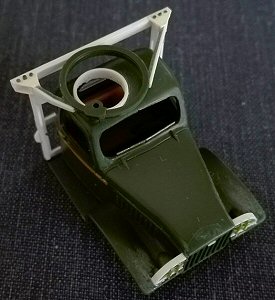
  • The cab has some shape problem. I’m not so finicky to count the number of louver vents, but the rear of the cab is not well done and I had to file it to get a more domed shape.
  • The rain guard above the door was shorter, so I adapted its length.
  • I used stretched sprue thinned on one side to have a “D” section, sanded down in place, to replace the horizontal moulding.
  • The tiny handles, erased while working on the moulding, were replaced by stretched sprue.
  • The bonnet top should have a little vent for the cab just in front of the windshield. I ignored this minor fault.
  • The mirror arm was broken in my box. Being too fragile I replaced it by a little rod slice and metallic wire which bents and doesn’t break if touched.
  • The radiator grille has 9 rods (in reality there were 14) and is made reversed. Its rods have a triangular section and if placed as suggested (with the base of the triangle facing the radiator), the brush guards are on the wrong side. If glued the other way, the thinner side of the rods will face the radiator, giving the grille a massive look. So, I cut off the brush guards and glued the radiator grille in the right way. Since I modelled a truck produced before the April 1943, I added also a little plastic chip for the rectangular GMC logo. Later productions vehicles lacked this detail.
  • The windshield shape is not correctly reproduced. The upper edge is straight and sits too low and the corners are squared. I filed the upper edge and filled the corners. I glued some thin stretched sprue at the bottom of the opening, making a ridge which can support the new windscreen cut from a transparent packaging.
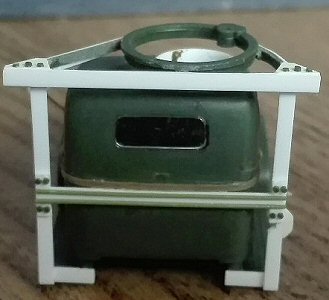
  • Speaking of the brush guards, I choose to make them symmetrical using plastic strip as for the first 192,800 trucks produced. The rods were made by stretched sprue. By February 1943 the brush guards became asymmetrical to protect the newly introduced black out light.
  • The lamps on the fenders depict the blackout light introduced by February 1943 on both sides. There was only one, on the left side. I cut off the surplus lamp and restored the original layout, filling the depressions left in the fender surface.
  • The closed cabin of the GMC family which had the MG mounts, had a hole in the roof which could be closed by a round canvas top. It had a raised edge like a well. Since I wished model to have the MG ring I made it using plastic sheet.
  • Under the fenders, behind the wheels, there were two other louvers; I made their vents with thin stretched sprue segments.

Body

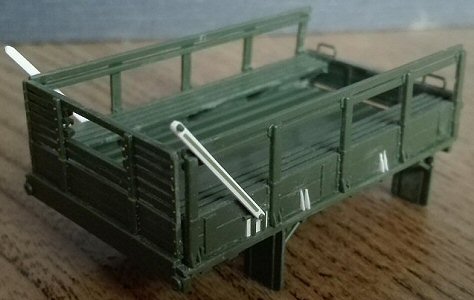
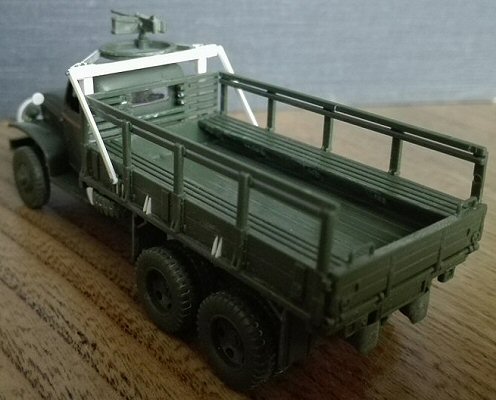
  • I added the details on the four frames, which make up the body sides, using thin plastic sheet.
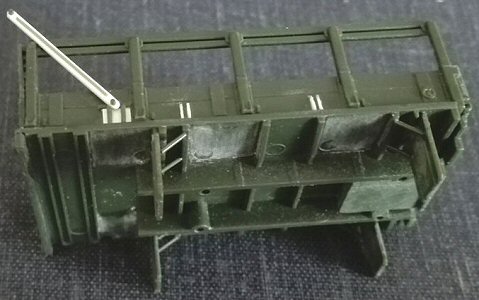
  • I made the tool box, missing on the bed belly, using the thick nametag on the sprue.
  • The tool rack K15 is missing its shovel. I left it on the sprue. I’m still not sure to use it or not, anyway in some photos it is visible attached along the body side.
  • I added the mudguards supports using some stretched sprue.
  • The opening on the right side, above the fuel tank cap, was missing. Using a file, I made a small notch.
  • The benches supports were five rods and not a single "stair" like piece. I cut off the longitudinal parts of the frames and used the “steps” of the “stairs”.
  • To have a better look, after dryfitting the hinged wall, I then put a drop of glue only in the hinges. When dry I cut them off. The wall, after having sanded the inner side, was attached to the body without spaces.
  • The metallic ribs on the floor of the body are much too raised. I sanded them down.

M37 mount

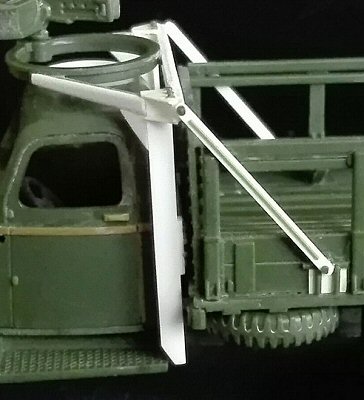
The AA MG mounts for the closed cab were the types M32 and M37. The kit proposes the M32 type, but it isn’t correctly reproduced and if used, should be modified. According to the photos I consulted, this type was only fitted to steel bodied trucks, while this kit has a wooden body. The vertical rods were rounded with rectangular fixing plates, the horizontal arms were triangular and the oblique rods were plain triangles which formed a rhomboid shape with the forward triangular plate. An interesting article can be found in the French magazine Vehicules Militaires # 55, February/March 2014.

For my closed cab truck, I choose to make a M37 mount, which could be used for both long and short wheelbase chassis. It was made in four variants; the type used on a 353 chassis with wooden body was the M37A2 (there were difference in the way it was fixed to the walls between the wooden body and the steel one). The frame wasn’t attached to the body as for the M32, it had a different shape and the ring supports were shorter.

I didn’t find the technical drawings so I had to scale it down from photos and sketches. To make it I used plastic strips and stretched sprue. Surely some dimensions are not 100% correct (I had also to adapt some dimensions to the kit parts) despite this, I prefer my solution because it is the only mount type of which I found photographic evidence being used on the wooden bodies. The only alternative to having an unarmed truck would be to use the improved M32 mount on a metal body, taken from another kit.

Decals

I didn’t find any photos of the two trucks suggested by the decal set:

  • 4734511 of a service unit (code SV), 98 Inf. Div., 369 Field Art. Rgt. This Division was held in reserve in Hawaii until the post war occupation of Japan. This registration number was sported by a restored closed cab which currently is repainted with a different registration number. Additionally, this vehicle number is very high and, as far as I know, should fall in the open cab batches.

  • 4148174 of the 3879 Transportation Corps in France, 25th August-16th November 1944. This registration number falls in the transition period between the two cab types. The highest closed cab registration number I’ve seen in photos is 4231146 and the lowest open cab registration number is 4144063.

Conclusions

Just like the Dodge WC54 kit, this Academy kit also left me with a strange impression. It may seem a very good kit, but it has detail issues which need heavy surgery if corrected and other ones which need to be replaced.
Therefore, I think this kit provides plenty of opportunities for the aftermarket makers. Beautiful sharp details has to be erased or filed off on the cab, which, of course, is a pity. Despite this, with some work, this kit will make a nice replica or provide a good base for conversions. A better attention to the details is strongly wished, ranging from the decal set to the correct gun mount.

Preview sample purchased by the author.

This model can be purchased from Tracks & Troops

Back to :

Academy Kit List

Kit Reviews

Back to Home Page

Article Last Updated: 06 May 2018