| Shadows
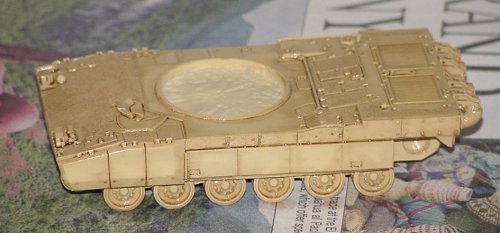
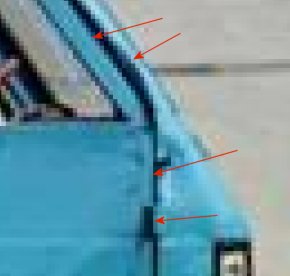
and Highlights As seen in the numerous Gallery contributions to this website, there is a very wide range of techniques used for adding dimension to models. Some modelers forego these techniques completely; others go very light on them; and yet others use them heavily. None are right, and none are wrong. Each person has their own interpretation on how best to depict a scale replica, and this page will describe my own thoughts on the subject. As is evident from my model reviews, I am a believer in heavy shadowing and highlighting. My reasoning is this: when you look at a scale model, you are not simply looking at a smaller version of the real item. The primary concern here is the effect that reduced scale has on the appearance of colors, highlights and shading (often called the "scale-effect"). Simply put, scale-effect refers to the fact that if you are looking at a 1/72nd scale model at a distance of one foot from your eyes, it should be the same as looking at a full-size vehicle (1/1 scale) at a disctance of 72 feet from your eyes. The effect that lighting has on an object further away is interpreted by your eyes differently than on an object close-up. For example, look at the following photograph:
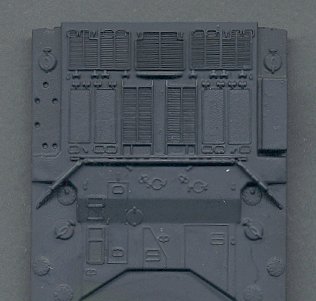
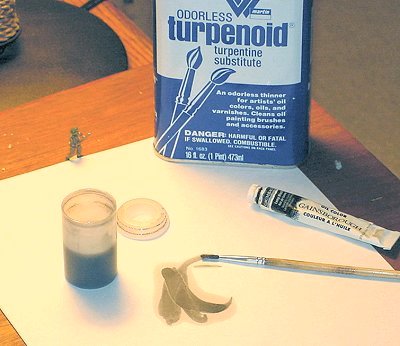
I consider painting scale models to be more than simply making a smaller version of the real item, because of the scale-effect. I approach modeling as a combination of painting a 3-dimensional object, and a 2-dimensional portrait of the same object. On 2-dimensional portraits, obviously the shadows and highlights need to be painted in, and the same holds true for scale models. Without the added dimension from highlights and shadows, the model looks too flat. Shadows Shadow is added to a model by means of a Wash. Washing a model in this context does not refer to soap and water, but rather the application of an extremely thin paint over the entire model. I am unsure of where the term "wash" originated for this technique, perhaps because the entire model is covered as though taking a bath? I don't know. The wash itself is so thin, that it is actually more of a darkened solvent, rather than a thinned paint. Its purpose is to recede into all of the hollows and recesses of a model, leaving the raised surface area relatively unchanged. As seen in the photo, it is so thin that when brushed onto a piece of white paper, is soaks in rapidly and very much appears as a water color.
I normally use two colors for washes: black and burnt umber. The black is used on vehicles that are painted panzer gray, brown, or green, like Russian green, olive drab, khaki drab, etc. The burnt umber is used on panzer yellow, and all the tan colors like middlestone, sand, etc. It's also good for rust on tracks, but sometimes I make a special wash of rust red for rusted tracks. To make the wash, simply fill an empty container (I use a camera film canister) with Terpenoid, add about a 2cm squirt of paint, and mix very well. Each time you use the wash, be sure to stir it thoroughly, since the paint will settle very rapidly. Apply the wash to the model by brushing it over the entire model's surface, letting it soak into all the recessed detail. It will likely leave some unsightly stains on the open portions of the plastic, but that's ok, we'll take care of those stains in the next step.
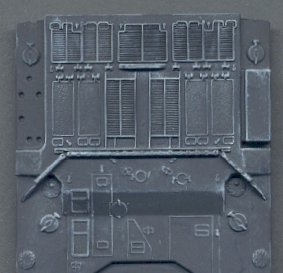
Highlights Highlighting a model involves two steps: the highlight coat of paint, and drybrushing. The highlight paint serves two purposes: it gets rid of unwanted wash stains, and it also weathers the vehicle. Use the same paint that you used for the base coat, but add some white to it. With the fine nozzle on the airbrush, carefully spray this lightened color onto all the open areas of the tank, like the glacis plate, turret roof, hatches, anywhere away from the nooks and crannies that have accumulated the wash. Pull the brush further away from the kit, and ever so lightly spray the lightened paint over the whole thing. This is difficult to explain, but it will make sense when you try it. The person who taught me this technique would buy two jars of the same color paint, and add a few drops of white to one of the jars, and use that jar for the highlights. I don't do this for two reasons. 1) I don't use enough paint to warrant two jars of each color. They'd go bad before I got around to using it all. 2) No matter how close the colors may look, it is possible to get colors that are ever so slightly different. Unless the jars came from the same batch of paint in the factory, this is always a risk. What I do is lighten the paint right in the airbrush cup. I add one or two drops of white and mix well. Don't add too much, or the colors won't match anymore, and don't add too little, or you won't be able to tell a difference from the base coat. Sometimes, you may want to repeat this process a couple of times, each time, lightening the paint a little more. The next step is the drybrush. The concept is to use some very light paint, either white, or a very lightened version of whatever the base color is on the tank. Get some on your brush, and then rub it off onto a rag or piece of paper, so that very little paint remains on the bristles of the brush and it is almost dry (hence the name "drybrushing"). Then lightly rub the brush bristles over all the bumps, edges, and high points on the kit, basically anything that would catch sunlight. The small amount of paint residue on the brush will highlight all the edges, making the model look more in scale. Again, I've been looking for the best method of doing this. Sometimes using acrylic paint works well, but other times, it seems that I get the best results by using an oil paint. Perhaps climate plays a part in this, and acrylics work best on very humid days. I'm not sure. Many armor builders I've met use pure white for drybrushing, but I think that tends to be too light. I instead use a very light gray. This is only for sharp edges, like along joints on the turret and hull edges, or any sharp, pointy protuberances. For rounded, softer, raised areas, like the mound-shape ventilator covers on Russian tanks, I use a very lightened shade of the camouflage color instead. You may want to repeat this step several times, using lighter shades each time.
|
 I have been on a quest for the
past several years to come up with the best wash, i.e.,
the best solvent and paint combination. I have tried just
about everything I can find in all the art stores, and
have settled on the same stuff that I was taught to use
by a member in my former model club. Perhaps this guy
went through the same trial and error as I did. For the
solvent I use an odorless turpentine called Terpenoid,
which you can get in any good art store like Michaels,
Pearl, Hobby Lobby, etc. For the paint, I use artist's
oil paints. They have a much finer pigment than do model
paints. I've tried several different brands to find the
one with the finest pigment, but they all seem to be the
same. The combination still isn't perfect. I still
occasionally get clumping of pigment, but these products
are the best that I've found. If anybody has a great
combination that they think works very well, I'd enjoy
hearing about it.
I have been on a quest for the
past several years to come up with the best wash, i.e.,
the best solvent and paint combination. I have tried just
about everything I can find in all the art stores, and
have settled on the same stuff that I was taught to use
by a member in my former model club. Perhaps this guy
went through the same trial and error as I did. For the
solvent I use an odorless turpentine called Terpenoid,
which you can get in any good art store like Michaels,
Pearl, Hobby Lobby, etc. For the paint, I use artist's
oil paints. They have a much finer pigment than do model
paints. I've tried several different brands to find the
one with the finest pigment, but they all seem to be the
same. The combination still isn't perfect. I still
occasionally get clumping of pigment, but these products
are the best that I've found. If anybody has a great
combination that they think works very well, I'd enjoy
hearing about it.