Italeri
(former ESCI) T-34/76 Model 1942 Kit (a.k.a. T-34 C)
ESCI Kit #8032; ESCI/Revell #H2332; ESCI/Ertl #8334; Italeri #7008
With my recent assembly of this kit
I thought I would offer my experience in what I found while building
these old (by modeling standards) but still respectable 1 72 scale
models. This review is intended to be complementary to Doug Chaltry’s
kit previews at:
http://www.onthewaymodels.com/reviews/ESCI/esciT3476mod42prev.htm
and at
http://www.onthewaymodels.com/reviews/ESCI/esciT3476mod43prev.htm.
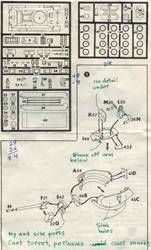
Please see Mr. Chaltry’s reviews for scans of the kit parts
and the water slide decal markings. My rational for writing this
article about 1970’s age model kits like these are: at this
time one of these two models has been rereleased by Italeri and
the other I expect to released in the next year or two, there are
still many of them in peoples collections and at vender’s
tables, and finally they are still good model kits comparable in
quality to recently released T-34 kits. My opinions and observations
below are based on my references, examining a hundreds wartime photos
and building both model kits; I do not claim to have noticed every
detail or that there may be exceptions to what I’ve observed
or read or stated below.
Briefly, the Model 1942 kit consists
of about 84 injection-molded styrene plastic parts on two sprues,
not including the link & length tracks or the two dreadful band
tracks. The large sprue has the hull parts, sprocket and idler wheels,
two figures, and fuel drums is exactly the same as that included
in the Model 1943 T-34 kit. The second, smaller, sprue has the turret
and roadwheel parts. Both this and the model 1943 are considered
to be reasonably accurate 1/72 scale.
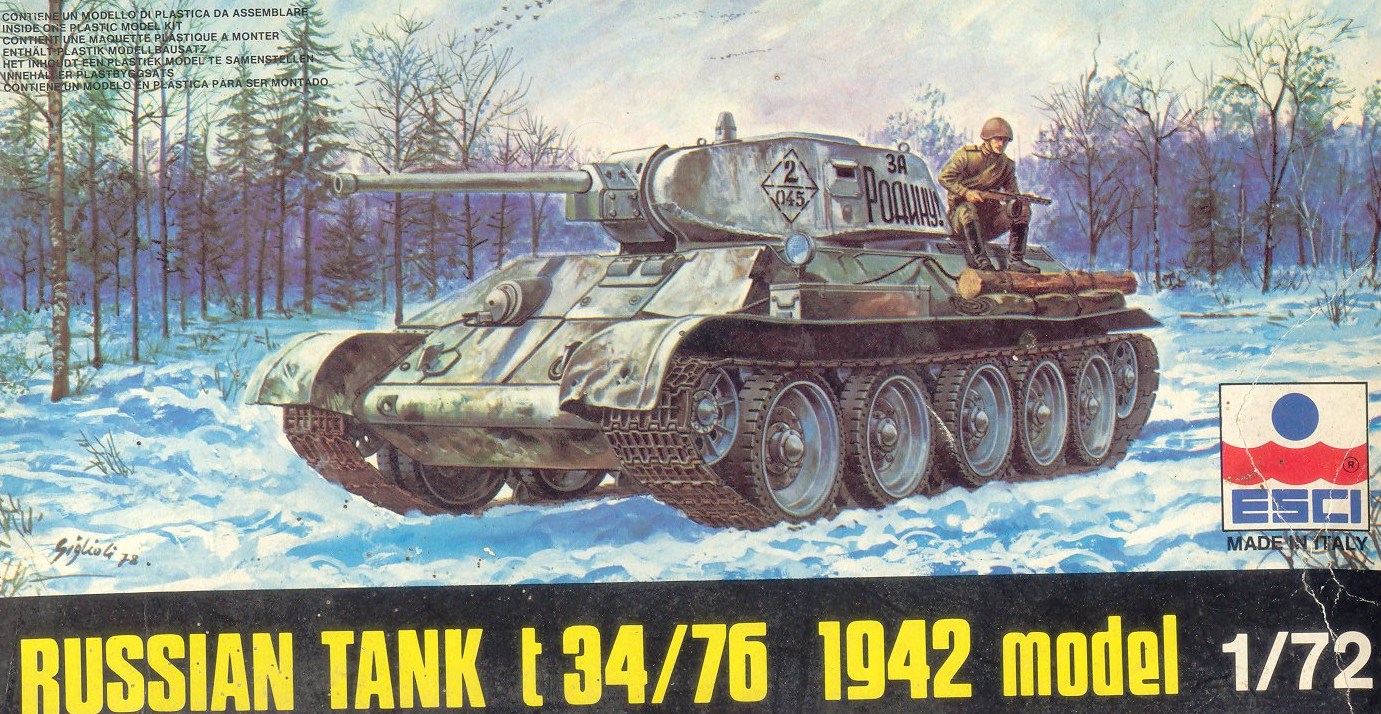
I like to look at the box art as it is the first thing we see when
we consider buying the model, it’s visual representation of
what is in the box so you should know what you are buying, it shows
us the paint scheme and markings, and it is often real good art.
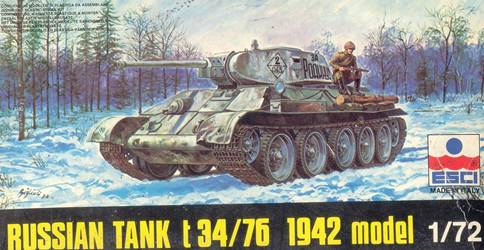
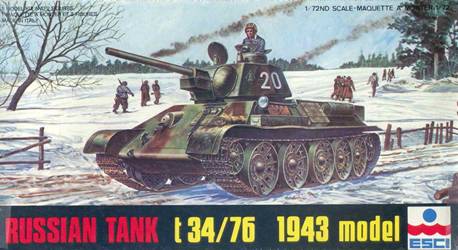
The great box art for ESCI’s T-34-76 Model 1942 shows a T-34
tank with a worn whitewash in a winter forest area. The turret is
a cast, rather than welded, turret sometimes called the “big
hatch” turret because of the single large turret hatch. On
the turret side is a viewport for a periscope; below this viewport
is a pistol port with a plug, both featured in the kit. The 76-mm
gun barrel seams unnaturally tapered with a large band at the muzzle.
The actual 76-mm F34 gun barrel appears actually much less tapered.
On the glacis plate of the box art are six or so “appliqué”
armor plates welded on to the front seen on 1941-1942 period T-34
tanks such as from Factory 112 in autumn of 1942. These appliqué
armor plates are not included in this model kit. The driver’s
hatch and the driver’s periscope hoods are both closed so
I hope the vehicle is stationary because the driver cannot see!
There are no fuel drums on the rear or side though they are offered
with the model kit.
There are handrails welded onto the hull side which is common for
this period of production but these handrails are not included in
this model kit. If you look at the edge where the glacis armor meets
the hull side you can make out a notched hull connection that was
seen on factory 112 and STZ (Stalingrad) factory hulls. This notched
hull edge is not actually featured on the model kit; the ESCI hull
has the straight seams at this edge. Sitting on the engine deck
is a lone tankisti (or Tank Desant (Russian:Танковый
десант, tankovyy desant)) in the same
pose as the figure included with kits. The roadwheels are the disc
type with perforated rubber tires; we can make out the two rings
of bolts around the wheels, bolts the model’s roadwheels
do not have.
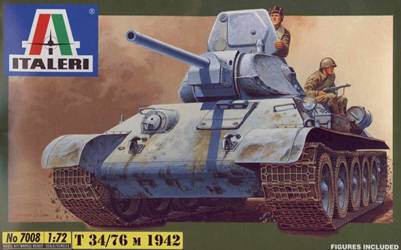
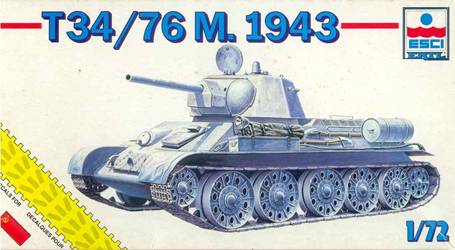
Italeri’s box art above shows a whitewashed T-34, similar
but a little different than ESCI’s T-34 portrayed in their
box art of the same model. The driver’s visor hoods are open,
yes, but the model’s visor hoods are molded shut (along with
just about on every other small scale model of the T-34). On the
glacis on either side of the driver’s hatch are two short
handrails common to many T-34’s of the 1942-1943 period. At
least the little tabs (tow points) on the bow are not displayed.
On the left (driver’s right) we see the stub of the antenna
mount peaking over the edge of the hull side.
Sitting on the engine deck is that lone tank desant figure; behind
the tank rider is a fuel drum, not the type of additional fuel tank
common to the 1942 T-34, but could have been added later. The tracks
are the 500-mm or 550-mm links with cast tread pattern similar to
the links provided in the model.
We again see a cast-steel turret with casting seams evident but
which are not featured on the kit turret. This is a good view of
the periscope viewport with the pistol port below it. This is also
a great view of the big hatch on the turret roof serving both the
commander and the loader. I have read that this hatch was unpopular,
and with a model if you portray the hatch open you better have some
kit interior because otherwise there will be a lot of empty space
to see! This ESCI / Italeri hatch also has no interior detail.

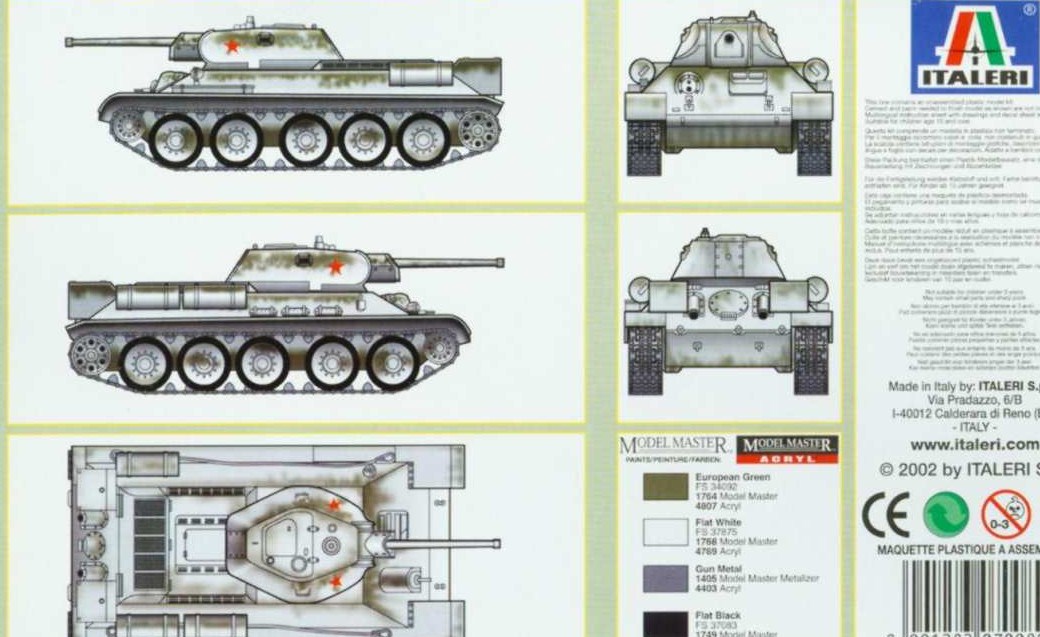
Italeri includes a five-view color painting of the vehicle’s
recommended paint scheme and simple markings of a red star. Personally,
I have never seen a T-34 with just a single red star on each side
of the turret.
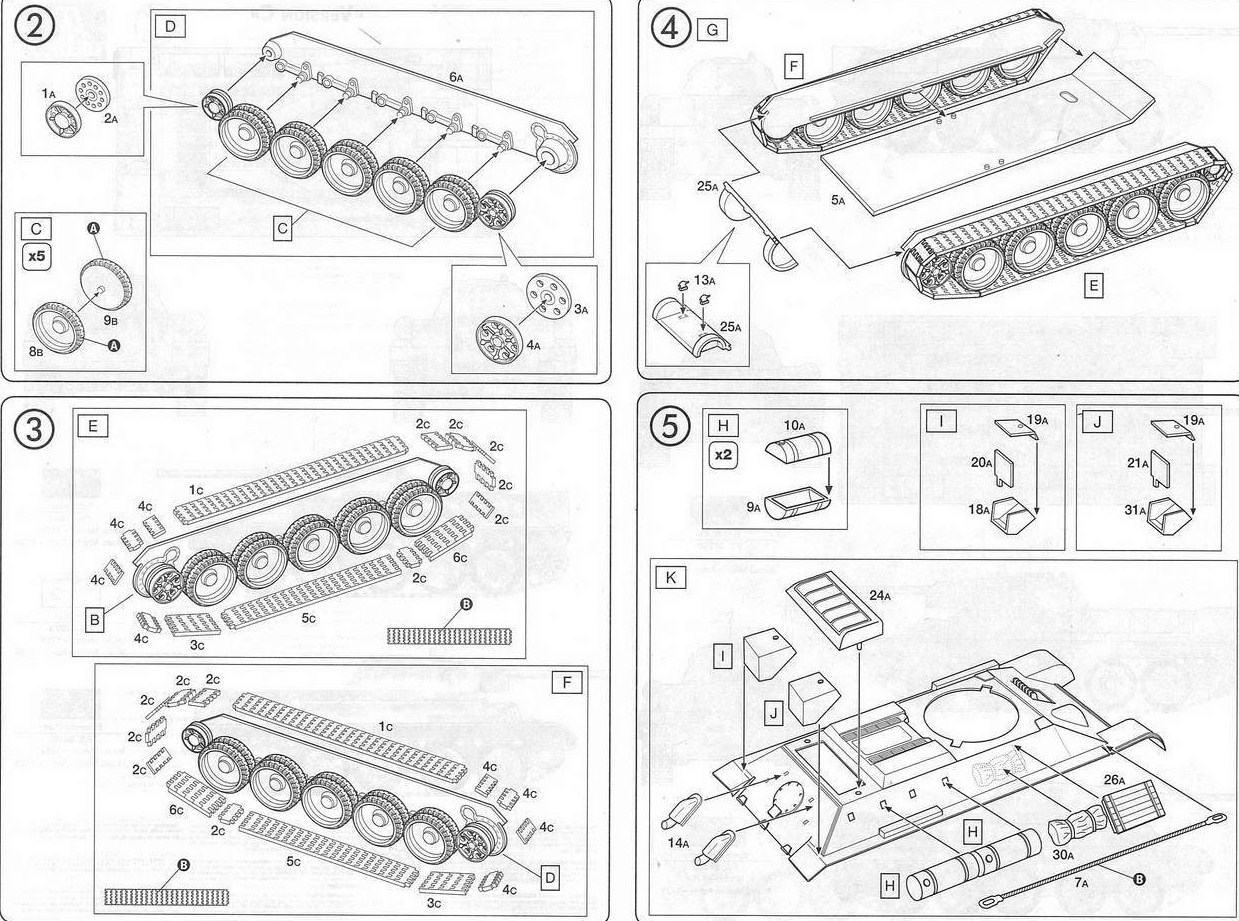
• Instructions for the suspension and lower hull are the same
for both the ESCI/Italeri model 1942 and model 1943 T-34 kits so
comments for the assembly of the T-34 model 1942 hull will also
apply to the model 1943 kit.
• The hull is well detailed and accurate.
• The axles for the roadwheels attach on the hull side are
a little too short so be careful to keep them straight and true
while the glue is drying.
• ESCI molded no bolts on the rubber-tired roadwheels of the
M1942 kit which may not be noticed to some but could cost you with
contest judges.
• The hub of the sprocket and idler wheels are flat but should
be round hubs. These rounded hubs can be fashioned perhaps from
sections of the sprue and glued onto the wheels.
• Attach the track links to the idler and sprockets and
then the track lengths before gluing the hull top down to the lower
hull as shown in the instructions to get the fit and alignment of
the tracks correct.
• Track guide teeth are too short on styrene link & length
tracks; something you can live with or get etched brass replacement
tracks?
• If you should have the stiff polyethylene band tracks you
will find that they are too stiff to wrap naturally around the idler
and sprocket. You may find conquer this problem by wrapping the
band track around a wood dowel where you want them to bend, and
hold them in hot (not boiling) water for a few seconds till the
curve holds. Or you can get aftermarket brass tracks.
• The spare tracks mounted on the glacis in ESCI’s instructions
were not typical of the m1942. The spare track links were usually
mounted on the rear of the fenders (track guard).
• Model 1941 and m1942 T-34s typically had track grousers
(cleats) strapped to the right track guard but these are not included
in the ESCI kit. (Trumpeter and DML do include these grousers.)
• The main gun looks too tapered and too short. I found that
replacing it with a longer piece of brass or aluminum tube improves
the look of the gun.
• It was rather unusual for the T-34 model 1942 to have the
cylindrical drum exterior fuel tanks which came later in 1943 &
1944, but I have seen some. I think they would be more likely to
have the fuel boxes on the rear plate, rarely if ever both fuel
containers as portrayed in ESCI’s and Italeri’s instructions.
• There are little circular marks on the hull sides which
are guides for handrail locations. Handrails are not included in
the model kit. If you are not adding handrails these marks should
be shaved and sanded smooth. Handrails can be nicely fashioned from
fine brass wire.
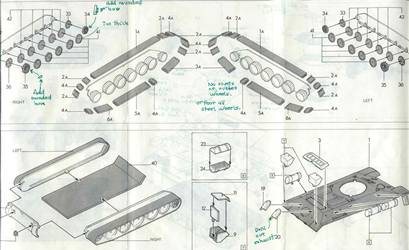
Above are ESCI’s old kit instructions while below are the
instructions from the Italeri re-release. We can see that both instructions
sheets are essentially the same except for the part numbers being
different. I wholly support the instructions to assemble the wheels
and tracks onto the hull sides before affixing the upper hull; this
goes for both the M1942 and the M1943 models.

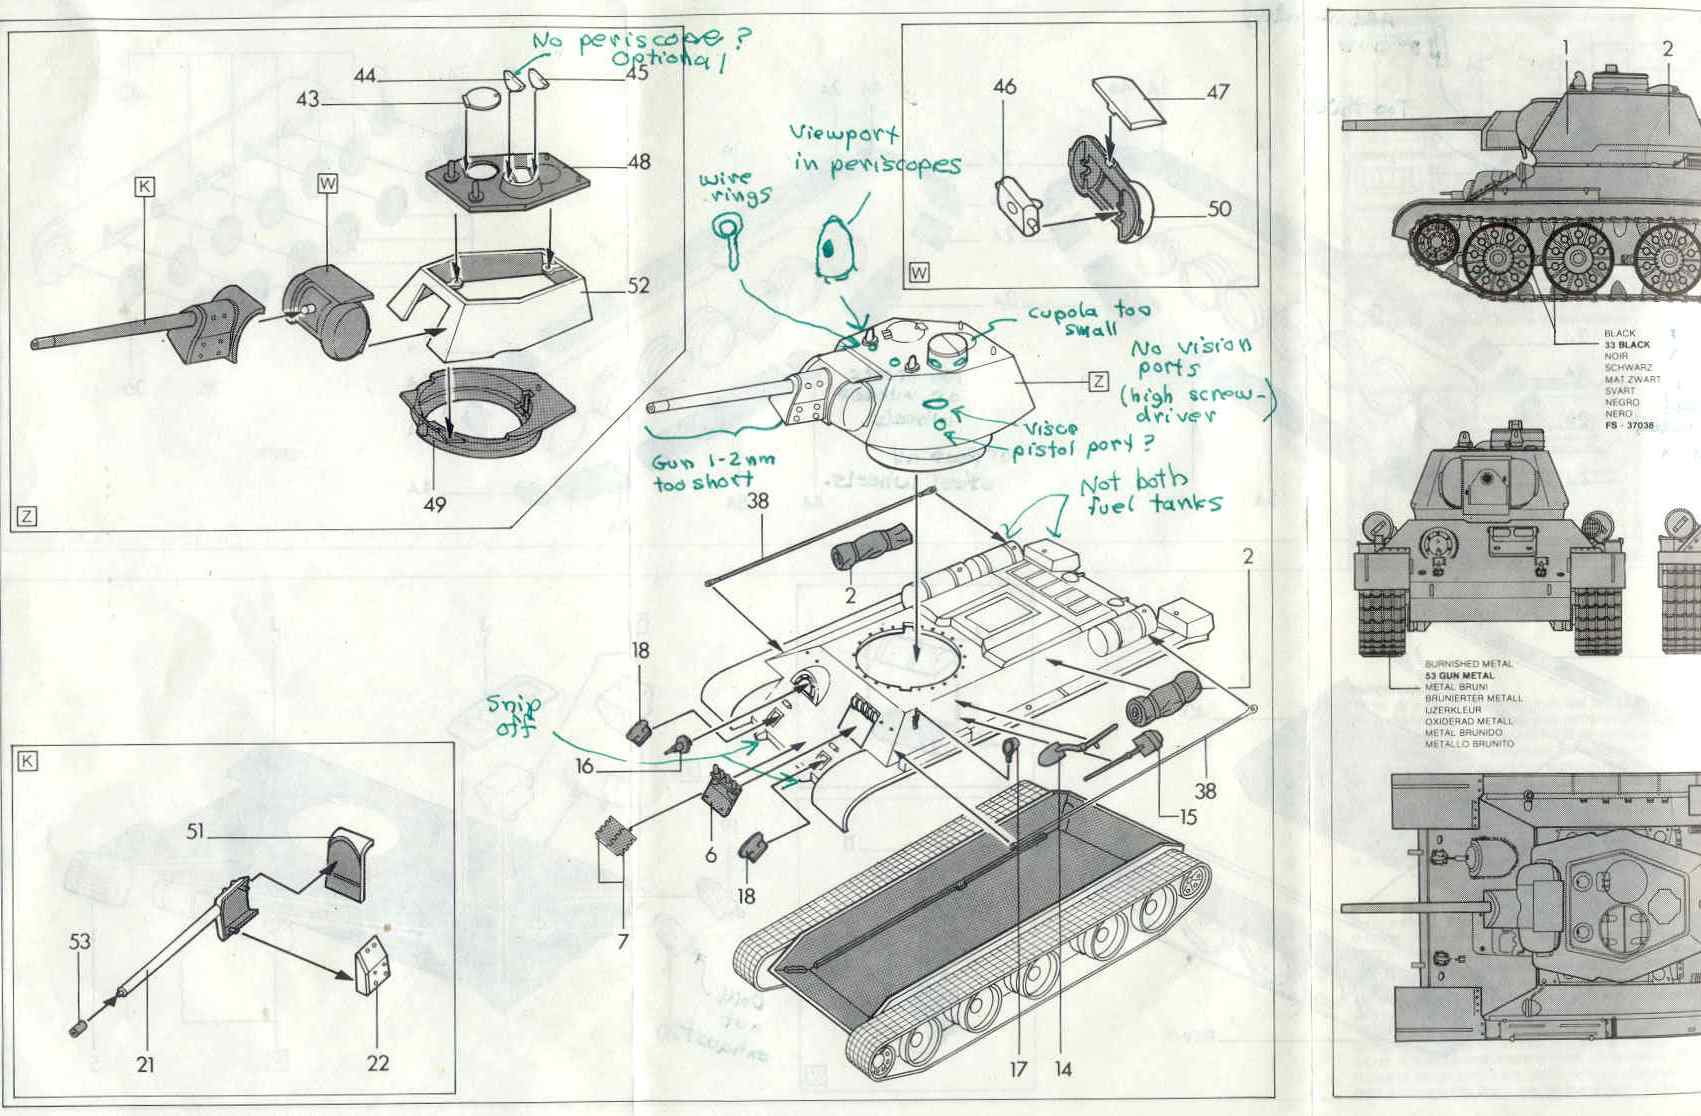
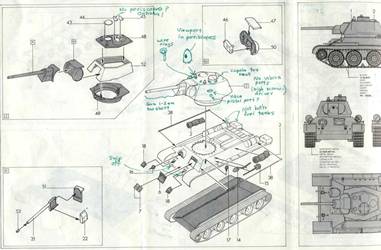
The turret instructions for the Model 1942 show the straightforward
assembly. We can see the half figure attached onto a shelf inside
the turret. For a contest model you would lose points for a half
figure with no interior detail. Part 41D is a rear bolted hatch
for removing and servicing the main gun; this feature is left off
in Trumpeter’s T-34 m1942.
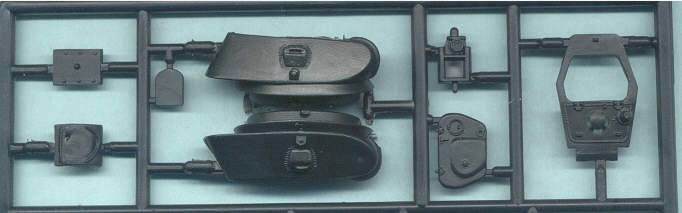
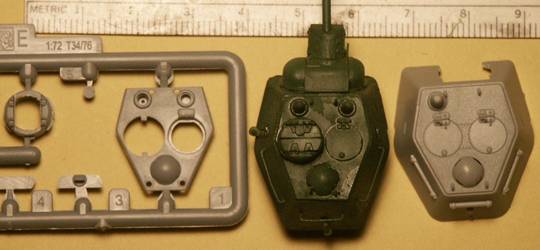
The Model 1942 turret from ESCI on the sprue. Due to the very dark
plastic the sink holes on the turret sides do not show up well,
but they are there. The lower turret half has the deepest sink hole;
I am not sure if Italeri’s release of this model includes
the sink holes.
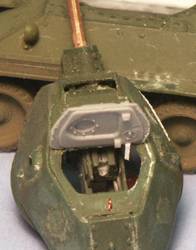 
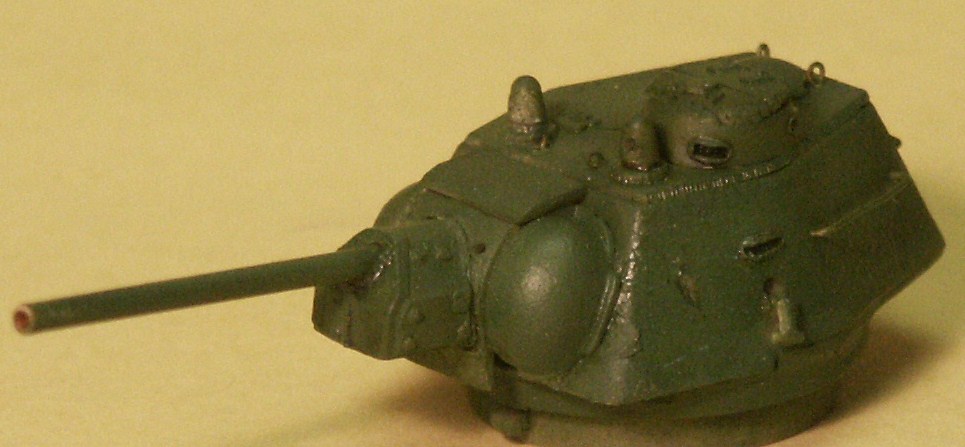
The photo above shows the dark green ESCI turret with a light gray
color large hatch taken from a Dragon model with good interior detail
on the underside. The gun breach is also from a Dragon model. The
light gray turret at right is from Trumpeter’s T-34 Model
1942 kit for comparison showing a more accurate turret mantlet without
such a large gap behind the mantlet.
• The ESCI gun barrel has been replaced by a copper tube.
• The turret lift rings have been fashioned with copper wire.
• Notice the large gap between the gun mantlet and the turret
roof; I have read that the T-34 leaked badly during rain but this
large a gap would cause unacceptable leaking! On the sides you can
see spots where sinkholes were filled in with modeling putty and
sanded smooth.
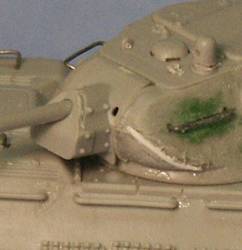
• Cast turrets of the Model 1942 T-34s could be very roughly
cast, this casting texture can be simulated on the ESCI (and Trumpeter,
UM and DML kits) in a number of ways. We can apply a coating of
liquid solvent glue and rough the surface up with a stiff toothbrush
while the glue is still wet. A second method is to coat the surface
in white glue (Elmers or School Glue) and sprinkle on a fine powder
such as backing soda or dolomite powder; this method may produce
an exaggerated rough texture. A third method is to use a commercial
product like Mr. Surfacer made for this purpose.

In order to give this ESCI
(Italeri) turret a rough cast texture it has been treated with a
coating of white glue and then a dusting of dolomite powder to give
it a rougher texture. I think this texture here is a little overdone
but is an improvement and adds more character to the model.
• A DT machinegun barrel made from a thin wire should be added
protruding from the right side of the mantlet.
• Add gunsight holes to the mantlet. As seen in the photos
above the top of the mantlet should be made taller so there is not
such a large gap behind the mantlet.

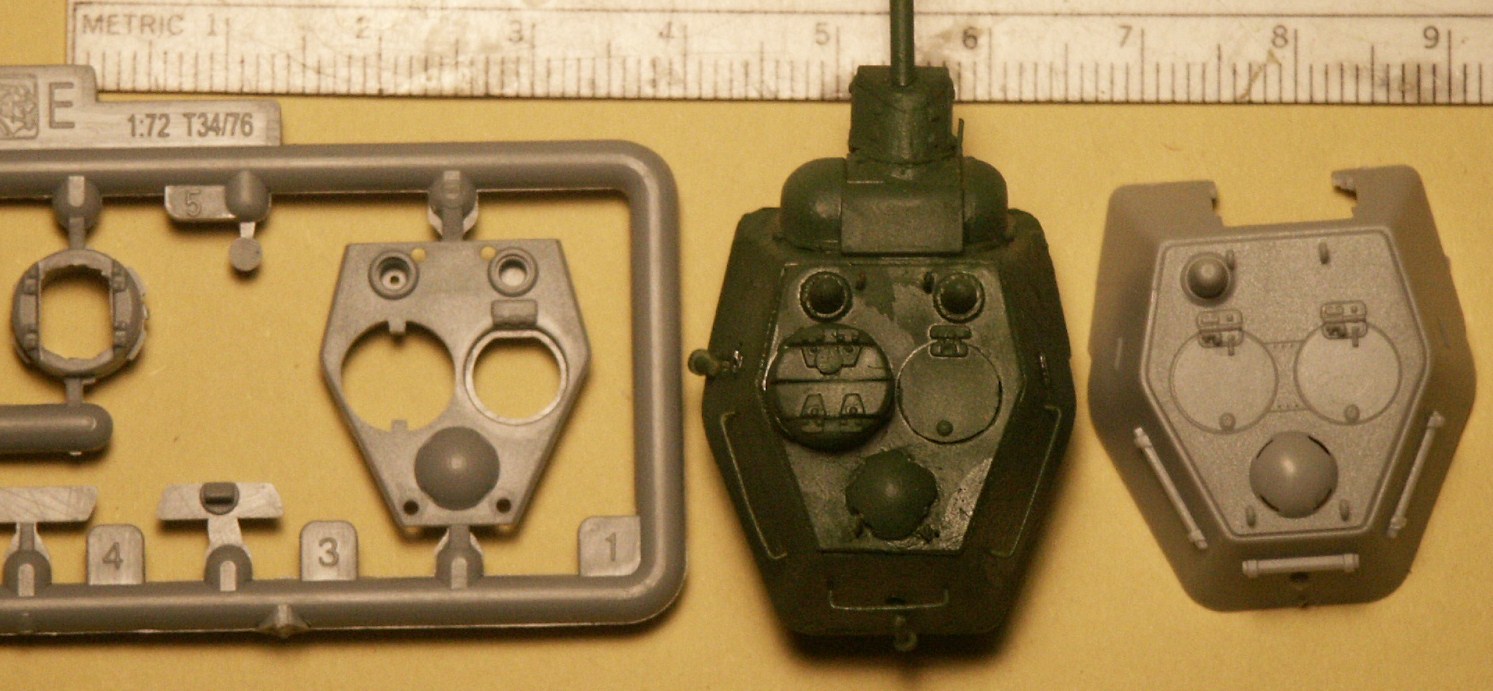
At far left are ESCI’s T-34 sprocket wheels. The two higher
wheels are the outer sprockets that should have a rounded hub in
the center. This is the same for the outer idler wheels which have
a nasty sink hole rather than the rounded hub.
• I recreated the four missing hubs by slicing off the ends
of the sprue attachment points, such as those at right, attaching
the roadwheels to the sprue, and rounding them off to the correct
shape.
• On the roadwheels at far right we can see the lack of two
rings of bolts around the hub. Otherwise the roadwheels look good,
particularly the rubber tires. These wheels are consistent in size
with UM, Trumpeter and Dragon wheels. For variety some all-steel
roadwheels can be substituted.
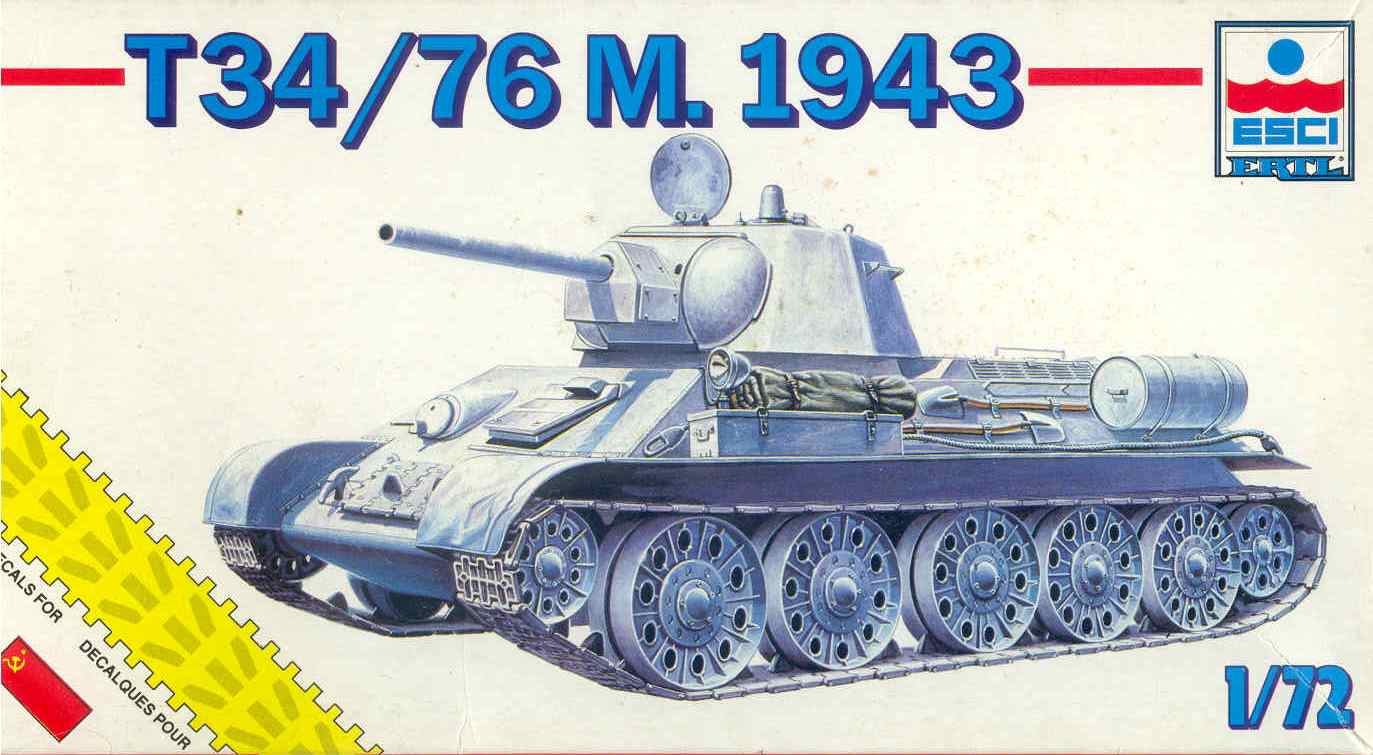
ESCI T-34/76 Model 1943 tank kit (Expected
to be released by Italeri)
Italeri Kit #7008; ESCI Kit #8047; Aurora/ESCI #6208; ESCI/Revell
#H2347; ESCI/Ertl #8335
The model 1943 kit consists of about
78 injection-molded styrene parts on two sprues, not including link
and length tracks, or the polyethylene plastic band tracks if you
are unlucky enough to get these. I have several boxes of the M1943
version and some portray the figures in the instructions and some
don’t; this is odd. The kit instructions below do not make
mention of the figures, a good crew member for the turret and a
sitting infantry ‘tank-rider’. The tank scale of 1/72
and as found by Doug Chaltry is understood to be pretty accurate.
Italeri has re-released the old ESCI T-34-76 Model 1942 kit as kit
#7008, but not the Model 1943 kit yet. When Italeri does re-release
it the model should have the hard link & length tracks based
on the ESCI kits they have re-released so far.
I like to look at the box art as it is the first thing we see when
we consider buying the model, it’s visual representation of
what is in the box, it shows us the paint scheme and markings, and
it is often real good art. Here we have the original ESCI box art
showing a T-34-76 with a two color camouflage scheme and a vehicle
number and unit marking on the turret. The driver’s hatch
and the driver’s periscope hoods are both closed so I hope
the vehicle is stationary because the driver cannot see! At the
point of the glacis we see one of two towing eyes that I do not
believe existed on a real wartime T-34. I believe that these towing
eyes are a post war modification, possibly at a museum.
A 76.2-mm ammunition box is on the side but does not appear tied
down (magnetic stowage?). On the side is a later war fuel drum and
on the rear a mid-war fuel box. We can have one of these or the
other but I have never seen both types of fuel containers used at
the same time. The turret is the hexagonal (hex-nut) type with a
commander’s cupola having split hatch characteristic of the
model 1943 T-34-76 (a.k.a. T-34 E). Around the cupola we can see
viewports. On the turret side, just in front of the number 20, is
a viewport. The pistol port on the left side below this viewport
is missing.
The roadwheels are the all-steel type common in 1942 and 1943. I
do not see any handrails on the turret or hull though they were
common on the T-34 from 1942 on. I see a tarp on the left front
fender but have never seen any attachment points in this location
on a T-34; often these whole front sections of the fenders are removed.
Next to the driver’s hatch on the left side is a single headlight.
Above we see the box art of the ESCI/ERTL release of the same kit
as above, finished in overall winter white. The driver’s hatch
is now portrayed slightly open (a driver’s memoir I read stated
this was common when the T-34 was traveling as the visor glass was
too poor in quality to see though well) and one of the two periscope
visors is now open. In the actual model kit the hatch can open but
the visors are molded closed. There is a length of track mounted
on the glacis which I do not think was particularly common till
1944 and the T-34-85; this track is included in the kit and is made
up of track pieces commonly mounted on the fenders. On the hull
side we see a pair of shovels which I have seen on modified “Beute”
T-34s captured by the Germans. Above the shovels and up on the engine
deck are handrails (which are not included in the kit).
The two towing eyes are missing from the bow in the painting but
are still present on the actual model kit. On the side is a fuel
drum but no fuel box on the rear. Tow cables are included in the
kit and are here laying down the length of the fender. The roadwheels
are the all-steel type.
The hexagonal turret is referred to as the hard-edge type based
on the lower edge. The turret now has handrails but the side vision
port and pistol port are is now missing as they are on the turret
in the kit. Another, very significant, thing missing in this box
art is the commander’s cupola! The lack of a commander’s
cupola would make this a model 1942-43 “Mickey Mouse”
version T-34-76 (a.k.a. T-34 D). But this kit does indeed come with
a cupola atop the turret (see photos below); I am pretty sure that
ESCI never released a T-34 with a hexagonal turret but no cupola.
.
The instructions for the model 1943’s lower hull and suspension
are the same as for the Model 1942 kit, so here are ESCI’s
instructions for the turret and connecting the two hull sections
together.
• The all-steel roadwheels in this kit I find poorly rendered.
You can try drilling the holes larger and sand the rim thinner which
will be a lot of work; you can live with them as is, steal
them from another kit, or you can buy some very nice aftermarket
resin wheels. Often the steel wheels were mixed with rubber-tired
wheels to improve the ride.
• Like the m1942 roadwheels, the m1943’s steel roadwheels
also lack the ring of bolts.
• The hub of the sprocket and idler wheels are flat but should
be round hubs. These rounded hubs can be fashioned perhaps from
sections of sprue and glued onto the wheels.
• Attach the track links to the idler and sprockets and
then the track lengths over the roadwheels on the lower hull sides
before gluing the hull top down to the lower hull, as shown in the
instructions, to get the fit and alignment of the tracks correct.
• There are little circular marks on the hull sides which
are guides for handrail locations. If you are not adding handrails
these marks should be shaved off and sanded smooth. Handrails can
be nicely fashioned from fine brass wire or thin steel guitar string.
• I have seen photos of Soviet T-34s with a shovel mounted
on the side but so far not two shovels. The placement of
the two shovels here resembles more the shovels I have seen on captured
and modified German Beute T-34s.
• It was common for the T-34 model 1943 to have the exterior
cylindrical fuel tanks on the sides, or the large fuel box on the
rear. Rarely if ever, would a T-34 have both types of fuel
containers at the same time as portrayed in ESCI’s instructions.
The fuel drums would be removed before the tank went into combat,
but not always.
• Snip off the funny tow point tabs on the peak of the bow
and sand smooth.
• With a sharp knife you can carefully cut under the two driver’s
visor hoods and bend them up to portray the visor hoods open. Strips
of dark, exposed camera film can simulate periscope lenses.
• Compared to the Trumpeter, UM and Dragon kits the ESCI main
gun barrel is too tapered and one to two milimeters too short. I
found that replacing it with a longer piece of brass or aluminum
tube improves the look of the gun.
• The cupola is a milimeter or more too narrow; it doesn’t
sound like much but is very noticeable to me. The cause of this
is that the turret appears too narrow, making the roof narrower,
therefore the cupola must be smaller to fit on the roof.
• The cupola needs five vision ports; these can be simulated
by carefully impressing a hot, small screwdriver tip into the plastic
leaving a slot with a raised ridge around it. The same approach
can be used to make the vision ports on the turret sides.
An ESCI / Italeri T-34 1943 turret (in center) compared with a Dragon
T-34 1943 turret roof at left, and a Trumpeter T-34 1943 turret
at far right. The ESCI / Italeri turret is a little over a milimeter
too narrow and therefore the cupola is also a milimeter too narrow.
The Dragon T-34 1943 cupola is at far left.
• The Turret hatches can be posed open but you will have to
add underside detail based on your references. The hatches are too
thick so sanding them down before posing them open would help.
• The turret lifting rings on the roof can be better portrayed
by snipping off the little nubs on the kit roof, drilling small
holes, and inserting rings made from fine copper wire wrapped around
a pin to make the ring.
• Add a pistol port plug to the left side under the view port
and another pistol port on the turret rear.
• Drill vision holes in the turret roof periscopes. It was
typical of Hex shaped T-34 turrets to have only one rotating periscope,
not two, typically one in front of the commander.
• Give the turret some cast texture, but be careful not to
overdue this.
• On the turret roof there are no vent holes in the roof ventilation-fan
dome. Carefully scribe four slots around the base of the dome based
on reference photos of the T-34.
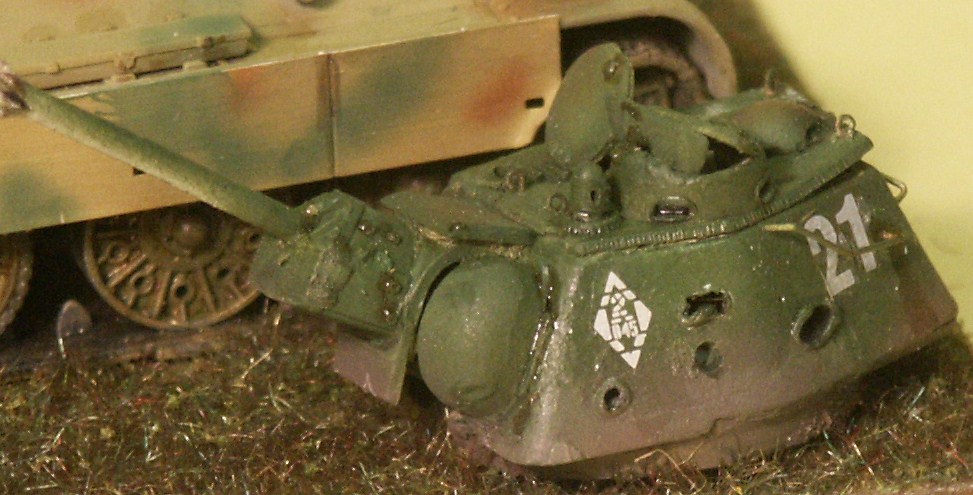
Right side of the ESCI Model 1943 turret left over after using an
aftermarket resin turret on the ESCI hull. Here is a good view of
the viewport on the hull side made with a hot jeweler’s screwdriver
tip. If you are not really careful it can come out a little crooked
like this one did. On the commander’s cupola the view ports
were made with a smaller screwdriver tip and came out much better.
A cast steel texture has been simulated by coating the surface with
Testers’ liquid cement and scrubbing it with a stiff toothbrush.

The left side of the turret shows the viewport and an open pistol
port with the plug hanging down on a chain. The viewport on the
cupola did not come out so well in this instance; there are five
viewports on the cupola and two on the turret side to do. In this
view we see the copper tube used to replace ESCI’s gun barrel.
Along the edge of the turret roof we see a nice welded seam. The
glossy surface is an acrylic gloss preparation for decals.

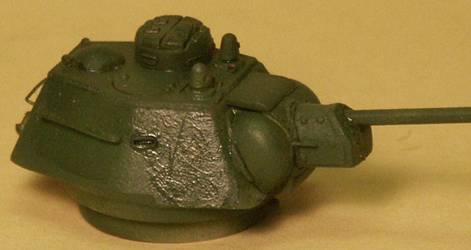
What to do with the leftover turret! This ESCI/Italeri hexagonal
T-34 turret is left over from a recent conversion of another ESCI
kit using a resin aftermarket turret; something like this is perfect
decoration or addition for a vignette or diorama. The antitank shell
perforations on the turret side were made with a hot graphite pencil
point. [This turret still needs more weathering and detailing so
is not officially ready for a contest.]
Conclusions
Despite their shortcomings both of these models are respectable
representatives of the T-34 and make a fine wargaming model or can
be detailed into a good display model. It definitely has certain
detail advantages over the UM and Trumpeter kits for example.
Resources & References
T-34 IN COMBAT, Model Fan Encyclopedia No 6, vol. II; Ajaks –
Military Books
T-34/76 MEDIUM TANK 1941-1945, Osprey Military New Vanguard 9, by
Zaloga and Sarson (1994).
T-34 MEDIUM TANK (1939-1943), Russian Armour Vol. 4, By Mikhail
Baryatinskiy, Ian Allen Publishing, (2007)
http://www.onthewaymodels.com/reviews/ESCI/esciT3476mod42prev.htm
http://www.onthewaymodels.com/reviews/ESCI/esciT3476mod43prev.htm
http://www.onthewaymodels.com/gallery4/SBrezinski_T-34_M1942.htm
http://www.onthewaymodels.com/articles/t34tables.htm
|