Tools required:
- Hand drill; the
Tamiya one is quite good, about 10USD.
- Drill bits with
various diameters, 0.4, 0.5, 0.6, 0.8 and 1.0mm.
These four kinds of drill bits are always used in
my workshop (about 0.7~1USD per each).
- Copper wires -
diameter around 0.3 ~0.4mm. These can be had from
the motors of some small household appliances
such as juicer. Or from the power cord. Please
note that it should be copper but not the brass,
which is too stiff.
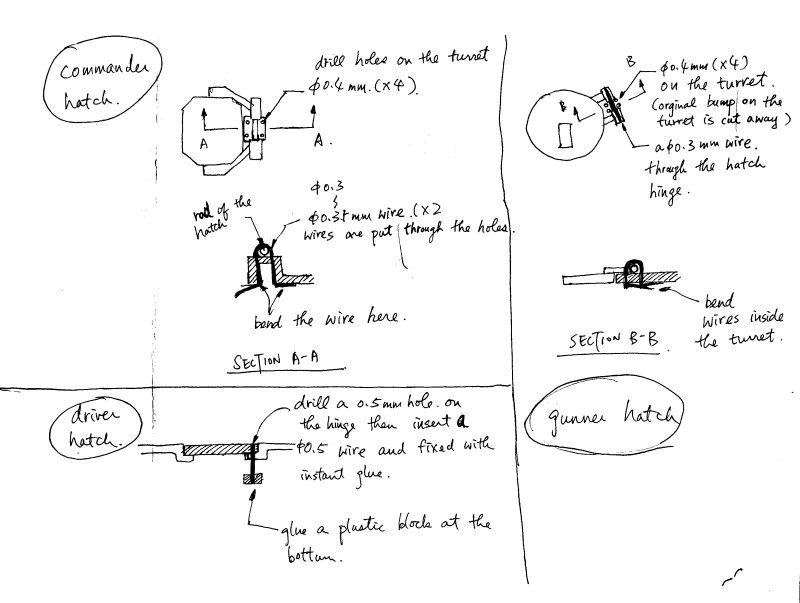
Commander hatch
hinge-make Procedures (see attached picture):
- Close the Hatch in
position.
- Drill four 0.4mm
holes adjacent to the hinge rod. You can use the
magnifier help. You can also use an engraving
blade to make dots for drill locating.
- Insert two
0.3~0.4mm wires to the holes.
- Bend the wires at
the bottom side of the cover. Don't use instant
glue to stick the wire to the bottom surface as
the glue would go through the holes into the
hinge. The wire should not be too thin, less than
0.3mm, as the wire would easy spring back.
Remarks:
- The gunner hatch is
similar, but you have to insert a shaft between
the two hinges on the hatch. A little bit
difficult.
- Such hinge making
would affect the outlook of the model. But since
the wires are so small, it is acceptable to me.
- It seems difficult
but once you try, you will find it is quite fast
and easy to do that.

|